
Introduction
Oh my goodness, friend. Get ready. If you’re anything like me, you have a deep, abiding love for two classic desserts: warm, comforting apple pie and rich, creamy cheesecake. Trying to choose between them can feel like a real dilemma, right? Well, what if I told you that you don’t have to choose? That you can have the best of both worlds in one spectacular dessert? Prepare yourself for the Apple Pie Stuffed Cheesecake!
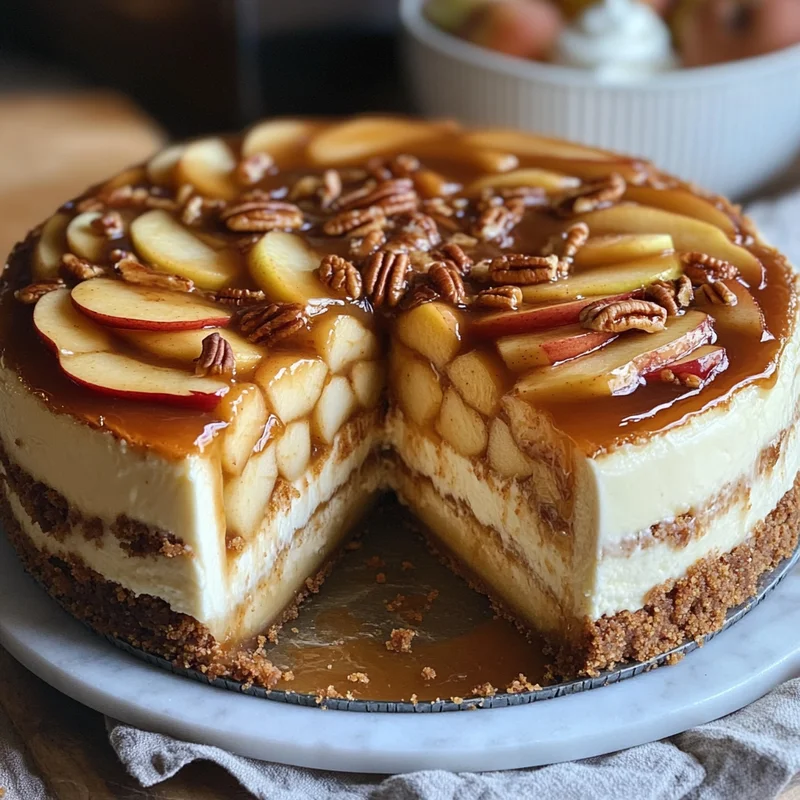
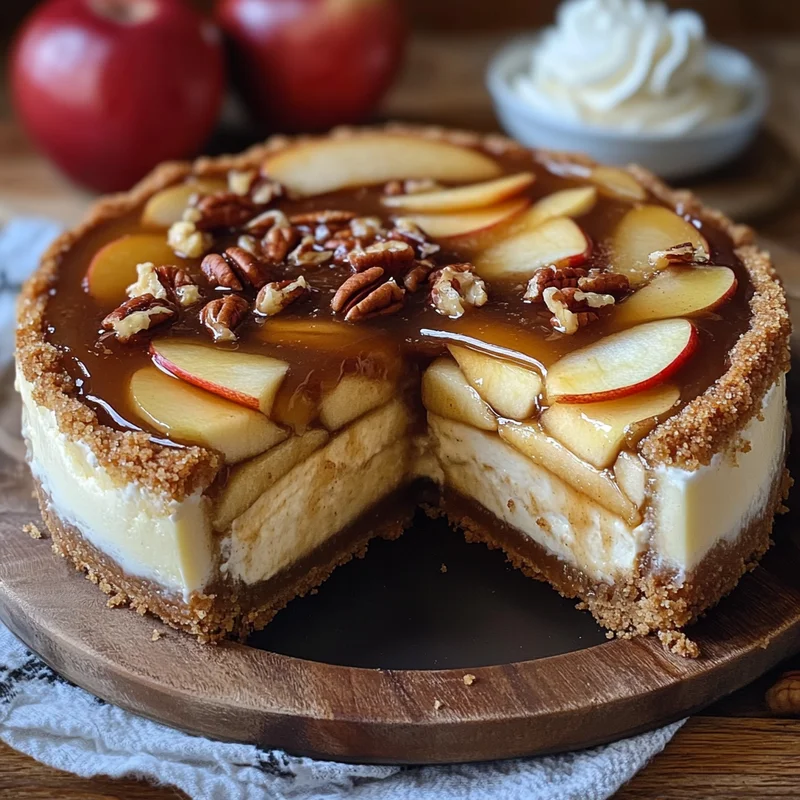
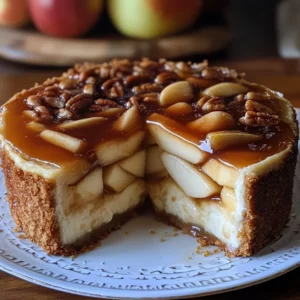
This isn’t just a cheesecake with apple pie on it; it has a luscious layer of spiced apple pie filling tucked inside the creamy cheesecake. It’s a showstopper, pure and simple. It might sound fancy, but honestly, with a little planning and these step-by-step instructions, you absolutely can make this. The result is a dessert that tastes like a cozy autumn hug and is guaranteed to impress everyone lucky enough to get a slice.
Why You’ll Love This Recipe
- Fast-ish (Okay, it’s cheesecake, it takes time, but the active prep isn’t crazy!)
- Easy (Totally manageable steps!)
- Giftable (Imagine bringing this to a holiday party!)
- Crowd-pleasing (Literally who doesn’t love apple pie OR cheesecake?)
Ingredients
Let’s gather our goodies! Using room temperature ingredients, especially the cream cheese, is KEY for that smooth, lump-free cheesecake filling, so plan ahead!
- Crust:
- 1 1/2 cups graham cracker crumbs (About 10-12 full graham crackers, finely crushed. You can use a food processor or a bag and a rolling pin!)
- 1/4 cup granulated sugar (Adds a touch of sweetness to the buttery crust)
- 1/3 cup unsalted butter, melted (The glue that holds it all together!)
- Apple Pie Filling:
- 4 cups apples, peeled and diced (I love a mix! Granny Smith gives tartness, Honeycrisp is sweet and crisp. Whatever you like to bake with works!)
- 1/3 cup granulated sugar (Sweetness for the apples)
- 1/3 cup brown sugar (Adds moisture and that lovely caramel note)
- 1 tsp cinnamon (Classic apple spice!)
- 1/4 tsp nutmeg (Just a pinch for extra warmth)
- 1 tbsp lemon juice (Brightens the flavor and helps keep apples from browning)
- 2 tbsp cornstarch (This is our thickening agent!)
- 1/4 cup water (To dissolve the cornstarch and help it thicken evenly)
- Cheesecake Filling:
- 4 (8 oz) packages cream cheese, softened (Seriously, let it sit out! Room temp is crucial for a smooth batter)
- 1 cup granulated sugar (Sweetens that rich cream cheese)
- 1/2 cup sour cream (Adds tang and makes the cheesecake extra creamy)
- 1 tsp vanilla extract (Pure vanilla is always best!)
- 4 large eggs (Make sure these are room temperature too!)
- Topping:
- 1/2 cup caramel sauce (Store-bought is totally fine, or make your own!)
- 1/4 cup chopped pecans (optional – adds a nice crunch!)
- Whipped cream (optional – because why not add more deliciousness?!)
How to Make It
Okay, deep breaths! We’re going to tackle this in stages. It’s mostly mixing and waiting, I promise!
- Get Ready: Preheat your oven to 350°F (175°C). Lightly grease a 9-inch springform pan. For cheesecake success, wrap the outside of the springform pan tightly with heavy-duty aluminum foil. You’ll thank me later – this helps prevent water leaks if you use a water bath (which you totally should!).
- Make the Crust: In a medium bowl, stir together the graham cracker crumbs and 1/4 cup sugar. Pour in the melted butter and stir until the crumbs are evenly moistened and look like wet sand. Press this mixture firmly into the bottom of the prepared springform pan. You can use the bottom of a glass or a measuring cup to get it nice and compact. Bake the crust for 8-10 minutes, then set it aside to cool slightly while you make the fillings.
- Make the Apple Filling: While the crust bakes or cools, combine the diced apples, 1/3 cup granulated sugar, brown sugar, cinnamon, nutmeg, and lemon juice in a medium saucepan. Stir to coat the apples. In a small bowl, whisk together the cornstarch and water until smooth. Pour this mixture into the saucepan with the apples. Cook over medium heat, stirring constantly, until the mixture thickens and the apples are slightly softened, about 5-7 minutes. Remove from heat and let cool completely.
- Make the Cheesecake Filling: In a large bowl using an electric mixer (stand or hand mixer), beat the softened cream cheese on medium speed until it is completely smooth and creamy. Make sure there are no lumps! Gradually add the 1 cup granulated sugar and continue beating until well combined, scraping down the sides of the bowl as needed. Beat in the sour cream and vanilla extract until just combined.
- Add the Eggs: Add the eggs one at a time, beating on low speed just until each egg is incorporated. Stop mixing as soon as the last egg is mixed in. Overmixing after adding the eggs can add too much air, which can cause cracks. Gently scrape down the sides one last time.
- Assemble the Cheesecake: Pour about half of the cheesecake filling (roughly 3 cups) over the cooled graham cracker crust in the springform pan. Spoon the cooled apple pie filling evenly over this layer of cheesecake filling. Gently pour the remaining cheesecake filling over the apple layer, spreading it carefully to cover the apples completely.
- Prepare the Water Bath: Place the foil-wrapped springform pan inside a larger baking pan (like a roasting pan). Carefully pour hot water into the larger pan until it comes about halfway up the sides of the springform pan. This water bath creates a humid environment in the oven and helps the cheesecake bake evenly and prevents cracking.
- Bake: Carefully transfer the pans to the preheated oven. Bake for 60-75 minutes, or until the edges are set and appear slightly puffed, but the center still looks a little jiggly (it will set as it cools). Don’t worry if it’s not completely firm in the center.
- Cool Gradually: Turn off the oven, but leave the cheesecake inside with the oven door propped open slightly (you can use a wooden spoon handle). Let it sit in the cooling oven for about an hour. This gradual cooling helps prevent cracking.
- Chill: Remove the cheesecake from the water bath and the outer pan. Remove the foil. Let it cool completely on a wire rack. Once cool, cover the cheesecake loosely with plastic wrap and refrigerate for at least 6-8 hours, but preferably overnight. Chilling is absolutely essential for cheesecake texture!
- Add Toppings: Just before serving, drizzle the top of the cheesecake with caramel sauce. If using, sprinkle with chopped pecans and serve with dollops of whipped cream!
Substitutions & Additions
Recipes are just starting points, right? Feel free to play around and make this your own!
- Crust: Not a graham cracker fan? Try crushed gingersnap cookies, shortbread, or even Biscoff cookies for a different flavor twist.
- Apples: While baking apples are recommended, you could try other fruits! How about a cherry or berry “pie” layer instead?
- Spices: Amp up the apple filling with a pinch of ground ginger or allspice.
- Cheesecake Add-ins: A splash of bourbon or rum in the cheesecake filling could add a lovely depth, especially with the apple.
- Toppings: Instead of or in addition to caramel and pecans, consider a streusel topping baked separately and sprinkled on top, a dusting of powdered sugar, or even a white chocolate drizzle.
Tips for Success
Cheesecake can feel intimidating, but these simple tips will help you nail it!
- Room Temperature Ingredients: I know I mentioned it, but it’s that important, especially for the cream cheese and eggs. Cold ingredients create lumps.
- Don’t Overmix the Cheesecake: Beat the cream cheese and sugar well before adding the eggs. Once the eggs go in, mix on low speed just until combined. Excess air causes cracks.
- The Water Bath is Your Friend: It helps regulate the temperature, ensures even baking, and adds moisture to the oven, which drastically reduces the chances of cracking. It’s worth the extra step!
- Don’t Overbake: A slightly jiggly center is okay! The residual heat will finish cooking it, and it will firm up completely as it chills. Overbaked cheesecake can be dry and crack.
- Cool Gradually: Leaving it in the cooling oven after baking is another key step to prevent those dreaded cracks.
- Chill, Chill, Chill: This isn’t a quick dessert. Allow plenty of time for it to chill completely. This is when the texture develops and flavors meld.
- Prep Ahead: You can make the apple filling a day or two in advance and store it in the fridge. You can also bake the crust ahead of time.
How to Store It
This glorious creation needs to be stored properly to keep it delicious! Keep the Apple Pie Stuffed Cheesecake covered tightly with plastic wrap or in an airtight container in the refrigerator. It will stay fresh and absolutely wonderful for 3-4 days. I mean, if it even lasts that long!
FAQs
- Can I use canned apple pie filling? While homemade is definitely better for flavor and texture, you could use canned in a pinch. Just make sure it’s drained well so it doesn’t add too much liquid.
- Why did my cheesecake crack? Common culprits are overmixing the batter after adding eggs, overbaking, or cooling too quickly. Follow the tips above, especially the water bath and gradual cooling!
- How long does the cheesecake really need to chill? Honestly, a full overnight chill (8+ hours) is best for the perfect firm, creamy texture. 6 hours is the minimum if you’re really pressed for time.
- Can I freeze this cheesecake? Yes, you can! Wrap the cooled and chilled cheesecake (without the caramel/pecan topping) tightly in plastic wrap, then in foil. Freeze for up to 1-2 months. Thaw slowly in the refrigerator overnight before adding toppings. The texture might change slightly, but it’s still quite good!
Decadent Apple Pie Stuffed Cheesecake Recipe
Equipment
- 9-inch springform pan Lightly greased, wrap outside tightly with heavy-duty aluminum foil for water bath
- Food processor or bag and rolling pin For crushing graham crackers
- Medium bowl For crust
- Medium saucepan For apple filling
- Small bowl For cornstarch mixture
- Large bowl For cheesecake filling
- Electric mixer Stand or hand mixer, for cheesecake filling
- Larger baking pan Like a roasting pan, for water bath
- Wire rack For cooling
- Wooden spoon handle Optional, for propping oven door open
Ingredients
Crust
- 1.5 cups graham cracker crumbs About 10-12 full graham crackers, finely crushed
- 0.25 cup granulated sugar Adds a touch of sweetness to the buttery crust
- 0.333 cup unsalted butter Melted
Apple Pie Filling
- 4 cups apples Peeled and diced (Granny Smith, Honeycrisp, or your preference)
- 0.333 cup granulated sugar Sweetness for the apples
- 0.333 cup brown sugar Adds moisture and that lovely caramel note
- 1 tsp cinnamon Classic apple spice!
- 0.25 tsp nutmeg Just a pinch for extra warmth
- 1 tbsp lemon juice Brightens the flavor and helps keep apples from browning
- 2 tbsp cornstarch Thickening agent
- 0.25 cup water To dissolve the cornstarch
Cheesecake Filling
- 4 packages cream cheese 8 oz each, softened
- 1 cup granulated sugar Sweetens that rich cream cheese
- 0.5 cup sour cream Adds tang and makes the cheesecake extra creamy
- 1 tsp vanilla extract Pure vanilla is always best!
- 4 large eggs Room temperature
Topping
- 0.5 cup caramel sauce Store-bought or homemade
- 0.25 cup chopped pecans Optional - adds a nice crunch!
- Whipped cream Optional - because why not add more deliciousness?!
Instructions
- Get Ready: Preheat your oven to 350°F (175°C). Lightly grease a 9-inch springform pan. For cheesecake success, wrap the outside of the springform pan tightly with heavy-duty aluminum foil. You'll thank me later – this helps prevent water leaks if you use a water bath (which you totally should!).
- Make the Crust: In a medium bowl, stir together the graham cracker crumbs and 1/4 cup sugar. Pour in the melted butter and stir until the crumbs are evenly moistened and look like wet sand. Press this mixture firmly into the bottom of the prepared springform pan. You can use the bottom of a glass or a measuring cup to get it nice and compact. Bake the crust for 8-10 minutes, then set it aside to cool slightly while you make the fillings.
- Make the Apple Filling: While the crust bakes or cools, combine the diced apples, 1/3 cup granulated sugar, brown sugar, cinnamon, nutmeg, and lemon juice in a medium saucepan. Stir to coat the apples. In a small bowl, whisk together the cornstarch and water until smooth. Pour this mixture into the saucepan with the apples. Cook over medium heat, stirring constantly, until the mixture thickens and the apples are slightly softened, about 5-7 minutes. Remove from heat and let cool completely.
- Make the Cheesecake Filling: In a large bowl using an electric mixer (stand or hand mixer), beat the softened cream cheese on medium speed until it is completely smooth and creamy. Make sure there are no lumps! Gradually add the 1 cup granulated sugar and continue beating until well combined, scraping down the sides of the bowl as needed. Beat in the sour cream and vanilla extract until just combined.
- Add the Eggs: Add the eggs one at a time, beating on low speed just until each egg is incorporated. Stop mixing as soon as the last egg is mixed in. Overmixing after adding the eggs can add too much air, which can cause cracks. Gently scrape down the sides one last time.
- Assemble the Cheesecake: Pour about half of the cheesecake filling (roughly 3 cups) over the cooled graham cracker crust in the springform pan. Spoon the cooled apple pie filling evenly over this layer of cheesecake filling. Gently pour the remaining cheesecake filling over the apple layer, spreading it carefully to cover the apples completely.
- Prepare the Water Bath: Place the foil-wrapped springform pan inside a larger baking pan (like a roasting pan). Carefully pour hot water into the larger pan until it comes about halfway up the sides of the springform pan. This water bath creates a humid environment in the oven and helps the cheesecake bake evenly and prevents cracking.
- Bake: Carefully transfer the pans to the preheated oven. Bake for 60-75 minutes, or until the edges are set and appear slightly puffed, but the center still looks a little jiggly (it will set as it cools). Don't worry if it's not completely firm in the center.
- Cool Gradually: Turn off the oven, but leave the cheesecake inside with the oven door propped open slightly (you can use a wooden spoon handle). Let it sit in the cooling oven for about an hour. This gradual cooling helps prevent cracking.
- Chill: Remove the cheesecake from the water bath and the outer pan. Remove the foil. Let it cool completely on a wire rack. Once cool, cover the cheesecake loosely with plastic wrap and refrigerate for at least 6-8 hours, but preferably overnight. Chilling is absolutely essential for cheesecake texture!
- Add Toppings: Just before serving, drizzle the top of the cheesecake with caramel sauce. If using, sprinkle with chopped pecans and serve with dollops of whipped cream!
Notes
- Use room temperature ingredients, especially cream cheese and eggs, to avoid lumps.
- Don't overmix the cheesecake batter after adding the eggs; excess air causes cracks.
- A water bath helps regulate temperature, ensures even baking, adds moisture, and reduces cracking.
- Don't overbake; a slightly jiggly center is okay as it will set while chilling.
- Cool gradually in the turned-off oven to prevent cracks.
- Chill thoroughly (preferably overnight) for proper texture development.
- Apple filling and crust can be prepped ahead of time. How to Store It:
- Store the cheesecake covered tightly with plastic wrap or in an airtight container in the refrigerator for 3-4 days.
- You can freeze cooled and chilled cheesecake (without caramel/pecan topping) tightly wrapped in plastic wrap then foil for 1-2 months. Thaw slowly in the refrigerator overnight.