
Introduction
Oh, Cincinnati chili! Just saying the name brings back so many wonderful memories of cozy nights, gathering with friends, and that unmistakable, comforting aroma filling the house. If you’ve never tried authentic Cincinnati chili, get ready for a treat! It’s not your typical Texas-style chili; this one is unique with its deep, complex flavor profile, often served over spaghetti. And the best part? You can absolutely make this incredibly delicious chili right in your own kitchen, and it’s much easier than you might think!
Why You’ll Love This Recipe
- Fast to Prep: While it simmers for a good while, the actual hands-on time is super quick!
- Easy to Make: Seriously, dump, stir, and simmer. That’s pretty much it!
- Giftable Goodness: This chili freezes beautifully, making it perfect to share with neighbors or friends who need a little comfort food.
- Crowd-Pleasing: Whether you’re serving it for game day, a family dinner, or just a weeknight meal, everyone will be asking for seconds!

Ingredients
Gather ’round, cooks! Here’s what you’ll need to create this Cincinnati chili magic:
- 2 pounds lean ground beef: The star of our show!
- 4 cups beef broth: Provides the savory liquid base.
- 1 (12 oz) can tomato paste: For that rich, concentrated tomato flavor.
- 2 cups diced white onion: Adds a sweet and aromatic foundation.
- 2 tablespoons cocoa powder, optional: This is a secret weapon for depth and a hint of richness! Trust me on this one.
- 2 tablespoons minced garlic: Because garlic makes everything better!
- 2 tablespoons apple cider vinegar: A touch of tang to balance out the richness.
- 2 tablespoons chili powder: The classic chili spice.
- 1 tablespoon Worcestershire sauce: Adds a savory, umami punch.
- 2 teaspoons cumin: Earthy and warm, a chili essential.
- 2 teaspoons dried oregano: Adds a lovely herbaceous note.
- 2 teaspoons beef bouillon: Boosts that beefy flavor even more!
- 2 teaspoons granulated sugar: Just a pinch to round out the flavors.
- 2 bay leaves: For that subtle aromatic magic during simmering.
- 1 teaspoon ground cinnamon: Yes, cinnamon! It’s a classic Cincinnati chili ingredient that adds warmth and complexity.
- 1 teaspoon allspice: Another warm spice that contributes to that signature flavor.
- ½ teaspoon black pepper: For a little bite.
- ½ teaspoon cayenne pepper: Adjust this based on how much heat you like!
- ¼ teaspoon ground cloves: A tiny pinch for a fragrant, cozy note.
- Salt, to taste: Always taste and adjust at the end!
How to Make It
Alright, let’s get cooking! It’s time to bring this delicious Cincinnati chili to life.
- Brown the Beef: Grab a big pot or a Dutch oven. Toss in your ground beef and cook it over medium-high heat. Use a spoon to break it all up as it browns. Once it’s all nicely browned, carefully drain off any excess fat. We want flavor, not grease!
- Sauté the Onions: Now, add your diced white onion to the pot with the browned beef. Cook them until they start to soften up, which usually takes about 5 minutes.
- Add the Garlic: Stir in the minced garlic and cook for just 1 more minute until it smells wonderfully fragrant. Be careful not to burn it!
- Bring on the Flavor! This is where the magic happens. Pour in the beef broth, tomato paste, cocoa powder (if you’re feeling adventurous!), apple cider vinegar, chili powder, Worcestershire sauce, cumin, oregano, beef bouillon, granulated sugar, bay leaves, cinnamon, allspice, black pepper, cayenne pepper, and ground cloves.
- Stir It Up: Give everything a really good stir to make sure all those spices and ingredients are well combined. Then, bring the whole mixture to a gentle simmer.
- Let the Simmer Begin: Reduce the heat to low, put a lid on your pot, and let that chili simmer away for at least 1.5 to 2 hours. Stir it every so often to prevent sticking and to let all those flavors meld together. The longer it simmers, the deeper and richer the flavor will become – I often let mine go for 3 hours if I have the time!
- The Finishing Touches: Before you serve, don’t forget to fish out those bay leaves. Give the chili a taste and add salt if you think it needs it.
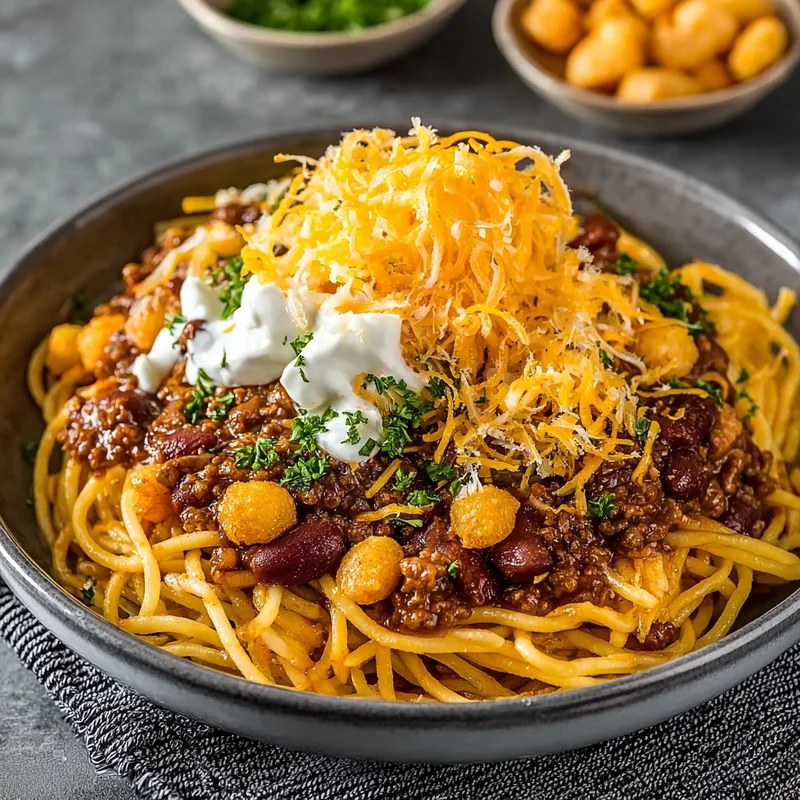
- Serve it Up Cincinnati Style! The classic way to enjoy Cincinnati chili is over cooked spaghetti noodles. Get creative with your toppings! Shredded cheddar cheese, a side of warmed kidney beans, a sprinkle of fresh chopped white onion, a dash of your favorite hot sauce, or even some crunchy oyster crackers are all fantastic choices.
Substitutions & Additions
This recipe is pretty fantastic as is, but feel free to make it your own!
- Ground Meat: If you prefer, you can use ground turkey or a mix of beef and pork.
- Vegetarian Option: For a vegetarian version, omit the beef and use vegetable broth. You can also add extra veggies like diced bell peppers or mushrooms, or even a can of rinsed lentils for extra protein.
- Spices: If you don’t have all the specific spices, don’t stress! A good quality chili powder blend will get you most of the way there. You can also adjust the cayenne pepper to control the heat.
- Sweetness: If you prefer a slightly sweeter chili, you can add another teaspoon of sugar or a tablespoon of brown sugar.
- Thickeners: If your chili isn’t as thick as you’d like after simmering, you can mix 1-2 tablespoons of cornstarch with a little cold water to make a slurry, then stir it into the chili and simmer for a few more minutes until thickened.
Tips for Success
Here are a few little tricks I’ve learned to make this Cincinnati chili absolutely perfect:
- Low and Slow is Key: Don’t rush the simmering process! That extended time is what allows the flavors to meld and deepen beautifully.
- Taste as You Go (Toward the End): Spices can vary in intensity, so tasting and adjusting salt and heat levels before serving is crucial.
- Prep Ahead: This chili actually tastes even better the next day! So, making it a day in advance is a great idea, especially if you’re serving guests.
- Don’t Skip the Cocoa (if you’re iffy!): I know it sounds unusual, but the cocoa powder adds a subtle richness and depth without making the chili taste like chocolate. It’s a game-changer!
How to Store It
Leftover Cincinnati chili is a treasure! Once it has cooled down completely, store it in an airtight container in the refrigerator for up to 3-4 days. It also freezes wonderfully! Portion it into freezer-safe containers or bags for up to 3 months. When you’re ready to enjoy it again, just thaw it in the refrigerator overnight and reheat it gently on the stovetop or in the microwave.
FAQs
Got questions? I’ve got answers!
Q: What makes Cincinnati chili different from other chilis?
A: Cincinnati chili has a unique, slightly sweeter and spicier flavor profile with warm spices like cinnamon and cloves. It’s also traditionally served over spaghetti, often called a “3-way” (chili, spaghetti, cheese), or with added beans (“4-way”) or onions (“5-way”).
Q: Can I make this chili ahead of time?
A: Absolutely! In fact, it’s highly recommended. The flavors meld and deepen overnight, making it even more delicious. Just reheat gently before serving.
Q: How long does the chili need to simmer?
A: For the best flavor development, aim for at least 1.5 to 2 hours. The longer you can let it simmer on low heat, the richer and more complex the taste will be.
Q: Is the cocoa powder really necessary?
A: While optional, the cocoa powder adds a wonderful depth and richness to the chili without making it taste like chocolate. It’s a traditional ingredient that contributes to the unique flavor profile!

Cincinnati Chili
Equipment
- Large pot or Dutch oven
- Spoon for breaking up beef and stirring
- lid for simmering
- Airtight container for storage
- freezer-safe containers or bags for freezing
Ingredients
Main ingredients
- 2 pounds lean ground beef The star of our show!
- 4 cups beef broth Provides the savory liquid base.
- 1 (12 oz) can tomato paste For that rich, concentrated tomato flavor.
- 2 cups diced white onion Adds a sweet and aromatic foundation.
- 2 tablespoons cocoa powder optional, for depth and a hint of richness
- 2 tablespoons minced garlic Because garlic makes everything better!
- 2 tablespoons apple cider vinegar A touch of tang to balance out the richness.
- 2 tablespoons chili powder The classic chili spice.
- 1 tablespoon Worcestershire sauce Adds a savory, umami punch.
- 2 teaspoons cumin Earthy and warm, a chili essential.
- 2 teaspoons dried oregano Adds a lovely herbaceous note.
- 2 teaspoons beef bouillon Boosts that beefy flavor even more!
- 2 teaspoons granulated sugar Just a pinch to round out the flavors.
- 2 bay leaves For that subtle aromatic magic during simmering.
- 1 teaspoon ground cinnamon Adds warmth and complexity.
- 1 teaspoon allspice Contributes to that signature flavor.
- 0.5 teaspoon black pepper For a little bite.
- 0.5 teaspoon cayenne pepper Adjust based on desired heat.
- 0.25 teaspoon ground cloves For a fragrant, cozy note.
- to taste Salt Always taste and adjust at the end!
Instructions
- Brown the ground beef in a large pot or Dutch oven over medium-high heat, breaking it up with a spoon. Drain off excess fat.2 pounds lean ground beef
- Add the diced white onion to the pot with the beef and cook until softened, about 5 minutes.2 pounds lean ground beef
- Stir in the minced garlic and cook for 1 minute until fragrant, being careful not to burn it.2 pounds lean ground beef
- Pour in the beef broth, tomato paste, cocoa powder (if using), apple cider vinegar, chili powder, Worcestershire sauce, cumin, oregano, beef bouillon, granulated sugar, bay leaves, cinnamon, allspice, black pepper, cayenne pepper, and ground cloves.2 pounds lean ground beef
- Stir everything well to combine and bring the mixture to a gentle simmer.
- Reduce heat to low, cover the pot, and let the chili simmer for at least 1.5 to 2 hours, stirring occasionally. The longer it simmers, the richer the flavor.
- Before serving, remove and discard the bay leaves. Taste and add salt if needed.2 pounds lean ground beef
- Serve the chili over cooked spaghetti noodles, with desired toppings like shredded cheddar cheese, kidney beans, chopped onion, or hot sauce.