
Introduction
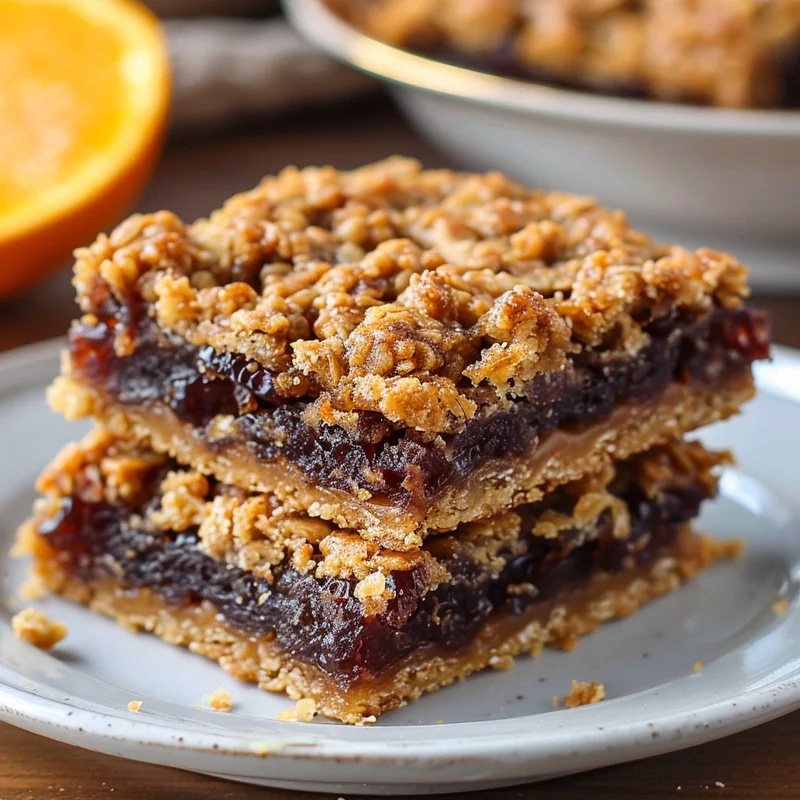
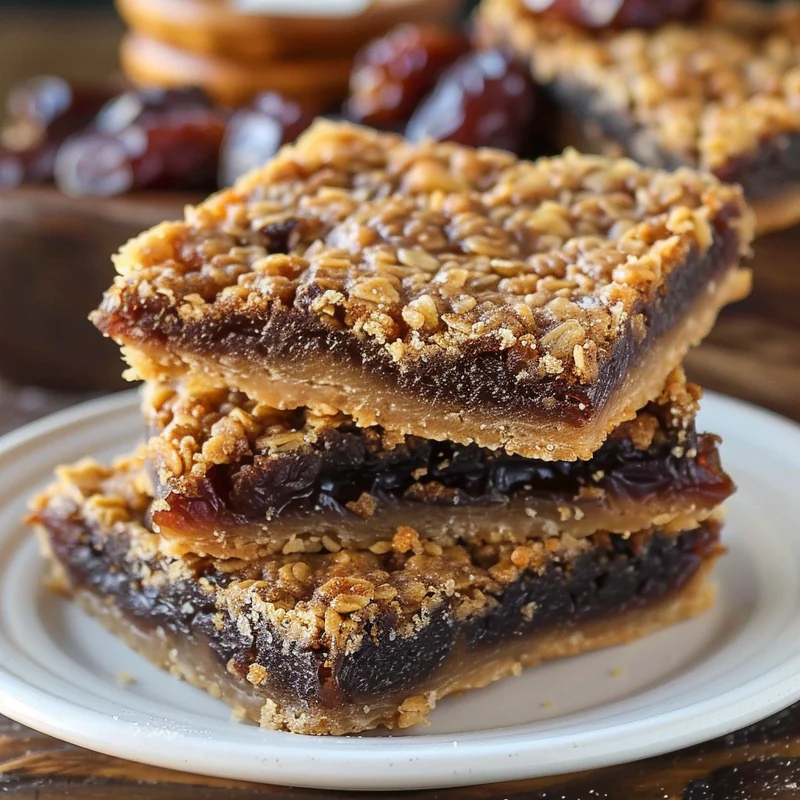
Oh, you guys, I have a recipe that’s going to transport you right back to your grandma’s kitchen! These Date Bars are like a warm hug in dessert form. They’re the kind of treat that instantly makes your home smell amazing and your heart feel happy. I remember the first time I tried a homemade date bar, and it was pure magic. The chewy, sweet date filling paired with that buttery, crumbly topping? Absolutely divine! And the best part? They are surprisingly simple to whip up, making them perfect for a weeknight treat or even a last-minute dessert for guests.
Why You’ll Love This Recipe
- Fast: Seriously, from start to finish, you can have these baking in under 30 minutes!
- Easy: No fancy techniques needed here, just simple mixing and baking.
- Giftable: Pack them up in a cute tin or box, and you’ve got a thoughtful, homemade gift that everyone will adore.
- Crowd-pleasing: Whether it’s a bake sale, a family gathering, or just an afternoon snack, these bars are guaranteed to disappear fast!
Ingredients
Let’s gather our goodies! You probably have most of these in your pantry already. I love that about this recipe – it feels so comforting and accessible.
For the Date Filling:
- 2½ cups Medjool dates, pitted and finely diced: Make sure they’re soft and gooey! If yours are a little dry, a quick soak in warm water will do the trick.
- 1 cup water (or brewed coffee): Coffee really deepens the flavor here, but water is perfectly lovely too!
- 2 tbsp orange juice: This adds a bright, zesty note that cuts through the sweetness beautifully.
- 2 tbsp butter: Just a little bit to make the filling extra smooth and rich.
- 2 tsp vanilla (or rum): Vanilla is classic, but if you have some rum lying around, a splash adds a wonderful depth of flavor.
- Pinch of salt: Essential for balancing out all that sweetness!
- ½ tsp baking soda: This little magic ingredient makes the filling wonderfully foamy and helps it spread.
For the Crumble Topping:
- 1¾ cups quick-cooking oats: These give the crumble that perfect texture.
- 1 cup all-purpose flour, spooned and leveled: Standard pantry staple!
- ¾ cup brown sugar: For that lovely caramel-y sweetness and chewy texture in the crumble.
- ¼ tsp baking powder: Just a touch for lift in the topping.
- ¼ tsp cinnamon: Because cinnamon and dates are a match made in heaven!
- ¾ cup + 2 tbsp butter, softened to room temperature: Make sure it’s nice and soft so it cuts in easily.
How to Make It
Alright, let’s get our hands a little bit messy and create some deliciousness!
Making the Date Filling:
- First things first, let’s get that date filling going. Grab a medium saucepan and combine your pitted and finely diced dates with the water (or that lovely coffee, if you’re feeling adventurous!).
- Place the saucepan over medium heat. You’ll want to stir it now and then as it heats up. Your goal is to get those dates nice and soft so they break down into a lovely, thick paste. It should start looking like a chunky jam.
- Now, stir in the orange juice, butter, vanilla (or rum, wink wink!), and that essential pinch of salt. Give it all a good mix until the butter is melted and everything is well combined.
- Here comes the fun part! Sprinkle in the baking soda. As soon as you stir it, you’ll see the mixture get all foamy and magical. This is exactly what you want!
- Take the pan off the heat and let your beautiful date filling cool down just a bit. It doesn’t need to be cold, but you don’t want it scorching hot when we assemble everything.
Whipping Up the Crumble:
- In a nice big bowl, let’s combine all our dry crumble ingredients. We’ve got the quick-cooking oats, the all-purpose flour, the brown sugar, baking powder, and that cozy cinnamon. Give them a quick whisk together.
- Now, add your softened butter to the bowl.
- This is where you get to be a bit hands-on! Using your fingers, a pastry blender, or even a couple of forks, you want to cut the butter into the dry ingredients. Keep working at it until the whole mixture looks like coarse, delicious crumbs. Think wet sand – that’s the texture you’re aiming for.
Assembling Your Masterpiece:
- Time to preheat that oven! Set it to 375°F (190°C).
- Get your baking pan ready. A 9×13 inch pan is perfect. You can grease and flour it, or my favorite trick is to line it with parchment paper. This makes lifting the baked bars out so much easier!
- Now, take about half of your crumble mixture and press it down evenly into the bottom of your prepared pan. This forms the base of our delicious bars.
- Gently spread that wonderful date filling you made all over the crumble base. Try to get it as even as you can.
- Finally, sprinkle the remaining crumble mixture evenly over the top of the date filling. Don’t be shy!
- Pop it into your preheated oven and bake for about 30-35 minutes. You’ll know they’re ready when that crumble topping is a beautiful golden brown.
- The hardest part? You have to let them cool completely in the pan before you even think about cutting them into bars. I know, I know, the anticipation is torture, but it’s crucial for clean cuts and the best texture!
Substitutions & Additions
Feeling creative? These bars are super forgiving and love a little twist!
- Nutty Crunch: Add about ½ cup of chopped walnuts or pecans to the crumble mixture for an extra layer of texture and flavor.
- Spice It Up: A pinch of nutmeg or cardamom in the crumble can add a lovely warmth.
- Citrus Zest: For an extra burst of citrus, add the zest of half an orange or lemon to the date filling.
- Gluten-Free: Try using a gluten-free all-purpose flour blend in the crumble. You might need slightly less liquid if your blend is very absorbent.
- Sugar Swap: You could experiment with coconut sugar in the crumble for a different caramel note.
Tips for Success
A few little pointers from my kitchen to yours to make these bars absolutely perfect:
- Don’t Overcook the Filling: You want a thick paste, not a caramel sauce. If it gets too thin, it might ooze out too much.
- Soft Butter is Key: Make sure your butter for the crumble is truly softened, not melted. This is what creates that perfect crumbly texture.
- Cooling is Crucial: Seriously, resist the urge to cut them while they’re hot! Letting them cool completely will make cutting into neat bars a breeze.
- Prep Ahead: You can make the date filling a day in advance and store it in the fridge. You can also mix the dry crumble ingredients together a day ahead and store them in an airtight container. Just add the butter and mix when you’re ready to bake!
How to Store It
These date bars are delicious at room temperature or chilled. I usually store them in an airtight container on the counter for up to 3-4 days. If you live in a warm climate or want them to last longer, pop them in the refrigerator. They’ll keep well there for about a week. You can also freeze them! Wrap individual bars tightly, or place them in a freezer-safe container, and they’ll be good for up to 2-3 months. Just let them thaw at room temperature when you’re ready for a treat!
FAQs
Q: Can I use regular dates instead of Medjool dates?
A: Yes, you can, but Medjool dates are preferred because they’re softer and sweeter, creating a more luscious filling. If you use firmer dates, you might need to simmer them a bit longer in the liquid to soften them properly.
Q: My crumble mixture seems too dry. What should I do?
A: If your crumble mixture seems too dry to hold together when you pinch it, you can add a teaspoon or two of melted butter or a splash of milk to help it along. Just be careful not to make it too wet.
Q: Can I make these dairy-free?
A: Yes! You can easily make these dairy-free by using a plant-based butter alternative for both the filling and the crumble. They’ll still be wonderfully delicious!

Date Bars
Equipment
- Medium saucepan
- bowl large
- Baking pan 9x13 inch
- Parchment paper
- Whisk
- fingers or pastry blender/forks
Ingredients
Date Filling
- 2.5 cups Medjool dates pitted and finely diced, soft and gooey
- 1 cup water or brewed coffee
- 2 tbsp orange juice
- 2 tbsp butter
- 2 tsp vanilla or rum
- 0.25 tsp salt pinch
- 0.5 tsp baking soda
Crumble Topping
- 1.75 cups quick-cooking oats
- 1 cup all-purpose flour spooned and leveled
- 0.75 cup brown sugar
- 0.25 tsp baking powder
- 0.25 tsp cinnamon
- 0.75 cup butter softened to room temperature
- 2 tbsp butter softened to room temperature
Instructions
- In a medium saucepan, combine pitted and finely diced dates with water or coffee.2.5 cups Medjool dates
- Place the saucepan over medium heat and stir occasionally until dates soften and form a thick paste.
- Stir in orange juice, butter, vanilla (or rum), and salt until well combined and butter is melted.2.5 cups Medjool dates
- Sprinkle in baking soda and stir; the mixture will get foamy.2.5 cups Medjool dates
- Remove from heat and let the date filling cool slightly.
- In a large bowl, whisk together quick-cooking oats, all-purpose flour, brown sugar, baking powder, and cinnamon.2.5 cups Medjool dates
- Add softened butter to the dry ingredients.2.5 cups Medjool dates
- Using your fingers, pastry blender, or forks, cut the butter into the dry ingredients until the mixture resembles coarse crumbs.
- Preheat oven to 375°F (190°C).
- Grease and flour a 9x13 inch baking pan, or line it with parchment paper.
- Press about half of the crumble mixture evenly into the bottom of the prepared pan.
- Spread the date filling evenly over the crumble base.
- Sprinkle the remaining crumble mixture evenly over the date filling.
- Bake for 30-35 minutes, or until the crumble topping is golden brown.
- Let the bars cool completely in the pan before cutting into bars.