Introduction
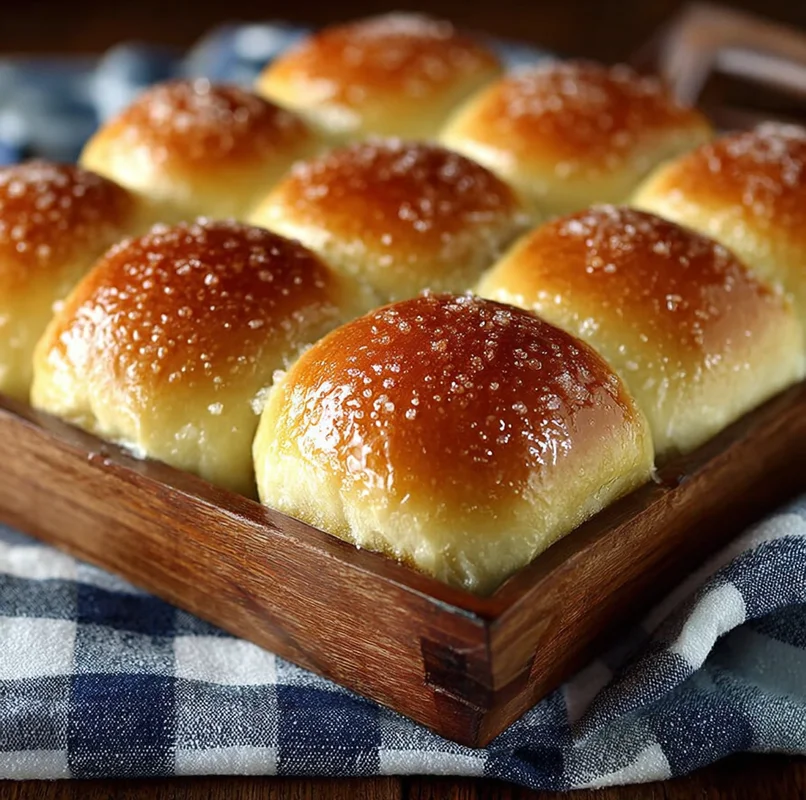
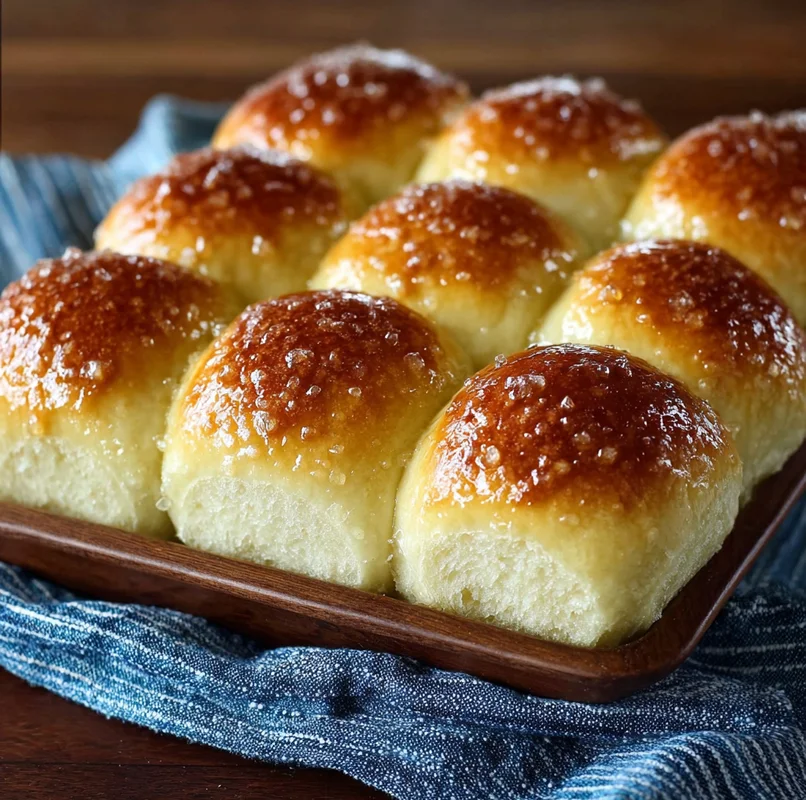
Oh, the smell of freshly baked bread! Doesn’t it just transport you back to cozy family dinners and happy holidays? There’s something truly magical about homemade dinner rolls – that perfect balance of soft, pillowy interior and a slightly golden, buttery crust. Today, I’m so excited to share a recipe that’s become an absolute staple in my kitchen. These aren’t just any dinner rolls; they’re the kind that disappear in minutes, leaving everyone begging for more. And the best part? They’re surprisingly simple to make, even if you’re new to baking bread!
Why You’ll Love This Recipe
- Fast: Get these beautiful rolls on your table without a fuss.
- Easy: Simple steps mean even beginners can bake with confidence.
- Giftable: Package them up for a thoughtful, edible present.
- Crowd-pleasing: Everyone, from picky eaters to gourmet foodies, will adore them.

Ingredients
Gathering your ingredients is the first step to baking bliss. Here’s what you’ll need:
- 1 1/2 Tablespoons Yeast: This is what gives our rolls their wonderful lift and fluffy texture.
- 1/4 cup Warm Water: Just right for waking up that yeast! Think lukewarm, not hot.
- 1 teaspoon Sugar: A little food for the yeast to get it going.
- 1/2 cup Butter, softened: We want it nice and pliable, not melted. This adds richness and tenderness.
- 1/2 cup Sugar: For that touch of sweetness that makes these rolls irresistible.
- 3 Eggs: These contribute to the richness and lovely golden color.
- 1 cup Whole or 2% Milk, warmed: Warm milk helps create a soft, tender crumb.
- 4 3/4 cups Flour (additional may be needed): All-purpose flour is perfect here. You might need a touch more depending on humidity.
- 2 teaspoons Salt: Essential for flavor and to balance the sweetness.
- For Brushing: 4 – 8 Tablespoons Butter, softened: This is our secret weapon for that glorious, glossy, buttery finish.
How to Make It
Ready to get your hands a little floured? Let’s bake!
- Activate the Yeast: In a small bowl, gently mix together the warm water, yeast, and 1 teaspoon of sugar. Let this happy little mixture sit for about 5 to 10 minutes. You’ll know it’s ready when it gets nice and foamy on top – that’s the yeast doing its thing!
- Cream the Butter and Sugar: In a big bowl (your stand mixer is your best friend here, but a good old-fashioned wooden spoon works too!), cream together the softened butter and the remaining 1/2 cup of sugar until it’s light and fluffy.
- Add the Eggs: Beat in the eggs, one at a time, making sure each one is fully incorporated before adding the next.
- Combine Wet Ingredients: Now, gradually pour in the warmed milk and the foamy yeast mixture. Mix everything together until it’s nice and combined.
- Mix Dry Ingredients: In a separate bowl, give your flour and salt a quick whisk. This just ensures everything is evenly distributed.
- Bring it All Together: Slowly add the dry ingredients to the wet ingredients. Mix until a soft dough starts to form. Don’t worry if it seems a little sticky at this stage. If it’s too wet, add a tablespoon of flour at a time until it just starts to pull away from the sides of the bowl.
- Knead the Dough: Turn the dough out onto a lightly floured surface. Now for the fun part – kneading! Gently push, fold, and turn the dough for about 8 to 10 minutes. You’re looking for a dough that’s smooth, elastic, and feels wonderfully soft.
- First Rise: Lightly grease a clean bowl. Place your kneaded dough in the bowl and turn it over so the top is also lightly greased. Cover the bowl with a clean kitchen towel and find a warm, draft-free spot for it to do its magic. Let it rise for 1 to 1.5 hours, or until it’s visibly doubled in size. I love putting mine in a slightly warm oven that’s been turned off.
- Shape the Rolls: Once doubled, gently punch down the dough to release the air. Now you can divide the dough into your desired roll portions. I usually aim for about 12-15 rolls, depending on how big I want them. Shape them into nice round balls and place them on a baking sheet lined with parchment paper.
- Second Rise: Cover the shaped rolls loosely with your kitchen towel again and let them have another rise for about 30 to 45 minutes. They should look nice and puffy.
- Preheat the Oven: While your rolls are puffing up, preheat your oven to 375°F (190°C).
- Bake to Golden Perfection: Pop your baking sheet into the preheated oven and bake for 15 to 20 minutes, or until the rolls are beautifully golden brown on top.
- Butter Them Up!: As soon as they come out of the oven, while they are still warm, brush the tops generously with that softened butter. Oh, that glorious butter bath!
Substitutions & Additions
Feeling creative? These rolls are a fantastic base for all sorts of delicious variations!
- Herbs: Mix in some chopped fresh rosemary, thyme, or chives into the dough before the first rise for a savory twist.
- Cheese: A sprinkle of shredded cheddar or Parmesan cheese on top before baking is absolutely divine.
- Sweetness: If you prefer a slightly sweeter roll, you can increase the sugar in the dough by another 1/4 cup.
- Milk: If you don’t have whole or 2% milk, you can use skim milk or even a plant-based milk like almond or soy, though the texture might be slightly different.
Tips for Success
A few little pointers to make sure your rolls turn out perfectly every time:
- Yeast Check: Always make sure your yeast is fresh. If it doesn’t foam, your rolls won’t rise properly.
- Don’t Over-flour: Resist the urge to add too much extra flour when kneading. A slightly sticky dough will result in softer, more tender rolls.
- Warmth is Key: Yeast loves warmth. Ensure your milk is warm (not hot!) and find a cozy spot for the dough to rise.
- Prep Ahead: You can make the dough the day before. After the first rise, punch it down, cover it tightly, and refrigerate it overnight. Let it come to room temperature for about an hour before shaping and baking.
How to Store It
These homemade dinner rolls are best enjoyed fresh, but they do store beautifully:
- At Room Temperature: Once completely cooled, store them in an airtight container or a bread bag at room temperature for up to 3 days.
- Freezing: For longer storage, freeze the completely cooled rolls in a freezer-safe bag or container for up to 3 months. Reheat gently in the oven or microwave.
FAQs
Got questions? I’ve got answers!
Q: My dough didn’t rise. What went wrong?
A: This is usually due to inactive yeast or incorrect water temperature. Make sure your water was warm (not hot!) and your yeast is fresh. Also, ensure the rising spot wasn’t too cold.
Q: Can I make these rolls ahead of time?
A: Yes! You can prepare the dough up to the end of the first rise, then cover and refrigerate it overnight. Let it come to room temperature for about an hour before proceeding with shaping and the second rise.
Q: Why do you brush with butter after baking?
A: Brushing with butter while the rolls are still warm infuses them with extra flavor and gives them that beautiful, soft, slightly glossy finish that’s just irresistible.
The Best Homemade Dinner Rolls
Soft, fluffy, and irresistibly buttery homemade dinner rolls that are surprisingly simple to make.
- Small bowl
- Large bowl
- Stand Mixer
- Wooden spoon
- Separate bowl
- Kitchen towel
- Baking Sheet
- Parchment paper
- Oven
For the Dough
- 1.5 Tablespoons Yeast
- 0.25 cup Warm Water (lukewarm)
- 1 teaspoon Sugar (for yeast)
- 0.5 cup Butter (softened)
- 0.5 cup Sugar (for dough)
- 3 Eggs
- 1 cup Whole or 2% Milk (warmed)
- 4.75 cups Flour (all-purpose, additional may be needed)
- 2 teaspoons Salt
For Brushing
- 4 Tablespoons Butter (softened)
- 8 Tablespoons Butter (softened)
- Activate the Yeast: In a small bowl, gently mix together the warm water, yeast, and 1 teaspoon of sugar. Let this mixture sit for about 5 to 10 minutes until foamy.
- Cream the Butter and Sugar: In a large bowl, cream together the softened butter and 1/2 cup of sugar until light and fluffy.
- Add the Eggs: Beat in the eggs, one at a time, fully incorporating each before adding the next.
- Combine Wet Ingredients: Gradually pour in the warmed milk and the foamy yeast mixture. Mix until combined.
- Mix Dry Ingredients: In a separate bowl, whisk together the flour and salt.
- Bring it All Together: Slowly add the dry ingredients to the wet ingredients. Mix until a soft dough forms. Add a tablespoon of flour at a time if too wet.
- Knead the Dough: Turn the dough onto a lightly floured surface and knead for 8 to 10 minutes until smooth and elastic.
- First Rise: Lightly grease a clean bowl. Place the dough in the bowl, turn to grease the top. Cover with a kitchen towel and let rise in a warm spot for 1 to 1.5 hours, or until doubled.
- Shape the Rolls: Punch down the dough. Divide into 12-15 portions and shape into balls. Place on a parchment-lined baking sheet.
- Second Rise: Cover the rolls loosely with the kitchen towel and let rise for 30 to 45 minutes until puffy.
- Preheat the Oven: Preheat oven to 375°F (190°C).
- Bake: Bake for 15 to 20 minutes, or until golden brown.
- Butter Them Up!: Brush the tops generously with softened butter while still warm.
These rolls are best enjoyed fresh but can be stored at room temperature for up to 3 days or frozen for up to 3 months.