Why You’ll Love This Decadent Caramel Apple Fudge
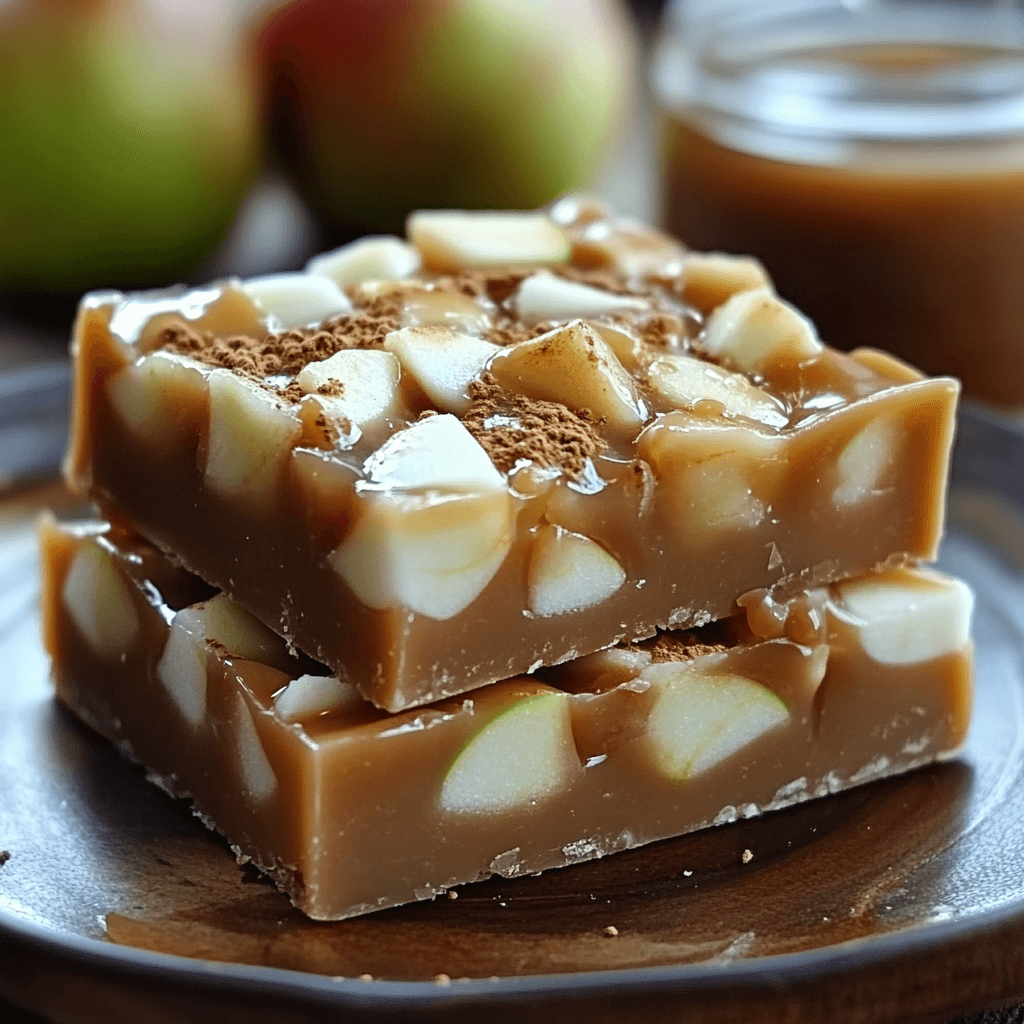
Hey there, fellow dessert enthusiasts! Are you ready for a fudge experience that’s going to send your taste buds straight to apple-picking paradise? This Caramel Apple Fudge is the ultimate autumnal treat, combining the creamy richness of fudge with the warm, comforting flavors of caramel and apple. Imagine sinking your teeth into a bite of this dreamy confection – the smooth, melt-in-your-mouth texture, the sweet caramel notes dancing with the subtle spice of apple pie, and the satisfying crunch of dried apple pieces. It’s pure indulgence, friends!

What sets this recipe apart? It’s the perfect blend of classic fudge with a unique autumnal twist. Forget complicated recipes; this one’s surprisingly quick and easy to whip up, making it perfect for busy weeknights or spontaneous dessert cravings. The creamy texture, achieved through a simple yet effective cooking process, is unbelievably decadent. The aroma alone will fill your kitchen with the cozy warmth of fall, creating the perfect ambiance for a movie night or a quiet evening in. It’s the kind of fudge that screams “comfort,” “deliciousness,” and “I deserve this.” Trust me, one bite and you’ll be hooked! Prepare to be utterly charmed by this irresistible autumnal masterpiece.
What You’ll Need
This recipe calls for simple ingredients you probably already have in your pantry! Let’s gather them:
- Granulated Sugar (2 cups): The foundation of our fudge’s sweetness.
- Brown Sugar (1 cup): Adds depth of flavor and a touch of molasses richness.
- Unsalted Butter (3/4 cup): Provides richness and creaminess. Use unsalted to control the salt level.
- Evaporated Milk (2/3 cup): Creates a wonderfully smooth and creamy texture.
- White Chocolate Chips (1 package, 12 ounces): Melts beautifully and adds a delightful sweetness.
- Marshmallow Cream (1 jar, 7 ounces): Contributes to the fudge’s marshmallowy softness and subtle sweetness.
- Apple Pie Spice (1 teaspoon): That warm, comforting autumnal flavor everyone craves. (Cinnamon, nutmeg, and allspice are usually in this blend).
- Vanilla Extract (1 teaspoon): Enhances the overall flavor profile and adds a touch of sophistication.
- Dried Apple, chopped (1/2 cup): Provides delightful texture and that signature apple taste.
- Caramel Sauce: For drizzling – the perfect finishing touch!
Step-by-Step Instructions
Let’s create some magic!
Step 1: The Sugar Symphony
In a large, heavy-bottomed saucepan, combine the granulated sugar and brown sugar. Over medium heat, stir constantly until the sugars are completely dissolved and the mixture begins to bubble gently. Tip: A heavy-bottomed pan prevents burning.
Step 2: Butter & Milk Embrace
Reduce the heat to low and add the unsalted butter. Stir continuously until the butter is melted and fully incorporated into the sugar mixture. Then, gradually whisk in the evaporated milk, ensuring no lumps form. Tip: Whisk continuously to avoid scorching the bottom.
Step 3: Spice It Up
Once the mixture is smooth and creamy, stir in the apple pie spice and vanilla extract. Continue to cook, stirring frequently, until the mixture reaches a soft-ball stage (235°F on a candy thermometer). This usually takes about 10-15 minutes. Tip: Use a candy thermometer for accurate results; this ensures the perfect texture.
Step 4: Chocolate Heaven
Remove the saucepan from the heat and carefully stir in the white chocolate chips until they are completely melted and incorporated into the mixture. Tip: Work quickly here to prevent the mixture from cooling too much before adding the chocolate.
Step 5: Marshmallow Magic
Now, gently fold in the marshmallow cream until it’s evenly distributed throughout the fudge. Be careful not to overmix; a few gentle folds are all you need.
Step 6: Apple Crunch
Stir in the chopped dried apples. Tip: Gently fold in the dried apples to maintain their texture.
Step 7: Setting Time
Pour the fudge into a greased 8×8 inch baking dish. Let it cool completely at room temperature before refrigerating for at least 2-3 hours, or preferably overnight, to allow it to set completely. Tip: For easier removal, line your pan with parchment paper, leaving an overhang on the sides for lifting.
Step 8: Drizzle & Delight
Once the fudge has set, drizzle with your favorite caramel sauce and cut into squares. Serve and enjoy!
Tips for Success
Use a candy thermometer: Accurate temperature is key for achieving the perfect fudge consistency.
Don’t rush the cooling process: Patience is key to a perfectly set fudge.
Grease your pan well: This prevents the fudge from sticking and makes it easier to remove.
Use high-quality ingredients: The better the ingredients, the better the fudge will taste.
Avoid overmixing: Overmixing can incorporate too much air and lead to a less smooth texture.
Variations to Try
Dark Chocolate Delight: Replace the white chocolate chips with dark chocolate for a richer, more intense flavor.
Nutty Fudge: Add ½ cup of chopped pecans or walnuts for a delightful crunch.
Spiced it Up: Add a pinch of cayenne pepper for a subtle kick.
Caramel Swirl: Swirl in extra caramel sauce into the fudge mixture before setting.
Storing and Reheating
Store the fudge in an airtight container in the refrigerator for up to a week. For longer storage, freeze the fudge in an airtight container for up to 2 months. To reheat, let it sit at room temperature for about 15-20 minutes before serving. Microwaving is not recommended as it can alter the texture.
Frequently Asked Questions
Q: Can I use salted butter instead of unsalted butter?
A: While you can, it’s recommended to use unsalted butter to control the salt level in your fudge. If using salted butter, reduce the amount of salt you may add to other ingredients.
Q: How long does this fudge last?
A: Stored properly in the refrigerator, this fudge will last for up to a week. Frozen fudge will keep for up to two months.
Q: Can I use fresh apples instead of dried apples?
A: Fresh apples would add moisture and might alter the texture slightly. Dried apples are recommended for this recipe to preserve the consistency. If you do wish to experiment, consider using very finely diced apples to minimize this effect.
Q: Can I make this fudge ahead of time?
A: Absolutely! In fact, it’s best to make this fudge a day or two in advance to allow it to set properly.
Q: What if I don’t have evaporated milk?
A: You could try using heavy cream, but the texture might differ slightly. The fudge may be less firm.
The Final Word
This decadent Caramel Apple Fudge is the perfect fall treat – easy to make, incredibly delicious, and guaranteed to impress. The combination of creamy fudge, warm spices, and sweet caramel is simply irresistible. So, gather your ingredients, put on your apron, and get ready to create a dessert that will be the star of any autumn gathering. Don’t forget to share your experience by leaving a comment below and rating the recipe! Happy baking!
Caramel Apple Fudge

A delicious fudge recipe with caramel and apple flavors.
- Medium saucepan
- 8×8 inch baking pan
Wet Ingredients
- 2 cups Sugar
- 1 cup Brown sugar
- 0.75 cup Unsalted butter
- 0.67 cup Evaporated milk
Dry Ingredients & Mix-ins
- 12 ounces White chocolate chips (1 package)
- 7 ounces Marshmallow cream (1 jar)
- 1 teaspoon Apple pie spice
- 1 teaspoon Vanilla extract
- 0.5 cup Dried apple, chopped
- Caramel sauce (For drizzling)
- Combine sugar, brown sugar, butter, and evaporated milk in a medium saucepan over medium heat.
- Bring to a boil, stirring constantly, until sugar dissolves.
- Reduce heat to low and simmer for 5 minutes, stirring occasionally.
- Remove from heat and stir in white chocolate chips, marshmallow cream, apple pie spice, and vanilla extract until melted and smooth.
- Stir in the chopped dried apples.
- Pour mixture into an 8×8 inch baking pan and let cool completely at room temperature.
- Once cooled and set, cut into squares and drizzle with caramel sauce.
- Serve and enjoy!
Adjust sweetness to your preference. Can be stored in the refrigerator for up to a week.