Introduction
Hey there, kitchen friends! Do you ever have those evenings where you just need something ridiculously comforting, super fast, and loaded with flavor, all in one pot? You know the kind of meal that makes everyone at the table sigh with happy satisfaction? Well, get ready, because this Cheesy Queso Taco Pasta is about to become your new best friend. It’s like two of your favorite comfort foods – creamy, dreamy queso and hearty taco goodness – had a delicious baby, and it happens to be ready in about 30 minutes. Seriously, it’s that easy. This recipe has saved me on countless busy nights, and I just know you’re going to fall in love with how simple and incredibly tasty it is.
Why You’ll Love This Recipe
- Fast: On the table in about 30 minutes! Perfect for busy weeknights.
- Easy: One pot (mostly!) and simple steps means less mess and stress.
- Giftable: Okay, maybe not giftable in a box, but perfect for sharing with friends or bringing to a potluck.
- Crowd-pleasing: Kids and adults alike devour this cheesy, flavorful pasta.

Ingredients
Gather ’round, let’s look at the simple stars of our show. You probably have most of these lurking in your pantry or fridge already!
- 16 ounces penne pasta: Penne is great because the little tubes hold onto that cheesy sauce, but most medium pasta shapes work!
- 2 tablespoons olive oil: Just a little bit to get our veggies going.
- 1 pound ground beef: The classic, but you can totally swap this out (more on that later!).
- ½ yellow onion, diced: Brings that essential savory base.
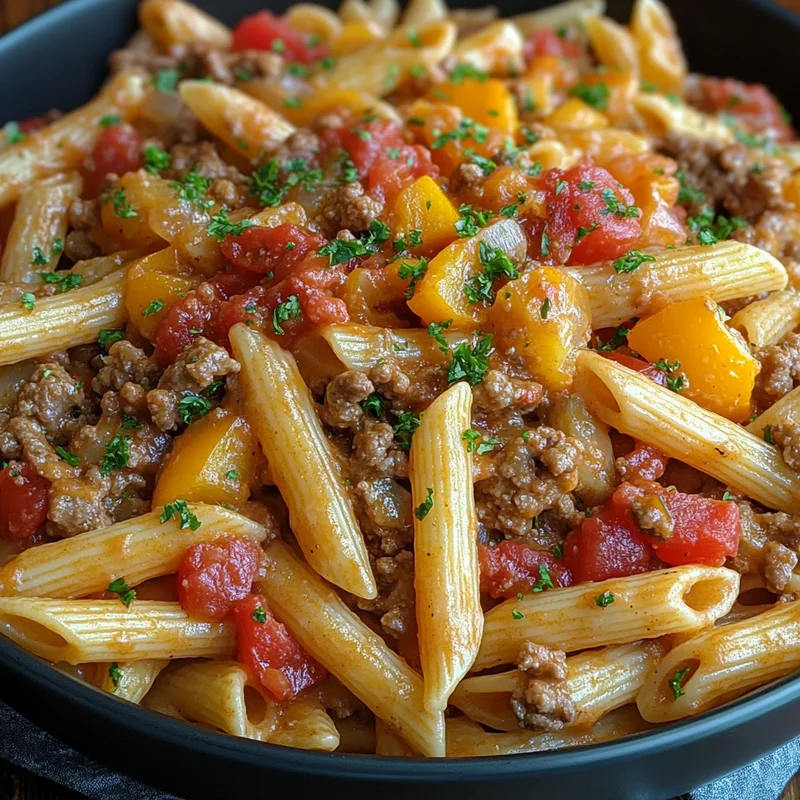
- 2 bell peppers, diced: Use any color you like! They add sweetness and a nice crunch.
- 1 packet taco seasoning: The shortcut to all that amazing taco flavor. Grab your favorite brand.
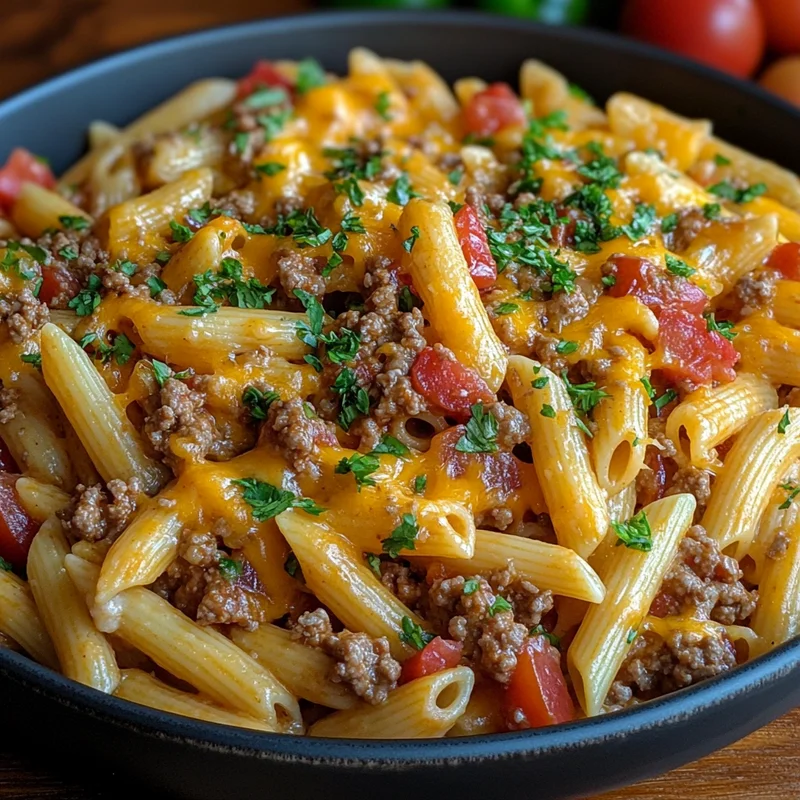
- 16 ounces cheese dip: This is the magic ingredient! Grab a jar of your favorite queso or cheese dip. Don’t skimp here!
- 10 ounces diced tomatoes with green chilies: Adds a little tang and a touch of heat. Undrained is fine!
How to Make It
Okay, let’s get cooking! Don’t blink, because this comes together in a flash.
First things first, get a big pot of water boiling for your pasta. Once it’s boiling, add your penne and cook it according to the package directions until it’s al dente. You want it tender but with a little bite, because it will finish cooking in the sauce. Drain it well when it’s done and set it aside.
While the pasta is cooking, grab a large skillet or Dutch oven. Add your olive oil and heat it over medium-high heat. Toss in your ground beef and break it up with a spoon, cooking until it’s nicely browned. Make sure you drain off any excess grease. This keeps our pasta from being greasy.
Now, add your diced onion and bell peppers to the skillet with the ground beef. Cook them for about 5-7 minutes, stirring occasionally, until the veggies soften up a bit and the onion is translucent. They don’t need to be super soft, just getting a head start.
Next, sprinkle that magical taco seasoning packet over the meat and veggie mixture. Stir it all together and let it cook for another minute, just to really toast the spices and wake up all those flavors. You’ll start smelling the deliciousness already!
Reduce the heat to low. Now for the good part! Pour in that jar of cheese dip and the can of diced tomatoes with green chilies (no need to drain the tomatoes!). Stir everything together until the cheese dip is melted and everything is coated in that creamy, cheesy, slightly spicy sauce.
Finally, add your cooked and drained penne pasta back into the skillet. Gently stir it all together, making sure every single piece of pasta is coated in that amazing sauce. Let it heat through for a minute or two, allowing the flavors to meld and the pasta to soak up some of the sauce.
And that’s it! You’re done! Serve it up hot and watch it disappear.
Substitutions & Additions
One of the best things about this recipe is how adaptable it is! Feel free to play around and make it your own.
- Meat: Not feeling ground beef? Use ground turkey, ground chicken, or even crumbled plant-based meat.
- Veggies: Add corn, black beans (drained and rinsed), or even some spinach for extra goodness. You can also swap bell peppers for roasted red peppers for a different flavor.
- Cheese: While the jarred queso is key to the ease, you could absolutely make your own queso or stir in shredded cheddar and Monterey Jack cheese at the end until melted for extra cheesiness.
- Pasta: Any medium pasta shape will work – rotini, elbows, bowties, or even shells would be fantastic.
- Heat: If you want it spicier, add a pinch of cayenne pepper with the taco seasoning, or stir in some hot sauce at the end.
- Toppings: This pasta is great on its own, but a dollop of sour cream or Greek yogurt, a sprinkle of fresh cilantro or green onions, or even some crushed tortilla chips take it over the top!
Tips for Success
This recipe is pretty foolproof, but here are a few pointers I’ve picked up along the way:
- Don’t overcook the pasta: Cook it to al dente! It finishes cooking in the hot sauce, and you don’t want mushy pasta.
- Drain the beef: Seriously, take the extra minute to drain off the grease after browning. It makes a big difference in the final texture.
- Heat gently: Once the cheese dip is in, keep the heat low and stir gently to melt and combine without scorching the bottom.
- Prep ahead: You can dice your onion and bell peppers ahead of time and store them in an airtight container in the fridge. This shaves off even more time on cooking night!
How to Store It
If you’re lucky enough to have leftovers of this Cheesy Queso Taco Pasta (it’s rare in my house!), store them in an airtight container in the refrigerator for up to 3-4 days. To reheat, you can microwave individual portions, or gently warm it in a pot on the stove over low heat, adding a splash of milk or broth if it seems a little thick.
FAQs
Can I make this vegetarian?
Absolutely! Swap the ground beef for a plant-based crumble, or use extra beans and corn for a hearty veggie version.
What kind of cheese dip should I use?
Any jarred queso or cheese dip you enjoy works! Queso Blanco or a classic yellow queso are both great options. Choose one that you like the flavor of right out of the jar.
Can I freeze this pasta?
Pasta dishes with creamy or cheesy sauces can sometimes have texture changes when frozen and reheated (they can become a bit grainy). While technically possible, I think this dish is best enjoyed fresh or reheated from the fridge. If you do freeze, make sure it’s in an airtight container and plan for potential texture differences upon thawing and reheating.
PrintCozy Cheesy Queso Taco Pasta Skillet

A super fast, loaded-with-flavor, one-pot meal that’s like a delicious baby of creamy queso and hearty taco goodness, ready in about 30 minutes.
- Cook Time: 30 minutes
- Total Time: 30 minutes
- : Lara
Ingredients
Hauptzutaten
- 16 ounces penne pasta (Penne is great because the little tubes hold onto that cheesy sauce, but most medium pasta shapes work!)
- 2 tablespoons olive oil (Just a little bit to get our veggies going.)
- 1 pound ground beef (The classic, but you can totally swap this out!)
- 0.5 yellow onion (diced)
- 2 bell peppers (diced, Use any color you like!)
- 1 packet taco seasoning (The shortcut to all that amazing taco flavor. Grab your favorite brand.)
- 16 ounces cheese dip (This is the magic ingredient! Grab a jar of your favorite queso or cheese dip.)
- 10 ounces diced tomatoes with green chilies (Adds a little tang and a touch of heat. Undrained is fine!)
Instructions
- First things first, get a big pot of water boiling for your pasta. Once it’s boiling, add your penne and cook it according to the package directions until it’s al dente. You want it tender but with a little bite, because it will finish cooking in the sauce. Drain it well when it’s done and set it aside.
- While the pasta is cooking, grab a large skillet or Dutch oven. Add your olive oil and heat it over medium-high heat. Toss in your ground beef and break it up with a spoon, cooking until it’s nicely browned. Make sure you drain off any excess grease. This keeps our pasta from being greasy.
- Now, add your diced onion and bell peppers to the skillet with the ground beef. Cook them for about 5-7 minutes, stirring occasionally, until the veggies soften up a bit and the onion is translucent. They don’t need to be super soft, just getting a head start.
- Next, sprinkle that magical taco seasoning packet over the meat and veggie mixture. Stir it all together and let it cook for another minute, just to really toast the spices and wake up all those flavors. You’ll start smelling the deliciousness already!
- Reduce the heat to low. Now for the good part! Pour in that jar of cheese dip and the can of diced tomatoes with green chilies (no need to drain the tomatoes!). Stir everything together until the cheese dip is melted and everything is coated in that creamy, cheesy, slightly spicy sauce.
- Finally, add your cooked and drained penne pasta back into the skillet. Gently stir it all together, making sure every single piece of pasta is coated in that amazing sauce. Let it heat through for a minute or two, allowing the flavors to meld and the pasta to soak up some of the sauce.
Notes
This recipe is highly adaptable! You can substitute ground turkey, chicken, or plant-based meat. Add corn, black beans, or spinach. Use shredded cheddar and Monterey Jack instead of jarred queso. Any medium pasta shape works (rotini, elbows, bowties, shells). Add cayenne or hot sauce for more heat. Great toppings include sour cream, Greek yogurt, cilantro, green onions, or crushed tortilla chips.
Tips for Success: Don’t overcook the pasta (cook to al dente), drain the beef after browning, heat gently on low once cheese dip is added to prevent scorching, dice onion and bell peppers ahead of time.
Storage: Store leftovers in an airtight container in the refrigerator for up to 3-4 days. Reheat in the microwave or gently in a pot on the stove over low heat, adding a splash of milk or broth if needed. Freezing is possible but may alter texture.