
Introduction
Hey there, sweet treat lovers! Do you ever get that craving for a classic carnival treat, but maybe don’t want to deal with a whole sticky apple on a stick? Or maybe you just want a little bite of cozy fall flavor any time of year? Oh, do I have the recipe for you! These Chocolate Covered Caramel Apple Slices are pure magic. They capture all that amazing sweet, tart, and chocolatey goodness you love, but in an easy-to-eat, shareable slice. Forget wrestling with a whole apple – this is the fun, simple way to get your fix. Seriously, you won’t believe how quick and simple these are to whip up, and they disappear even faster!
Why You’ll Love This Recipe
- Fast: Ready in under an hour, start to finish!
- Easy: No candy thermometers or tricky techniques required.
- Giftable: Package them up for a sweet homemade present.
- Crowd-pleasing: Everyone, kids and adults alike, adores these!

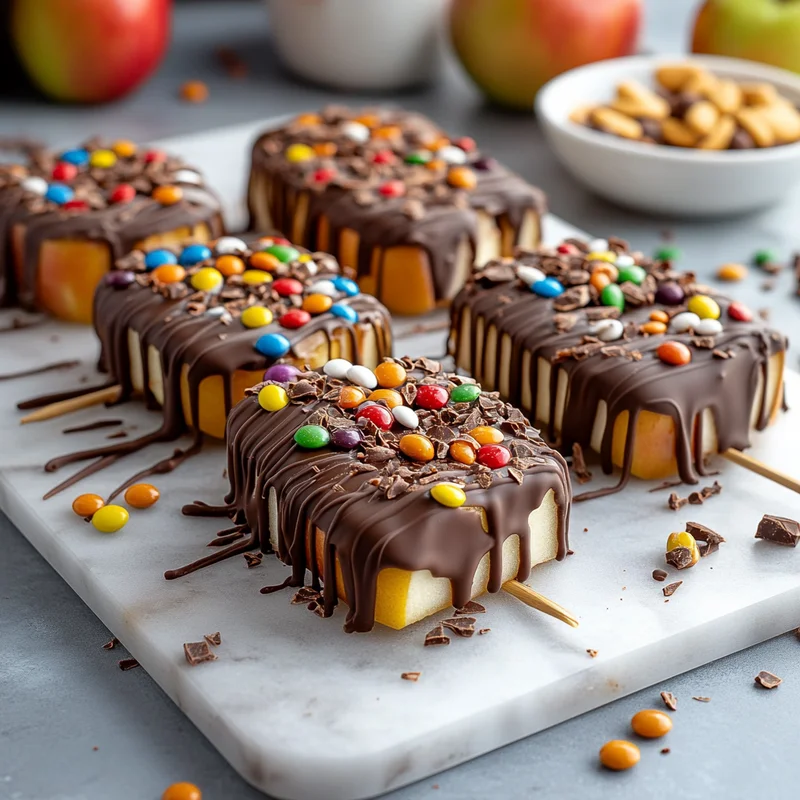
Ingredients
Here’s what you’ll need to make these little bites of heaven:
- 3 large Granny Smith or Honeycrisp apples: I love the tartness of Granny Smiths against the sweet caramel and chocolate, but Honeycrisp gives you a lovely crisp texture with less pucker. Pick your favorite!
- 1 cup (8 ounces) soft caramel squares: The kind you find individually wrapped are perfect.
- 1 cup Complementary variety chocolate melting wafers: This is your base chocolate for dipping. Using melting wafers makes this SO much easier than chips!
- 10 oz Milk or dark chocolate melting wafers: This is your secondary chocolate for drizzling and decoration. Use whichever you love most – I’m a dark chocolate fan myself!
- 2 tbsp Heavy cream: Just a splash to help the caramel melt smoothly.
- Mini M&M’s: For that fun pop of color and crunch! But feel free to get creative here.
How to Make It
Okay, let’s get dipping! This process is super straightforward:
- Prep your apples: First, give your apples a good wash and dry them really well. Slice each apple into about 1/2-inch thick rounds. You’ll want to avoid the core area, so maybe plan for 4-5 good slices per apple. Use a small circle cutter or knife to carefully remove the core from each slice.
- Melt the caramel: In a microwave-safe bowl, combine the caramel squares and heavy cream. Microwave on 50% power, stirring every 30-45 seconds, until the caramel is completely melted and smooth. This usually takes a few minutes. Be patient and stir gently!
- Dip in caramel: Holding each apple slice, dip about 3/4 of the way into the warm caramel. Let any excess drip off back into the bowl. Place the caramel-dipped slices onto a baking sheet lined with parchment paper or a silicone mat. Pop them in the fridge for about 10-15 minutes to let the caramel set up slightly.
- Melt the chocolate: While the caramel chills, melt both types of chocolate melting wafers separately according to package directions. Melting wafers are usually best gently melted in the microwave or over a double boiler. Don’t rush it!
- Dip in chocolate: Once the caramel is firm, dip the caramel-covered portion of each apple slice into one of the melted chocolates (your base chocolate). Allow excess chocolate to drip off. Place them back on the lined baking sheet.
- Decorate! While the chocolate is still wet, immediately drizzle with the other melted chocolate (the complementary variety) and sprinkle with mini M&M’s or any other toppings you like.
- Let them set: Return the baking sheet to the fridge for another 15-20 minutes, or until the chocolate is completely firm.
- Enjoy! Once set, carefully peel them off the parchment paper and dig in!
Substitutions & Additions
Get creative with your toppings! Here are a few ideas:
- Swap the M&M’s for chopped peanuts, pecans, or walnuts.
- Add a sprinkle of sea salt over the caramel and chocolate for a delicious sweet and salty combo.
- Crushed cookies (like Oreos or graham crackers) make a fun topping.
- Use white chocolate for dipping or drizzling.
- Sprinkles are always a good idea, especially for a festive touch!
- A pinch of cinnamon or apple pie spice stirred into the melted caramel adds extra warmth.
Tips for Success
A few things I’ve learned along the way to make these turn out perfectly:
- Dry those apples! Any water on the apple slices will make it hard for the caramel and chocolate to stick. Pat them really dry after slicing.
- Use melting wafers: Seriously, they are formulated to melt smoothly and harden beautifully, making your life so much easier compared to standard chocolate chips (which often contain stabilizers that prevent smooth melting and setting).
- Don’t overheat the caramel or chocolate: Melt them slowly and gently. Overheating can make caramel seize or burn, and chocolate can get grainy or thick. Microwave on low power and stir often.
- Work efficiently once melted: Have your apples prepped and your toppings ready before you melt the caramel and chocolate, especially the chocolate, as it will start to set relatively quickly.
- Prep ahead: You can slice and core the apples a little bit ahead of time, but keep them covered and in the fridge to prevent browning. Do the dipping closer to when you want to serve them.
How to Store It
These are best enjoyed the day they’re made, but you can store leftovers. Place them in a single layer in an airtight container, separated by parchment paper if stacking, and keep them in the refrigerator. They’ll last for about 2-3 days, though the apple texture might change slightly over time.
FAQs
Got questions? I’ve got answers!
- What’s the best way to slice the apples evenly? Using a sharp chef’s knife and taking your time is key. Aim for slices about 1/2 inch thick.
- Can I use a different kind of caramel? Soft, chewy caramel squares that melt down smoothly work best. Stiff caramels or sauces might not coat properly.
- Why did my chocolate seize? This usually happens if it gets too hot or if even a tiny drop of water gets into it while melting. Melt gently and ensure everything is dry.
- How far in advance can I make these? While they are best fresh, you can make them up to 2-3 days ahead and store them in the fridge.

Easy Homemade Chocolate Caramel Apple Slices
Equipment
- Microwave-safe bowl
- Baking Sheet
- Parchment paper or silicone mat
- Small circle cutter or knife for coring
Ingredients
Main Ingredients
- 3 large Granny Smith or Honeycrisp apples
- 1 cup soft caramel squares (8 ounces), individually wrapped
- 1 cup Complementary variety chocolate melting wafers for dipping (base chocolate)
- 10 oz Milk or dark chocolate melting wafers for drizzling and decoration
- 2 tbsp Heavy cream
- Mini M&M's or other toppings
Instructions
- Prep your apples: First, give your apples a good wash and dry them really well. Slice each apple into about 1/2-inch thick rounds. You'll want to avoid the core area, so maybe plan for 4-5 good slices per apple. Use a small circle cutter or knife to carefully remove the core from each slice.
- Melt the caramel: In a microwave-safe bowl, combine the caramel squares and heavy cream. Microwave on 50% power, stirring every 30-45 seconds, until the caramel is completely melted and smooth. This usually takes a few minutes. Be patient and stir gently!
- Dip in caramel: Holding each apple slice, dip about 3/4 of the way into the warm caramel. Let any excess drip off back into the bowl. Place the caramel-dipped slices onto a baking sheet lined with parchment paper or a silicone mat. Pop them in the fridge for about 10-15 minutes to let the caramel set up slightly.
- Melt the chocolate: While the caramel chills, melt both types of chocolate melting wafers separately according to package directions. Melting wafers are usually best gently melted in the microwave or over a double boiler. Don't rush it!
- Dip in chocolate: Once the caramel is firm, dip the caramel-covered portion of each apple slice into one of the melted chocolates (your base chocolate). Allow excess chocolate to drip off. Place them back on the lined baking sheet.
- Decorate! While the chocolate is still wet, immediately drizzle with the other melted chocolate (the complementary variety) and sprinkle with mini M&M's or any other toppings you like.
- Let them set: Return the baking sheet to the fridge for another 15-20 minutes, or until the chocolate is completely firm.
- Enjoy! Once set, carefully peel them off the parchment paper and dig in!