Introduction
Oh, those cozy kitchen moments! Does anything bring back those warm, fuzzy feelings quite like the smell of freshly baked cookies wafting through the house? Today, we’re diving into a recipe that’s an absolute classic, a taste of pure joy that’s as delightful to make as it is to devour: Chocolate-Covered Peanut Butter Cookies! These aren’t just cookies; they’re little pockets of happiness, perfect for sharing (or not!) and guaranteed to make any day feel a little more special. And the best part? They’re surprisingly simple to whip up, making them your new go-to for a quick treat or a thoughtful homemade gift.
Why You’ll Love This Recipe
- Fast: You can have warm, delicious cookies ready in under an hour!
- Easy: Simple steps that even beginner bakers can follow with confidence.
- Giftable: These cookies are picture-perfect and make a fantastic edible present for friends, family, or neighbors.
- Crowd-pleasing: Who can resist the irresistible combo of peanut butter and chocolate? Everyone loves these!
Ingredients
Gathering your ingredients is half the fun! Here’s what you’ll need to create these little masterpieces:
- 1 cup unsalted butter, softened: Make sure it’s nice and soft for that creamy texture.
- 1 cup peanut butter: Your favorite creamy peanut butter is perfect here.
- 1 cup packed brown sugar: This gives our cookies that lovely chewy texture and rich flavor.
- 1/2 cup granulated sugar: For that classic cookie sweetness.
- 2 large eggs: The binders that hold all our deliciousness together.
- 2 1/2 cups all-purpose flour: The foundation of our cookies.
- 1 teaspoon baking powder: To give them just the right lift.
- 1/2 teaspoon salt: Balances out the sweetness and brings out the flavors.
- 1 cup semisweet chocolate chips, for melting and dipping: The crowning glory! Use good quality chocolate for the best results.
How to Make It
Ready to get your bake on? Follow these easy steps and prepare for cookie heaven!
- Preheat and Prep: First things first, let’s get your oven ready! Preheat it to 375°F (190°C). Then, line your baking sheets with parchment paper. This makes cleanup a breeze and ensures your cookies won’t stick.
- Creamy Beginnings: Grab a large bowl. Add your softened butter and peanut butter. Cream them together until they’re wonderfully smooth and creamy. This is where the magic starts!
- Sweet Additions: Now, toss in the brown sugar and granulated sugar. Beat everything together until the mixture is nice and fluffy. It should look light and airy – a good sign you’re on the right track!
- Egg-cellent Incorporation: Add your eggs, one at a time. Make sure you beat well after each egg is added. This helps everything emulsify beautifully.
- Dry Ingredient Symphony: In a separate medium bowl, whisk together your flour, baking powder, and salt. Giving them a quick whisk ensures they’re evenly distributed, so you don’t get pockets of baking powder.
- Gentle Mixing: Now, it’s time to combine the wet and dry ingredients. Gradually add the dry ingredients to your wet mixture. Mix until just combined. And I mean it – overmixing can lead to tough cookies, so be gentle!
- Cookie Ball Formation: Roll your dough into lovely 1-inch balls. Place them about 2 inches apart on your prepared baking sheets. This gives them room to spread as they bake.
- A Gentle Flattening: Once they’re in ball form, gently flatten each cookie. You can use the palm of your hand or the classic fork design. I love using a fork – it adds a pretty pattern!
- Bake to Golden Perfection: Pop those trays into the preheated oven. Bake for about 10-12 minutes, or until you see those beautiful edges turning lightly golden brown.
- Cool Down Time: Once they’re baked, let the cookies cool on the baking sheets for a few minutes. This allows them to firm up a bit. Then, carefully transfer them to a wire rack to cool completely. Patience is key here – warm cookies and melted chocolate don’t mix well!
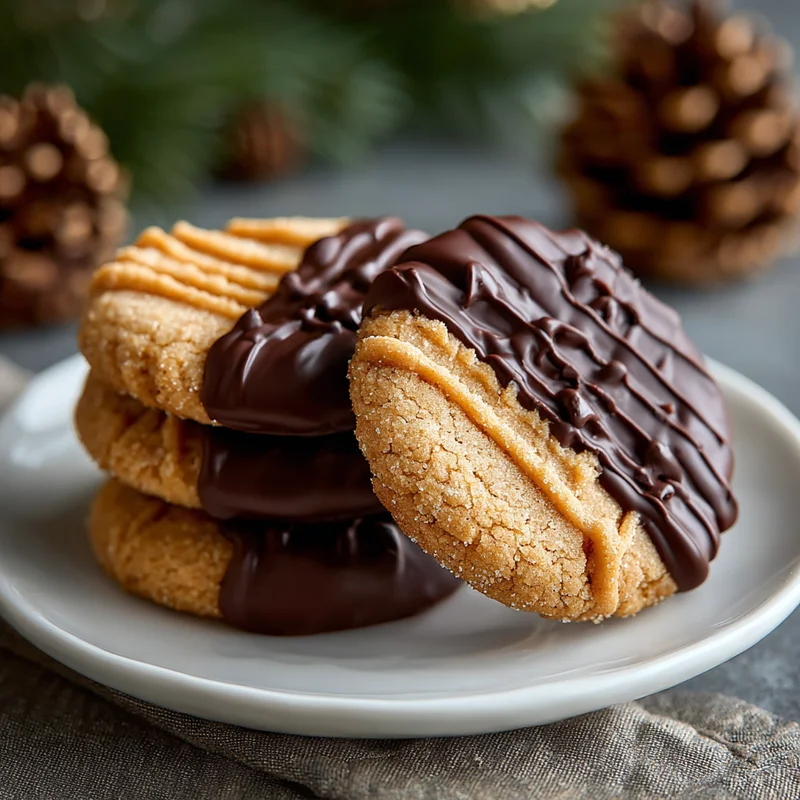
- Chocolate Magic: When your cookies are completely cool, it’s time for the chocolate! Grab your semisweet chocolate chips. Place them in a microwave-safe bowl and melt them in 30-second intervals, stirring well between each. They’ll melt into a glorious, glossy pool. If you prefer, you can also use a double boiler for a super smooth melt.
- The Dip: Now for the best part! Dip each cooled cookie halfway into the melted chocolate. Let any excess chocolate drip back into the bowl.
- Set and Shine: Place your beautifully dipped cookies back on the wire rack or a fresh piece of parchment paper. Let the chocolate set completely. You can speed this up in the refrigerator if you’re eager to taste!
Substitutions & Additions
Feeling adventurous? Here are a few ways to make these cookies even more your own:
- Peanut Butter Swap: If you’re not a fan of creamy, feel free to use crunchy peanut butter for added texture. Almond butter or cashew butter would also be delicious!
- Chocolate Varieties: Dark chocolate, milk chocolate, or even white chocolate would be delightful coatings. You could even swirl two types of chocolate together for a marbled effect.
- Sprinkle Power: Before the chocolate sets, sprinkle on some sea salt flakes for a salty-sweet kick, or add some colorful sprinkles for a festive touch.
- Candy Decorations: Chop up some of your favorite candy bars and press them into the wet chocolate for extra decadence.
Tips for Success
A few little secrets to ensure your cookies turn out perfectly every time:
- Room Temperature Ingredients: Using softened butter and room temperature eggs is crucial for achieving that light and fluffy dough.
- Don’t Overmix: I can’t stress this enough! Overmixing develops the gluten in the flour, resulting in tough cookies. Mix until just combined.
- Cool Completely: Make sure your cookies are entirely cool before dipping them in chocolate. Warm cookies will melt the chocolate, creating a mess and a less-than-perfect coating.
- Prep Ahead: You can make the cookie dough a day in advance and store it in the refrigerator. Just let it soften slightly before rolling into balls. The baked cookies can also be stored in an airtight container and dipped in chocolate later.
How to Store It
Once your chocolate-covered delights have set, it’s time to store them. Keep your cookies in an airtight container at room temperature for up to 3-4 days. If your kitchen is particularly warm, or if you’ve used frosting or other delicate decorations, storing them in the refrigerator might be a good idea. Just be aware that refrigeration can sometimes make cookies a bit harder.
FAQs
Got questions? We’ve got answers!
Q: Can I use different types of peanut butter?
A: Absolutely! While creamy unsalted peanut butter is classic, crunchy peanut butter adds a lovely texture. Nut butters like almond or cashew butter also work wonderfully.
Q: My chocolate isn’t melting smoothly. What should I do?
A: Ensure you’re melting the chocolate slowly and gently. Overheating can cause it to seize. If using the microwave, stir frequently. If using a double boiler, make sure the water doesn’t touch the bottom of the bowl.
Q: How long will these cookies last?
A: Stored properly in an airtight container at room temperature, they’ll stay fresh and delicious for about 3 to 4 days. For longer storage, you can freeze the undecorated cookies for up to 3 months.
Q: Can I make these cookies vegan?
A: You can adapt this recipe by using a vegan butter substitute, vegan peanut butter (most are!), and vegan chocolate chips. Ensure your sugar is also vegan-friendly.

Chocolate-Covered Peanut Butter Cookies
Equipment
- Large bowl
- Medium bowl
- Baking sheets
- Parchment paper
- Wire rack
- Microwave-safe bowl
Ingredients
Main ingredients
- 1 cup unsalted butter softened
- 1 cup peanut butter creamy
- 1 cup brown sugar packed
- 0.5 cup granulated sugar
- 2 large eggs
- 2.5 cups all-purpose flour
- 1 teaspoon baking powder
- 0.5 teaspoon salt
- 1 cup semisweet chocolate chips for melting and dipping
Instructions
- Preheat oven to 375°F (190°C) and line baking sheets with parchment paper.
- In a large bowl, cream together softened butter and peanut butter until smooth.
- Add brown sugar and granulated sugar, then beat until fluffy.
- Add eggs one at a time, beating well after each addition.
- In a separate bowl, whisk together flour, baking powder, and salt.
- Gradually add dry ingredients to wet ingredients and mix until just combined.
- Roll dough into 1-inch balls and place 2 inches apart on prepared baking sheets.
- Gently flatten each cookie ball.
- Bake for 10-12 minutes, or until edges are lightly golden brown.
- Let cookies cool on baking sheets for a few minutes, then transfer to a wire rack to cool completely.
- Melt semisweet chocolate chips in a microwave-safe bowl in 30-second intervals, stirring between each, until smooth.
- Dip each cooled cookie halfway into the melted chocolate, allowing excess to drip off.
- Place dipped cookies on a wire rack or parchment paper and let the chocolate set completely.