Introduction
Oh, the holidays! They just bring back so many wonderful memories, don’t they? One that always makes me smile is the buzz of activity in the kitchen, everyone gathered around, eager to help or just sneak a taste. And if there’s one thing that truly embodies that festive spirit and brings people together, it’s food that’s as fun to make as it is to eat. This Christmas Tree Pull-Apart Pizza is exactly that! It’s incredibly simple, comes together in a flash, and honestly, it’s just plain magical to see it transform into a festive tree right before your eyes. Get ready to make some new holiday traditions!
Why You’ll Love This Recipe
- Fast: Seriously, this comes together so quickly, you’ll have more time for carols and cocoa.
- Easy: No fancy skills required! If you can unroll a can of dough, you can make this.
- Giftable: While you’ll probably devour it immediately, the idea of a pizza tree is a fun treat to share. Imagine bringing this to a potluck – instant hit!
- Crowd-pleasing: Who doesn’t love pizza? This festive twist makes it a guaranteed winner for kids and adults alike.
Ingredients
- 2 (7.8 oz) cans refrigerated pizza crust: The foundation of our festive fun! So easy to work with.
- 1 ½ cups shredded mozzarella cheese: Melty, gooey goodness that’s a pizza essential.
- 1 ½ cups pizza sauce: Your favorite jarred sauce is perfect here, no need to get fancy.
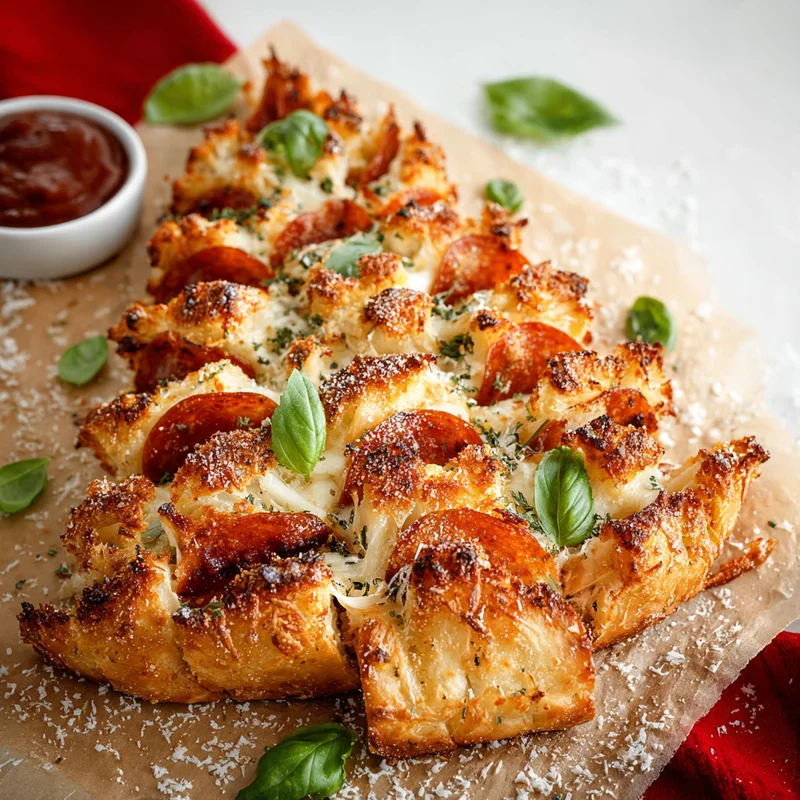
- 20 pepperoni slices: Little spicy circles of joy! They add a pop of color and flavor.
- 3 tablespoons unsalted butter, melted: This is our “paint” for brushing on that golden-brown crust.
- ½ teaspoon garlic powder: For a little savory kick that makes everything better.
- ½ teaspoon Italian seasoning: A blend of herbs that just screams “delicious pizza.”
- 2 tablespoons grated Parmesan cheese: The final sprinkle of nutty, salty perfection.
- Fresh basil, for garnish: A little touch of green to make our tree truly bloom!
How to Make It
Alright, let’s get this festive bake going! It’s so straightforward, you’ll be amazed at the result.
- Preheat and Prep: First things first, crank your oven up to 400°F (200°C). Grab a baking sheet and line it with parchment paper. This is going to make cleanup a breeze, trust me!
- Cut the Dough: Gently unroll those cans of pizza crust. You’ll want to cut each one into 12 equal pieces. Think of them as little pizza building blocks!
- Mix the Good Stuff: In a medium bowl, let’s get our filling ready. Combine the shredded mozzarella cheese, pizza sauce, and those lovely pepperoni slices. Give it a gentle stir to get everything acquainted.
- Whip Up the Brush-On: In a separate, smaller bowl, whisk together the melted butter, garlic powder, and Italian seasoning. This is our flavor boost for the crust!
- Sauce it Up: Now, take your pizza crust pieces and spread that delicious sauce mixture evenly over them. Make sure each piece gets a good coating of cheese, sauce, and pepperoni.
- Build Your Tree: This is where the magic happens! Arrange the sauced-up pizza crust pieces on your prepared baking sheet. Start at the bottom and arrange them closely together in a wide base, then work your way up, making each layer a little narrower, until you form a beautiful, edible Christmas tree shape. Don’t worry if it’s not perfect; rustic charm is part of its appeal!
- Brush with Butter: Take your garlic and herb butter mixture and brush it generously over the top of your pizza tree. This will give it that gorgeous golden-brown finish.
- Parmesan Snowfall: Sprinkle the grated Parmesan cheese all over the tree. It’s like a dusting of festive snow!
- Bake to Perfection: Pop your Christmas Tree Pizza into the preheated oven and bake for 15-20 minutes. You’re looking for that perfect moment when the crust is golden brown and the cheese is bubbly and irresistible.
- Garnish and Serve: Once it’s out of the oven, let it cool just slightly. Then, scatter some fresh basil leaves over the top for a pop of color and freshness. Get ready for everyone to cheer!
Substitutions & Additions
This recipe is wonderfully forgiving, so feel free to play around! Here are a few ideas:
- Cheese Swap: If you’re not a mozzarella fan, try a blend of cheddar and Monterey Jack for a different flavor. A little ricotta dolloped on top before baking can add extra creaminess.
- Veggie Power: Finely chopped bell peppers, onions, or mushrooms can be stirred into the sauce mixture for added veggies. Just make sure they’re chopped small so they cook through nicely.
- Meat Lovers: Cooked and crumbled sausage or tiny bits of ham would be delicious additions to the sauce mixture.
- Spice it Up: A pinch of red pepper flakes in the sauce mixture can add a little warmth for those who like a bit of heat.
- Dipping Sauces: Serve with extra pizza sauce, ranch dressing, or even a garlic butter dip for extra flavor.
Tips for Success
A few little pointers to make your Christmas Tree Pizza absolutely perfect:
- Don’t Overcrowd: While you want the pieces to touch to form the tree, make sure there’s a little breathing room so they bake evenly and don’t get gummy.
- Parchment Paper is Your Friend: I can’t stress this enough! It prevents sticking and makes cleanup a dream.
- Watch the Oven: Ovens can be quirky! Keep an eye on your pizza tree towards the end of the baking time to ensure it gets perfectly golden, not burnt.
- Prep Ahead: You can mix the sauce and cheese mixture a few hours ahead of time and keep it covered in the fridge. You can also cut the pizza dough pieces and store them in an airtight container in the fridge for a few hours. Just assemble and bake when you’re ready!
How to Store It
Leftovers (if there are any!) can be stored in an airtight container in the refrigerator for up to 2-3 days. To reheat, you can pop individual pieces or the whole tree back into a 350°F (175°C) oven for about 5-10 minutes until warmed through and slightly crisp again. Honestly though, this is best enjoyed fresh!
FAQs
Q: Can I make this ahead of time?
A: You can prepare the sauce mixture and cut the dough pieces ahead of time and store them separately in the fridge. Assemble and bake just before you plan to serve for the best results.
Q: What kind of pizza sauce should I use?
A: Any good quality jarred pizza sauce you enjoy will work perfectly! Homemade is great too, if you have a favorite recipe.
Q: Can I use a different type of cheese?
A: Absolutely! While mozzarella gives that classic pizza pull, a blend of cheddar, provolone, or even a sprinkle of Gruyère would be delicious.
Q: How big is this pizza tree?
A: This recipe makes a medium-sized tree, perfect for an appetizer for about 4-6 people, or as a fun snack for a larger group. You can easily double it for a bigger crowd!
Christmas Tree Pull-Apart Pizza

A fun and easy holiday appetizer made with refrigerated pizza crust, cheese, sauce, and pepperoni arranged in a festive Christmas tree shape.
- Baking Sheet
- Parchment paper
- Medium bowl
- Small bowl
- Whisk
- Pastry brush
Main ingredients
- 2 cans refrigerated pizza crust (7.8 oz each)
- 1.5 cups shredded mozzarella cheese
- 1.5 cups pizza sauce (Your favorite jarred sauce)
- 20 slices pepperoni
- 3 tablespoons unsalted butter (melted)
- 0.5 teaspoon garlic powder
- 0.5 teaspoon Italian seasoning
- 2 tablespoons grated Parmesan cheese
- fresh basil (for garnish)
- Preheat your oven to 400°F (200°C). Line a baking sheet with parchment paper.
- Gently unroll the cans of pizza crust and cut each one into 12 equal pieces.
- In a medium bowl, combine the shredded mozzarella cheese, pizza sauce, and pepperoni slices. Stir gently.
- In a separate small bowl, whisk together the melted butter, garlic powder, and Italian seasoning.
- Spread the sauce mixture evenly over the pizza crust pieces.
- Arrange the sauced-up pizza crust pieces on the prepared baking sheet, starting with a wide base and working upwards to form a Christmas tree shape.
- Brush the garlic and herb butter mixture generously over the top of the pizza tree.
- Sprinkle the grated Parmesan cheese over the tree.
- Bake for 15-20 minutes, or until the crust is golden brown and the cheese is bubbly.
- Let cool slightly, then garnish with fresh basil leaves and serve.
Leftovers can be stored in an airtight container in the refrigerator for up to 2-3 days. Reheat in a 350°F (175°C) oven for 5-10 minutes.