Introduction
Remember those chilly autumn evenings, the scent of something warm and comforting filling the air? That’s the feeling these Cranberry Turkey Hand Pies bring! They’re like a little hug in a flaky crust, perfect for a quick weeknight dinner or a delightful afternoon snack. I’ve made these more times than I can count, and they always disappear in a flash. You’re going to love how simple they are to whip up, making a satisfying meal or a thoughtful treat without any fuss.
Why You’ll Love This Recipe
- Fast: Ready in under an hour from start to finish!
- Easy: Perfect for beginners with simple steps and common ingredients.
- Giftable: Wrap them up for a delicious homemade present that shows you care.
- Crowd-pleasing: A delightful twist on familiar flavors that everyone will enjoy.
Ingredients
Gathering your ingredients is half the fun! Here’s what you’ll need to make these yummy hand pies:
For the Filling:
- 1 tablespoon olive oil: Just enough to get things sizzling.
- 1 pound ground turkey: A leaner, delicious base for our savory filling.
- 1 small onion, diced: It adds a lovely sweetness and depth.
- 2 cloves garlic, minced: Because everything is better with a little garlic!
- 1 teaspoon dried sage: A classic herb that sings with turkey.
- 1 teaspoon dried thyme: Earthy and aromatic, it’s a perfect partner to sage.
- ½ teaspoon salt: To bring out all those wonderful flavors.
- ¼ teaspoon black pepper: For a gentle kick.
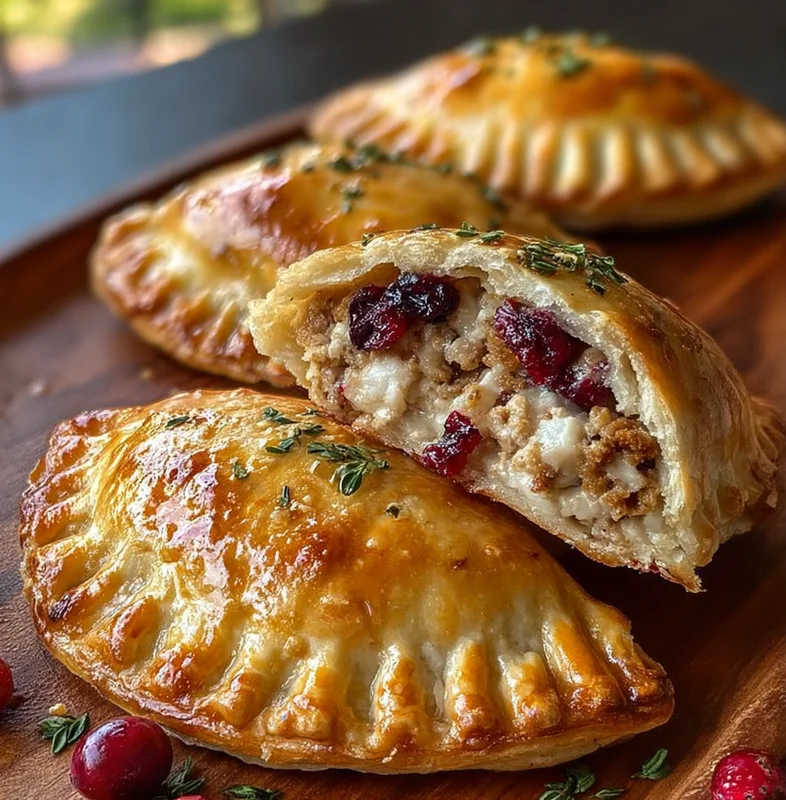
- ½ cup dried cranberries: These little gems add a delightful tartness and a touch of sweetness.
- ¼ cup chicken broth: To keep our filling moist and flavorful.
- 2 tablespoons fresh parsley, chopped: A pop of freshness to brighten everything up.
For the Crust:
- 2 refrigerated pie crusts: The ultimate shortcut for flaky, golden goodness!
- 1 egg, beaten: This is our magical egg wash to give those crusts a beautiful shine.
How to Make It
Alright, let’s get cooking! Grab your apron, and let’s make some magic happen in the kitchen.
Step 1: Prepare the Flavorful Filling
First things first, let’s get that delicious turkey filling going. Heat your olive oil in a skillet over medium heat. Toss in the ground turkey and cook it up, breaking it apart with your spoon until it’s nice and browned. Don’t forget to drain off any extra fat – we want pure flavor!
Step 2: Sauté the Aromatics
Now, add your diced onion to the skillet. Let it cook until it’s nice and soft, which usually takes about 5 minutes. Then, stir in that minced garlic, along with the dried sage, thyme, salt, and pepper. Cook for just another minute until everything smells wonderfully fragrant. Oh, the aromas!
Step 3: Simmer and Soften
Time for the stars of our filling: the dried cranberries! Add them to the skillet along with the chicken broth. Bring it all to a gentle simmer and let it cook for about 5 minutes. You want most of that liquid to evaporate and those cranberries to get nice and plump. Once that’s done, stir in your fresh parsley. Remove the skillet from the heat and let that glorious filling cool down just a bit. This is important so it doesn’t make our pie crusts too soft.
Step 4: Assemble Your Hand Pies
Preheat your oven to 375°F (190°C). While it’s heating up, line a baking sheet with parchment paper – this makes cleanup a breeze!
Unroll those ready-made pie crusts. You’re going to cut each one into four equal circles. Think of them as little canvases for our delicious filling!
Now, spoon about 2 tablespoons of that cooled turkey filling onto one half of each pie crust circle. Make sure to leave a little ½-inch border all around. This gives us room to seal them up tight.
Gently fold the other half of the pie crust over the filling to create a perfect half-moon shape. Use a fork to press down and crimp the edges. This seals in all that yummy goodness!
Carefully place your assembled hand pies onto the prepared baking sheet. And here’s a little trick: cut a few small slits in the top of each one. This helps the steam escape as they bake, so they get nice and puffy!
Step 5: The Golden Touch
Now for the final flourish! Brush the tops of your hand pies with the beaten egg wash. This is what gives them that beautiful, golden-brown, irresistible finish.
Step 6: Bake to Perfection
Pop those beauties into your preheated oven and bake for 20-25 minutes. You’re looking for that crust to be a gorgeous golden brown and the filling to be nice and hot. Once they’re done, let them cool just a little bit before you dive in. Patience, my friends, is a virtue, especially when deliciousness awaits!
Substitutions & Additions
These hand pies are fantastic as is, but I always love a chance to get creative! Feel free to:
- Swap the Turkey: Ground chicken or even finely chopped cooked chicken works wonderfully here.
- Veggie Boost: Add some finely diced celery or carrots along with the onion for extra nutrition and flavor.
- Cheesy Delight: A tablespoon or two of shredded cheddar cheese mixed into the filling before assembling is a game-changer for some!
- Spice it Up: If you like a little heat, a pinch of red pepper flakes in the filling is a nice touch.
- Herb Variations: Rosemary or marjoram can be lovely substitutes for sage or thyme.
Tips for Success
Here are a few little secrets from my kitchen to yours to ensure your hand pies turn out perfectly every time:
- Cool the Filling: I can’t stress this enough! A cooled filling prevents the bottom crust from getting soggy.
- Don’t Overfill: Too much filling can make it hard to seal the pies and might lead to leaks.
- Seal Those Edges: A good crimp with the fork ensures your filling stays put during baking.
- Prep Ahead: You can make the turkey filling a day in advance and store it in the refrigerator. Just let it come to room temperature slightly before assembling.
- Egg Wash is Key: Don’t skip the egg wash! It’s what gives you that beautiful, appetizing sheen.
How to Store It
These hand pies are best enjoyed fresh, but if you happen to have any leftovers (which is rare in my house!), they store beautifully. Let them cool completely, then place them in an airtight container. They’ll stay delicious in the refrigerator for up to 3 days. To reheat, pop them back in a 350°F (175°C) oven for about 5-10 minutes until warmed through and the crust is crisp again.
FAQs
Can I make the filling ahead of time?
Absolutely! The filling can be made up to 2 days in advance and stored in an airtight container in the refrigerator. Just let it warm up slightly before assembling your pies.
Can I freeze these hand pies?
Yes, you can! Assemble them but don’t bake them. Place them on a baking sheet and freeze until solid, then transfer them to a freezer-safe bag. Bake from frozen, adding a few extra minutes to the baking time.
Are these suitable for kids?
Definitely! The flavors are mild and comforting, and the hand pie format is perfect for little hands. You might want to ensure the filling isn’t too hot when serving.
What can I serve with Cranberry Turkey Hand Pies?
They are wonderful on their own, but they also pair beautifully with a simple green salad, some roasted vegetables, or a dollop of cranberry sauce for an extra festive touch!
PrintCranberry Turkey Hand Pies

Cozy Cranberry Turkey Hand Pies are a delicious and easy comfort food, perfect for a quick weeknight dinner or an afternoon snack. They feature a savory ground turkey and cranberry filling encased in a flaky pie crust, baked to golden perfection.
- Prep Time: 20 minutes
- Cook Time: 30 minutes
- Total Time: 50 minutes
- Yield: 8 pies
- : Lara
Ingredients
For the Filling
- 1 tablespoon olive oil (Just enough to get things sizzling.)
- 1 pound ground turkey (A leaner, delicious base for our savory filling.)
- 1 small onion (diced. It adds a lovely sweetness and depth.)
- 2 cloves garlic (minced. Because everything is better with a little garlic!)
- 1 teaspoon dried sage (A classic herb that sings with turkey.)
- 1 teaspoon dried thyme (Earthy and aromatic, it’s a perfect partner to sage.)
- 0.5 teaspoon salt (To bring out all those wonderful flavors.)
- 0.25 teaspoon black pepper (For a gentle kick.)
- 0.5 cup dried cranberries (These little gems add a delightful tartness and a touch of sweetness.)
- 0.25 cup chicken broth (To keep our filling moist and flavorful.)
- 2 tablespoons fresh parsley (chopped. A pop of freshness to brighten everything up.)
For the Crust
- 2 refrigerated pie crusts (The ultimate shortcut for flaky, golden goodness!)
- 1 egg (beaten. This is our magical egg wash to give those crusts a beautiful shine.)
Instructions
- Heat your olive oil in a skillet over medium heat. Toss in the ground turkey and cook it up, breaking it apart with your spoon until it’s nice and browned. Don’t forget to drain off any extra fat – we want pure flavor!
- Now, add your diced onion to the skillet. Let it cook until it’s nice and soft, which usually takes about 5 minutes. Then, stir in that minced garlic, along with the dried sage, thyme, salt, and pepper. Cook for just another minute until everything smells wonderfully fragrant. Oh, the aromas!
- Time for the stars of our filling: the dried cranberries! Add them to the skillet along with the chicken broth. Bring it all to a gentle simmer and let it cook for about 5 minutes. You want most of that liquid to evaporate and those cranberries to get nice and plump. Once that’s done, stir in your fresh parsley. Remove the skillet from the heat and let that glorious filling cool down just a bit. This is important so it doesn’t make our pie crusts too soft.
- Preheat your oven to 375°F (190°C). While it’s heating up, line a baking sheet with parchment paper – this makes cleanup a breeze!
- Unroll those ready-made pie crusts. You’re going to cut each one into four equal circles. Think of them as little canvases for our delicious filling!
- Now, spoon about 2 tablespoons of that cooled turkey filling onto one half of each pie crust circle. Make sure to leave a little ½-inch border all around. This gives us room to seal them up tight.
- Gently fold the other half of the pie crust over the filling to create a perfect half-moon shape. Use a fork to press down and crimp the edges. This seals in all that yummy goodness!
- Carefully place your assembled hand pies onto the prepared baking sheet. And here’s a little trick: cut a few small slits in the top of each one. This helps the steam escape as they bake, so they get nice and puffy!
- Now for the final flourish! Brush the tops of your hand pies with the beaten egg wash. This is what gives them that beautiful, golden-brown, irresistible finish.
- Pop those beauties into your preheated oven and bake for 20-25 minutes. You’re looking for that crust to be a gorgeous golden brown and the filling to be nice and hot. Once they’re done, let them cool just a little bit before you dive in. Patience, my friends, is a virtue, especially when deliciousness awaits!
Notes
These hand pies are best enjoyed fresh, but leftovers can be stored in an airtight container in the refrigerator for up to 3 days. Reheat in a 350°F oven for 5-10 minutes. The filling can be made up to 2 days in advance. You can also freeze assembled, unbaked hand pies for later baking.