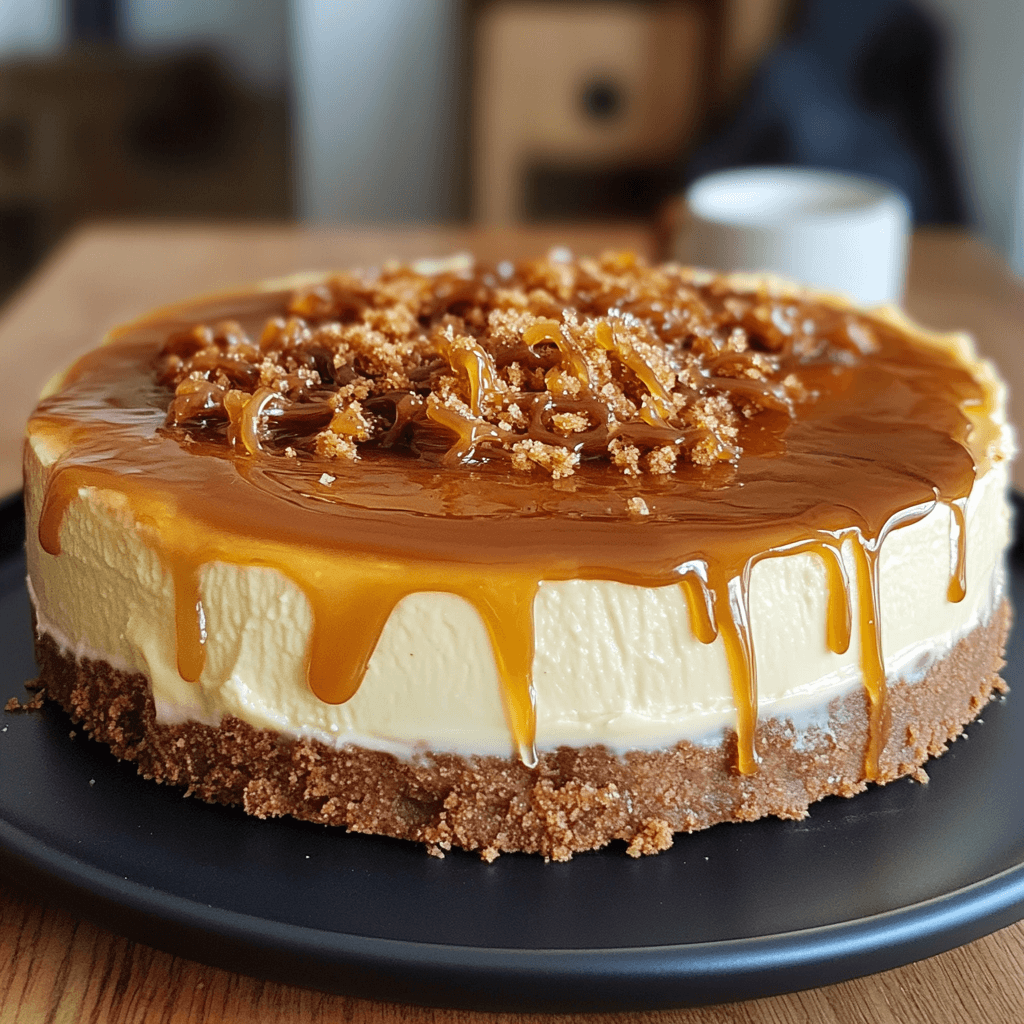
If you’re looking for a show-stopping dessert that combines the richness of a classic cheesecake with the beloved flavors of South Africa’s Milk Tart, then Creamy Milk Tart Cheesecake with a Salted Caramel Drizzle is the perfect treat to satisfy your sweet tooth. This indulgent dessert features a smooth and velvety cheesecake filling, with hints of cinnamon and nutmeg, layered on top of a buttery digestive biscuit crust. To top it off, a decadent salted caramel drizzle adds just the right balance of sweet and salty flavors, elevating the entire dish.
Not only is this cheesecake mouth-wateringly delicious, but it also presents beautifully for any occasion, from family gatherings to formal dinners. Read on to discover why this dessert should be your next baking adventure, what you’ll need to make it, step-by-step instructions, and helpful tips for perfecting it!

Why You’ll Love This Creamy Milk Tart Cheesecake with a Salted Caramel Drizzle
This Creamy Milk Tart Cheesecake with a Salted Caramel Drizzle is an irresistible dessert that combines the best of two worlds—creamy, rich cheesecake and the comforting, familiar flavors of a traditional Milk Tart. Here’s why you’re going to love it:
- A Heavenly Combination of Flavors: The creamy and smooth cheesecake filling brings together the warm, spiced flavors of cinnamon and nutmeg, reminiscent of a classic Milk Tart. The addition of a salted caramel drizzle takes it to the next level, offering a perfect balance of sweetness and a touch of savory saltiness.
- Decadent Yet Light: Despite its richness, the cheesecake filling is light and fluffy, thanks to the condensed milk and cornstarch. It’s smooth and velvety, not too dense, making it a delightful treat after a heavy meal.
- Show-Stopping Presentation: This dessert is as visually stunning as it is delicious. The golden caramel drizzle cascading down the sides of the cheesecake and the crumbly, buttery crust make for an impressive dish that will certainly wow your guests.
- Perfect for Any Occasion: Whether you’re preparing a special dessert for a holiday, birthday, or dinner party, this cheesecake is sure to be a crowd-pleaser. It’s sophisticated, yet easy enough to make at home, giving you the best of both worlds.
- Easy to Make: The combination of simple ingredients and easy-to-follow instructions ensures that even beginner bakers can tackle this dessert with confidence. The process is straightforward, with minimal prep work involved.
What You’ll Need
Before you begin, make sure you have all the ingredients ready. This dessert requires three main components: the crust, the cheesecake filling, and the salted caramel drizzle. Here’s the full list:
For the Crust:
- 1 1/2 cups crushed digestive biscuits (or graham crackers)
- 1/2 cup melted butter
- 1/4 cup sugar
For the Cheesecake Filling:
- 500g cream cheese, softened
- 1 cup condensed milk
- 1/2 cup milk
- 1 teaspoon vanilla extract
- 3 large eggs
- 1/4 cup cornstarch
For the Salted Caramel Drizzle:
- 1/2 cup sugar
- 2 tablespoons butter
- 1/4 cup cream
- Pinch of sea salt

Step-by-Step Instructions
Step 1: Prepare the Crust
Start by preheating your oven to 325°F (165°C). Line the bottom of a 9-inch springform pan with parchment paper, and lightly grease the sides with cooking spray or butter.
To make the crust, combine the crushed digestive biscuits (or graham crackers), melted butter, and sugar in a bowl. Mix until the crumbs are evenly coated and the mixture resembles wet sand. Press this mixture into the bottom of your prepared pan, ensuring it’s tightly packed and even. Use the back of a spoon to gently press the crumbs down.
Place the crust in the preheated oven and bake for 10-12 minutes, or until it’s golden and firm. After baking, remove it from the oven and set it aside to cool while you prepare the cheesecake filling.
Step 2: Prepare the Cheesecake Filling
In a large mixing bowl, beat the softened cream cheese with an electric mixer until it’s smooth and creamy. Add the condensed milk, milk, and vanilla extract, and continue mixing until well combined.
Next, add the eggs one at a time, beating well after each addition. Once all the eggs are incorporated, sift the cornstarch directly into the mixture. Beat until the filling is smooth and lump-free.
Pour the cheesecake filling into the cooled crust, smoothing the top with a spatula. Tap the pan gently on the counter to release any air bubbles.
Step 3: Bake the Cheesecake
Place the cheesecake in the oven and bake for 45-50 minutes, or until the edges are set but the center is still slightly jiggly. If the top begins to brown too quickly, cover it loosely with aluminum foil to prevent burning.
Once the cheesecake is baked, turn off the oven and leave the cheesecake inside for an additional hour with the oven door slightly ajar. This helps the cheesecake cool gradually and reduces the likelihood of cracking. After this time, remove the cheesecake from the oven and allow it to cool to room temperature.
Once cooled, transfer the cheesecake to the refrigerator and chill for at least 4 hours, or preferably overnight. This will help the cheesecake set perfectly.
Step 4: Make the Salted Caramel Drizzle
While the cheesecake is chilling, it’s time to make the salted caramel drizzle. In a medium saucepan, heat the sugar over medium heat. Stir the sugar constantly as it begins to melt and turn into a golden amber color. Be careful not to burn the sugar.
Once the sugar has completely melted, add the butter and stir until fully melted and combined. Then, slowly pour in the cream, stirring continuously. Let the mixture simmer for about 2-3 minutes, until it thickens slightly.
Remove the saucepan from the heat and stir in a pinch of sea salt. Allow the caramel to cool slightly before drizzling it over the cheesecake.
Step 5: Drizzle the Caramel and Serve
Once the cheesecake has chilled and the caramel has cooled slightly, carefully remove the cheesecake from the springform pan and place it on a serving platter. Drizzle the salted caramel over the top of the cheesecake, allowing it to cascade down the sides for a dramatic effect.
Slice and serve the cheesecake immediately, or store it in the refrigerator until ready to serve.

Tips for Success
- Softening Cream Cheese: Ensure that the cream cheese is softened to room temperature before mixing. Cold cream cheese can result in lumps and make it difficult to achieve a smooth filling.
- Prevent Cracking: To avoid cracks in your cheesecake, bake it at a lower temperature, and don’t open the oven door during the first 45 minutes of baking. Cooling the cheesecake gradually in the oven helps prevent cracks as well.
- Cornstarch Tip: Be sure to sift the cornstarch into the batter. This ensures there are no lumps and helps create a smooth and creamy texture in the filling.
- Chill the Cheesecake: The cheesecake needs time to set and cool. It’s essential to chill it for at least 4 hours or overnight to achieve the perfect texture.
- Make Extra Caramel Sauce: You can make extra salted caramel sauce and store it in the refrigerator for later use. It’s great drizzled over ice cream, pancakes, or other desserts!
Variations to Try
While the Creamy Milk Tart Cheesecake with a Salted Caramel Drizzle is a standout recipe on its own, here are a few fun variations you can try to customize this dessert to your taste:
- Add Spices to the Filling: To enhance the milk tart flavor, you can add a pinch of ground cinnamon and nutmeg to the cheesecake filling. These spices will add warmth and depth to the flavor, reminiscent of a traditional Milk Tart.
- Chocolate Drizzle: If you’re a chocolate lover, substitute the salted caramel drizzle with a rich chocolate ganache or chocolate syrup for a different twist.
- Fruit Topping: Top the cheesecake with fresh fruits like berries or sliced peaches for a refreshing contrast to the creamy and caramel flavors.
- Nutty Crust: Add some chopped nuts, like almonds or pecans, to the crust for an extra crunch and flavor that pairs beautifully with the creamy cheesecake filling.
- Almond Extract: Swap out the vanilla extract for almond extract in the filling for a unique flavor that complements the caramel sauce.
Storing and Reheating
- Storing: Once your cheesecake is fully set, store it in the refrigerator, covered, for up to 5 days. The caramel sauce can also be stored in an airtight container in the refrigerator for up to a week.
- Freezing: You can freeze the cheesecake for up to 3 months. For best results, wrap the cheesecake tightly in plastic wrap, followed by aluminum foil, before freezing. Thaw the cheesecake overnight in the fridge before serving.
- Reheating the Caramel: If your salted caramel drizzle hardens in the fridge, simply reheat it gently in the microwave or over low heat until it’s pourable again.
Frequently Asked Questions
Can I make this cheesecake without a springform pan? Yes, you can use a regular round cake pan or even a square pan. Just make sure the pan is lined with parchment paper or greased to help remove the cheesecake once it’s set.
Can I make the cheesecake ahead of time? Yes! In fact, this cheesecake is even better when made ahead of time, as it allows the flavors to set and develop. Make it a day or two in advance for the best results.
Can I use a different type of biscuit for the crust? Yes, you can substitute digestive biscuits with graham crackers, ginger snaps, or any other similar cookies for a slightly different flavor in the crust.

The Final Word
The Creamy Milk Tart Cheesecake with a Salted Caramel Drizzle is a dessert that brings together the smooth, velvety goodness of cheesecake with the warm, comforting flavors of Milk Tart, topped off with the indulgent sweetness of salted caramel. It’s an absolute showstopper that is sure to impress at any gathering or celebration. The texture is light and fluffy, and the combination of flavors is simply divine.
With easy-to-follow steps, helpful tips, and a little patience while the cheesecake chills, you’ll create a dessert that’s worthy of any special occasion. Whether you’re sharing it with loved ones or indulging in it yourself, this cheesecake will quickly become a favorite in your dessert repertoire. Happy baking!