Introduction
Hey friend! Ever get a craving for something warm, savory, and utterly comforting? Something that feels like a hug in bun form? That’s exactly how I feel about these amazing Vegan Pan-Fried Buns! They bring back memories of cozy kitchen days, filling my home with the most delicious smells.
Forget complicated recipes! These pan-fried beauties are surprisingly simple to make, even if you’ve never worked with yeast before. We’re talking fluffy dough that gets wonderfully crispy on the bottom, wrapped around a vibrant, flavorful vegetable filling. They’re perfect for a weekend project, a fun dinner, or even a packed lunch. Trust me, once you make these, they’ll become a regular in your rotation!
Why You’ll Love This Recipe
- Fast(ish): Thanks to instant yeast and pan-frying, they come together quicker than traditional steamed buns.
- Easy: Simple ingredients, straightforward steps. Perfect for beginners!
- Giftable: Share a batch with friends or family – they’ll be SO impressed.
- Crowd-pleasing: Even non-vegans rave about these savory pockets of goodness!

Ingredients
- 3 cups All-purpose flour: Your basic pantry staple for soft, pliable dough.
- 2 1/2 tsp Salt: Essential for flavor in both the dough and the filling.
- 2 tbsp Sugar: Just a touch to help activate the yeast and add slight sweetness.
- 2 tsp Instant dry yeast: The magical stuff that makes our buns light and airy!
- 1 cup Soy milk: Or your favorite plant-based milk, warmed slightly. It brings the dough together.
- 6 cups Raw cabbage: Finely shredded. This is the base of our crunchy, delicious filling.
- 1 cup Carrot: Grated for sweetness and color.
- 1/2 cup Scallions or chives: Finely chopped for a fresh, oniony kick.
- 1 (3.5 oz) bundle uncooked Vermicelli noodles: Those thin, clear noodles. They absorb flavor beautifully and add great texture.
- 1 tbsp Soy sauce: Adds that essential umami depth to the filling.
- 2 tbsp Roasted sesame seed: For nutty flavor and a little crunch.
- 1 tbsp Neutral oil: For sautéing the filling just a little.
- 3 tbsp Toasted sesame oil: The finishing touch! Drizzled over the filling, it adds incredible aroma and taste.
How to Make It
Okay, let’s get our hands doughy! Making these buns is a fun process, and you’ll feel like a kitchen wizard when you’re done.
Step 1: Make the Dough. In a large bowl, whisk together the flour, salt, sugar, and instant dry yeast. Gently warm your soy milk (not too hot, just lukewarm – think bathwater temp!). Pour the warm milk into the dry ingredients and stir with a spoon or spatula until a shaggy dough forms. Turn it out onto a lightly floured surface and knead for about 5-7 minutes until it’s smooth and elastic. It should bounce back when you poke it. Place the dough back in the bowl, cover it with a clean kitchen towel or plastic wrap, and let it rest in a warm spot for about 30-45 minutes while you make the filling. It should puff up nicely.
Step 2: Prep the Filling. While the dough is resting, get your filling ready. Soak the vermicelli noodles in hot water according to package directions until softened, then drain and chop them into smaller pieces. In a large bowl, combine the shredded cabbage, grated carrot, and chopped scallions. In a small pan, heat the neutral oil over medium heat. Add the chopped vermicelli noodles, soy sauce, and roasted sesame seeds. Stir-fry for just a minute or two to combine the flavors. Add this mixture to the bowl with the veggies. Drizzle the toasted sesame oil over everything and mix it all together really well. You can taste it here and add a pinch more salt if you like.
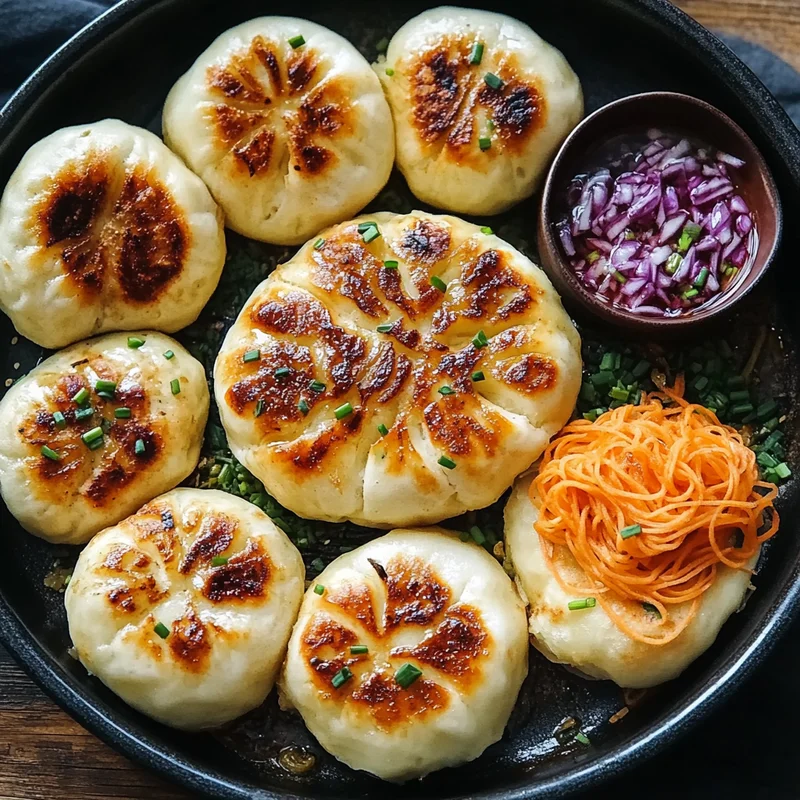
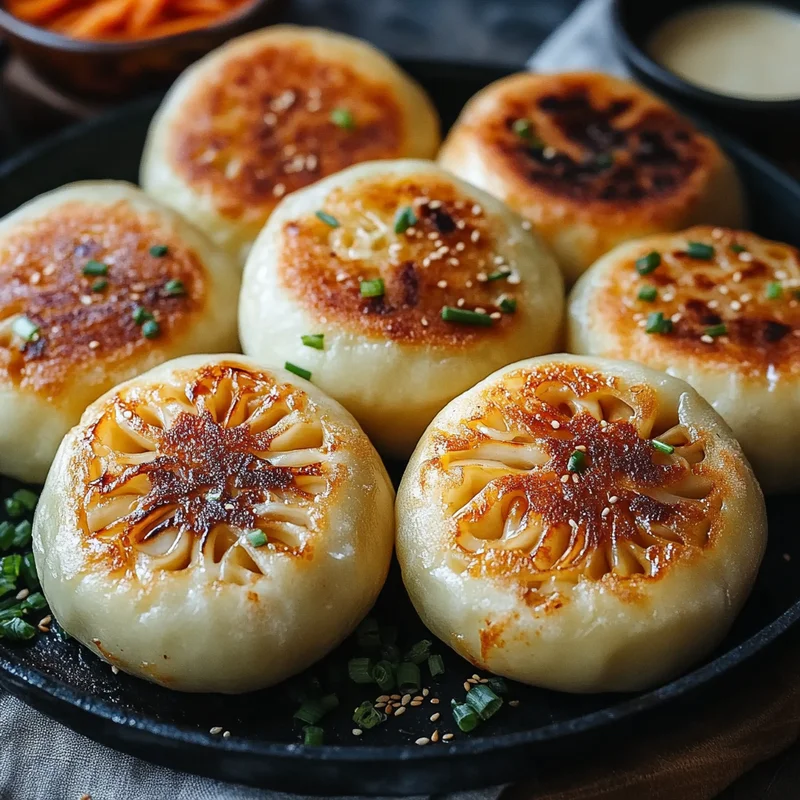
Step 3: Assemble the Buns. Your dough should be nicely rested now. Punch it down gently and turn it out onto your lightly floured surface again. Divide the dough into equal pieces – aim for 8-12 depending on how big you want your buns. Roll each piece into a ball. Now, flatten each ball into a circle about 4-5 inches in diameter, thicker in the center and thinner around the edges (like a little dumpling wrapper). Place a generous spoonful of filling in the center of each dough circle. Gather the edges of the dough up and pinch them together to seal, forming a bun shape. You can make a simple pleat or just pinch firmly to close. Make sure there are no gaps!
Step 4: Pan-Fry Those Beauties! Heat a few tablespoons of neutral oil in a large non-stick skillet over medium heat. Carefully place the buns in the hot oil, seam-side up initially (or down, it doesn’t strictly matter but seam-up looks nice when browned first). Cook for 3-5 minutes, until the bottoms are golden brown and crispy. Now, carefully pour about 1/2 cup of water into the skillet (be careful, it will steam!). Immediately cover the skillet with a lid and let the buns steam for about 8-10 minutes, or until the dough is cooked through and the water has evaporated. Remove the lid and let them fry for another minute or two if needed to ensure the bottoms are super crispy. Serve hot!
Substitutions & Additions
- Veggies: Feel free to swap or add other finely chopped veggies like mushrooms, spinach (wilt first and squeeze dry), bell peppers, or corn.
- Noodles: Rice noodles or even finely chopped rehydrated shiitake mushrooms could work instead of vermicelli.
- Protein: Add crumbled firm tofu or plant-based ground for extra heartiness.
- Flavor Boosts: Include grated fresh ginger, minced garlic, a pinch of white pepper, or a dash of rice vinegar in the filling.
- Dipping Sauce: While delicious on their own, these are amazing dipped in soy sauce, rice vinegar, chili oil, or a mix of all three!
Tips for Success
- Don’t Overfill: It’s tempting, but too much filling makes sealing difficult and can cause buns to burst while cooking.
- Seal Them Well: Pinch the edges tightly to prevent the filling from escaping during steaming and frying.
- Proper Heat: Make sure the oil is hot enough to get a good sear before adding water for steaming.
- Resting Time: Don’t skip the dough resting time – it’s crucial for texture.
- Prep Ahead: You can make the filling a day in advance and store it in the fridge.
How to Store It
- Fridge: Cooked pan-fried buns can be stored in an airtight container in the refrigerator for up to 3-4 days.
- Freezer: Once completely cool, you can freeze them in a single layer on a tray until solid, then transfer to a freezer-safe bag or container. They’ll keep for up to 2-3 months.
- Reheating: Reheat from the fridge in a skillet over medium heat until warmed through and the bottom crisps up again. Reheat from frozen in a skillet (might take a bit longer) or steam them.
FAQs
- Can I use whole wheat flour? You can substitute some, but using all whole wheat might result in a denser bun. I recommend starting with a mix if you want to try it.
- My dough isn’t rising. What’s wrong? Your yeast might be old, or the milk wasn’t the right temperature (too hot can kill it, too cold won’t activate it). Ensure your yeast is fresh and your liquid is lukewarm.
- Can I bake these instead of pan-frying? These are specifically designed for the pan-fry method to get that crispy bottom. Baking won’t give you the same texture. You could try steaming them for a softer bun!
- Is this recipe gluten-free? As written, no, because it uses all-purpose flour. You would need to adapt it significantly using a gluten-free flour blend and ensuring other ingredients are GF.
Crispy & Cozy Vegan Pan-Fried Veggie Buns
These Vegan Pan-Fried Buns are a warm, savory, and comforting dish. Surprisingly simple to make, even for beginners, they feature fluffy dough with a crispy bottom wrapped around a vibrant vegetable filling. They are quicker than traditional steamed buns and perfect for dinner, lunch, or sharing.
- Large bowl
- Small pan
- Large non-stick skillet
- Lid for skillet
- Clean kitchen towel or plastic wrap
- Spoon or spatula
Dough
- 3 cup All-purpose flour (Your basic pantry staple for soft, pliable dough.)
- 2.5 tsp Salt (Essential for flavor in both the dough and the filling.)
- 2 tbsp Sugar (Just a touch to help activate the yeast and add slight sweetness.)
- 2 tsp Instant dry yeast (The magical stuff that makes our buns light and airy!)
- 1 cup Soy milk (Or your favorite plant-based milk, warmed slightly. It brings the dough together.)
Filling
- 6 cup Raw cabbage (Finely shredded. This is the base of our crunchy, delicious filling.)
- 1 cup Carrot (Grated for sweetness and color.)
- 0.5 cup Scallions or chives (Finely chopped for a fresh, oniony kick.)
- 1 bundle Uncooked Vermicelli noodles (Those thin, clear noodles. They absorb flavor beautifully and add great texture. (3.5 oz))
- 1 tbsp Soy sauce (Adds that essential umami depth to the filling.)
- 2 tbsp Roasted sesame seed (For nutty flavor and a little crunch.)
- 1 tbsp Neutral oil (For sautéing the filling just a little.)
- 3 tbsp Toasted sesame oil (The finishing touch! Drizzled over the filling, it adds incredible aroma and taste.)
- Make the Dough: In a large bowl, whisk together the flour, salt, sugar, and instant dry yeast. Gently warm your soy milk (not too hot, just lukewarm – think bathwater temp!). Pour the warm milk into the dry ingredients and stir with a spoon or spatula until a shaggy dough forms. Turn it out onto a lightly floured surface and knead for about 5-7 minutes until it’s smooth and elastic. It should bounce back when you poke it. Place the dough back in the bowl, cover it with a clean kitchen towel or plastic wrap, and let it rest in a warm spot for about 30-45 minutes while you make the filling. It should puff up nicely.
- Prep the Filling: While the dough is resting, get your filling ready. Soak the vermicelli noodles in hot water according to package directions until softened, then drain and chop them into smaller pieces. In a large bowl, combine the shredded cabbage, grated carrot, and chopped scallions. In a small pan, heat the neutral oil over medium heat. Add the chopped vermicelli noodles, soy sauce, and roasted sesame seeds. Stir-fry for just a minute or two to combine the flavors. Add this mixture to the bowl with the veggies. Drizzle the toasted sesame oil over everything and mix it all together really well. You can taste it here and add a pinch more salt if you like.
- Assemble the Buns: Your dough should be nicely rested now. Punch it down gently and turn it out onto your lightly floured surface again. Divide the dough into equal pieces – aim for 8-12 depending on how big you want your buns. Roll each piece into a ball. Now, flatten each ball into a circle about 4-5 inches in diameter, thicker in the center and thinner around the edges (like a little dumpling wrapper). Place a generous spoonful of filling in the center of each dough circle. Gather the edges of the dough up and pinch them together to seal, forming a bun shape. You can make a simple pleat or just pinch firmly to close. Make sure there are no gaps!
- Pan-Fry Those Beauties! Heat a few tablespoons of neutral oil in a large non-stick skillet over medium heat. Carefully place the buns in the hot oil, seam-side up initially (or down, it doesn’t strictly matter but seam-up looks nice when browned first). Cook for 3-5 minutes, until the bottoms are golden brown and crispy. Now, carefully pour about 1/2 cup of water into the skillet (be careful, it will steam!). Immediately cover the skillet with a lid and let the buns steam for about 8-10 minutes, or until the dough is cooked through and the water has evaporated. Remove the lid and let them fry for another minute or two if needed to ensure the bottoms are super crispy. Serve hot!
Tips for Success:
– Don’t Overfill: It’s tempting, but too much filling makes sealing difficult and can cause buns to burst while cooking.
– Seal Them Well: Pinch the edges tightly to prevent the filling from escaping during steaming and frying.
– Proper Heat: Make sure the oil is hot enough to get a good sear before adding water for steaming.
– Resting Time: Don’t skip the dough resting time – it’s crucial for texture.
– Prep Ahead: You can make the filling a day in advance and store it in the fridge.
How to Store It:
– Fridge: Cooked pan-fried buns can be stored in an airtight container in the refrigerator for up to 3-4 days.
– Freezer: Once completely cool, you can freeze them in a single layer on a tray until solid, then transfer to a freezer-safe bag or container. They’ll keep for up to 2-3 months.
– Reheating: Reheat from the fridge in a skillet over medium heat until warmed through and the bottom crisps up again. Reheat from frozen in a skillet (might take a bit longer) or steam them.