Introduction
Oh, friend, do you ever just crave something sweet, something satisfying, but also something you don’t have to feel too guilty about? And maybe, just maybe, something so fun and simple that even the little ones can help out? Well, let me tell you about my latest obsession: Banana Sushi! Forget complicated rolling and raw fish (unless you’re into that, which is cool too!). This is dessert sushi, snack sushi, pure happiness sushi. It’s incredibly easy, takes minutes to assemble, and I promise, it’s going to become a regular request in your house. We’re making THREE delicious variations today – one for peanut butter lovers, one for berry fans, and one for chocolate aficionados. Get ready to make some sweet memories!
Why You’ll Love This Recipe
Seriously, what’s not to love? Let’s break it down:
- Fast: We’re talking under 10 minutes, start to finish.
- Easy: Can you spread and roll? Great, you can make this!
- Giftable: Package them up for a unique treat or lunchbox surprise.
- Crowd-pleasing: There’s a flavor for everyone, and kids especially go wild for them!
Ingredients
Gathering your ingredients is the first fun step! You likely have most of these on hand already. Here’s what you’ll need for our banana sushi adventure:
Common Base:
- 1 taco-size flour tortilla (or gluten-free): This is our “seaweed” wrap! Choose a soft, pliable one. Gluten-free works perfectly too!
- 1 ripe but firm banana, peeled: The star of our show! You want one that’s yellow with just a few spots – easy to peel but still holds its shape when sliced.
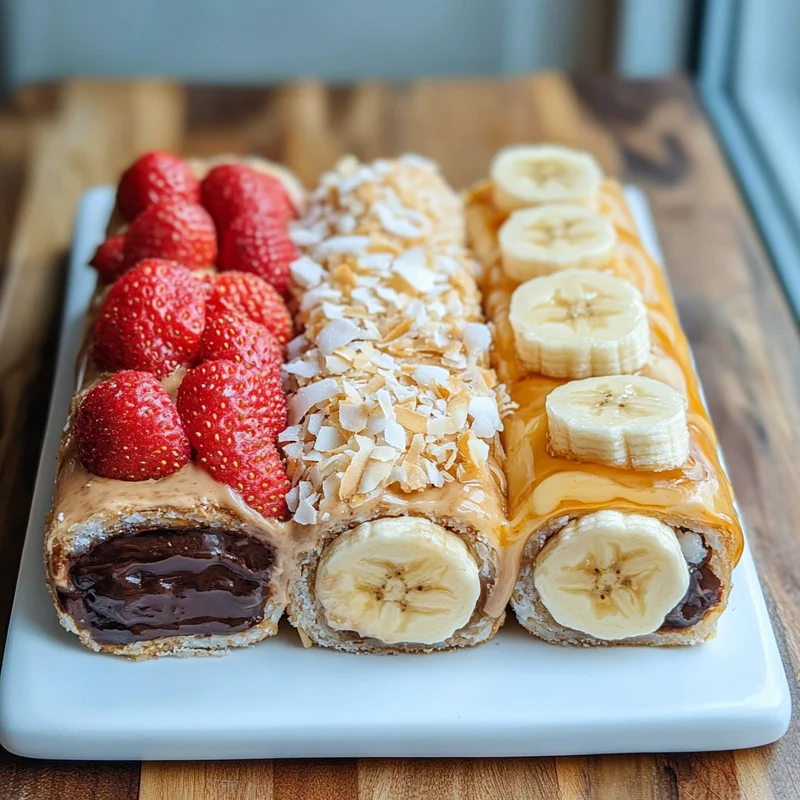
For Peanut Butter Banana Sushi:
- 3 tablespoons peanut butter: Creamy or crunchy, your choice! This adds that classic, comforting flavor.
- ½ cup chopped peanuts: For that essential crunch factor! You can use roasted and salted for a little extra flavor pop.
For Strawberries and Cream Banana Sushi:
- 3 tablespoons softened cream cheese: Let it sit out for a bit so it’s easy to spread. It’s like a dreamy frosting!
- 2 strawberries, thinly sliced: Fresh, sweet, and beautiful.
- 2 tablespoons crushed freeze-dried strawberries: This is my little secret! They add intense strawberry flavor and a fun powdery texture.
For Chocolate Coconut Banana Sushi:
- 3 tablespoons Nutella: Because who doesn’t love Nutella? A decadent, hazelnutty chocolate spread.
- 2 tablespoons shredded coconut: Sweetened or unsweetened, whatever you prefer! Adds tropical flair.
How to Make It
Alright, let’s roll! The process is the same for all three flavors, just swapping out the yummy fillings. Pick your favorite to start, or make all three like I do!
Peanut Butter Banana Sushi:
Okay, grab one of your tortillas. Lay it out flat on a clean surface – a cutting board or just your counter is perfect.
Next, take your peanut butter and spread it evenly all the way to the edges of the tortilla. Think of it like painting! This acts as our “glue” and adds delicious flavor.
Now, place your peeled banana right at one edge of the tortilla. I like to place it along the edge closest to me, so it’s easy to start rolling.
Sprinkle those chopped peanuts generously over the peanut butter, concentrating some around the banana. Get that crunch everywhere!
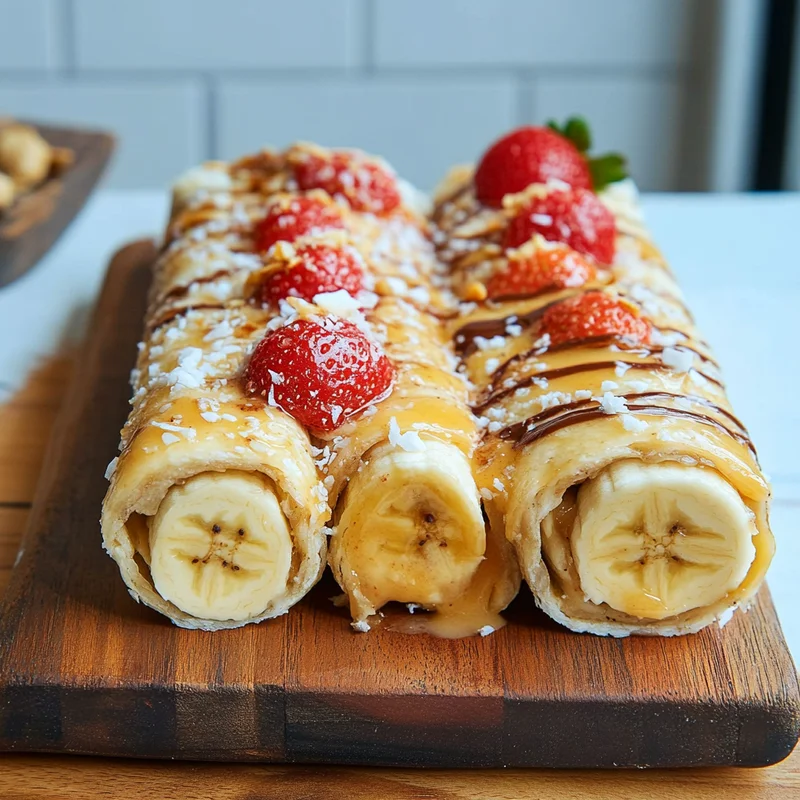
This is the slightly tricky part, but you got this! Carefully, but firmly, roll the tortilla tightly around the banana and all those glorious fillings. Start from the edge with the banana and roll away from you. Keep it snug!
Now for the fun part – slicing! Use a sharp knife (a serrated one works really well here) and slice the roll into segments about 1 inch thick. It will look just like sushi rolls! Arrange them on a plate and admire your handiwork.
Strawberries and Cream Banana Sushi:
Lay out another tortilla nice and flat.
Spread that lovely, softened cream cheese all over the tortilla, just like you did with the peanut butter.
Place your banana at one edge.
Now, arrange those pretty, thin strawberry slices around the banana and over the cream cheese. Then, sprinkle the crushed freeze-dried strawberries over everything. It smells amazing already!
Time to roll! Carefully and tightly roll the tortilla around the banana and all the creamy, fruity goodness.
Again, use a sharp knife to slice the roll into 1-inch segments. These are so colorful and inviting!
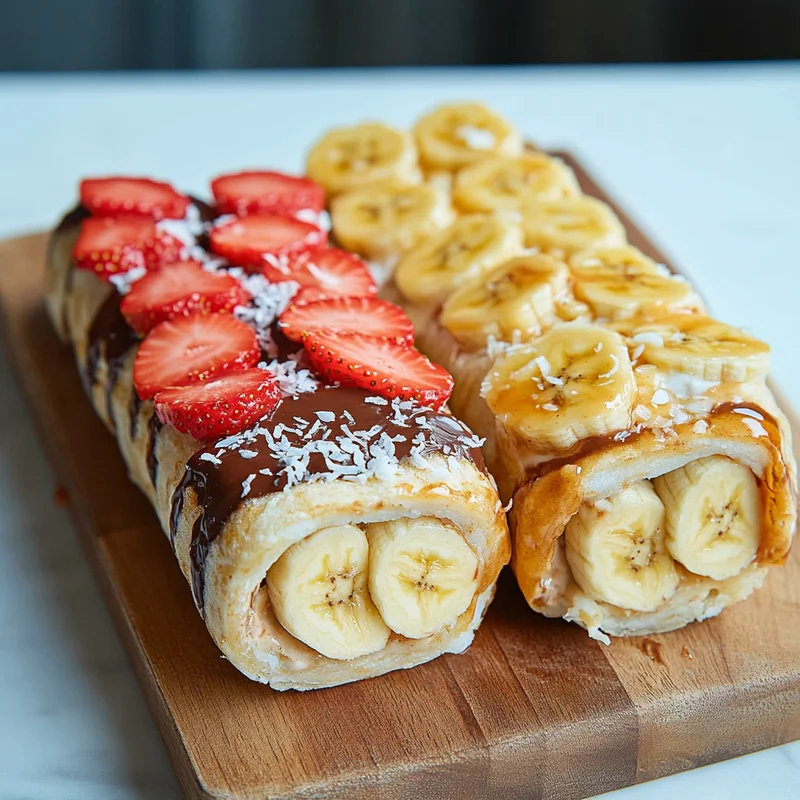
Chocolate Coconut Banana Sushi:
Last tortilla! Lay it flat and ready.
Spread that luscious Nutella evenly over the entire surface. Mmm, chocolate!
Pop the banana onto one edge.
Sprinkle the shredded coconut over the Nutella, making sure you get some right around the banana for that tropical hug.
Give it a careful, tight roll, bringing the tortilla snuggly around the banana and the chocolatey, coconutty filling.
Grab that sharp knife again and slice your final roll into those perfect 1-inch sushi bites. These are pure dessert heaven!
And there you have it! Three amazing flavors of banana sushi, ready to devour. So simple, so fun!
Substitutions & Additions
The beauty of this recipe is how flexible it is! Feel free to mix and match or try new things. Here are some ideas:
- Spreads: Try almond butter, cashew butter, sunflower seed butter (nut-free!), or even a thin layer of plain yogurt (make sure it’s thick!).
- Fruits: Swap strawberries for thinly sliced kiwis, raspberries, blueberries (press them gently into the spread), or even a thin layer of mashed avocado (really!).
- Crunch: Instead of peanuts, use chopped almonds, walnuts, pecans, granola, crispy rice cereal, or sesame seeds.
- Sweetness: Drizzle a little honey, maple syrup, or agave over the spread before rolling.
- Extra Flavor: A pinch of cinnamon or a tiny bit of cocoa powder mixed into the spread could be fun!
- Healthier Twist: Use a whole wheat tortilla or even a large leaf of lettuce or collard green (for a super fresh take!).
- More Indulgence: Add mini chocolate chips, sprinkle with sprinkles, or dip the ends in melted chocolate after slicing.
Tips for Success
This recipe is super forgiving, but a couple of little pointers can make it even better:
- Choose the Right Banana: Like I mentioned, ripe but firm is key. Too green and it’s hard; too brown and it’s mushy for slicing.
- Spread to the Edges: Getting your spread all the way to the edges helps the tortilla “stick” when you roll it and keeps everything contained.
- Roll Tightly: A tight roll holds together better and makes for prettier slices. Don’t be afraid to give it a good squeeze as you go!
- Use a Sharp Knife: This is probably the most important tip! A dull knife will squish your beautiful roll instead of slicing cleanly. Wipe the knife clean between slicing different flavors if you want crisp lines.
- Don’t Overfill: While it’s tempting to pile on the goodies, too many fillings can make it hard to roll tightly and slice neatly.
- Can You Make Ahead? You can definitely spread the tortilla and even add the banana a little bit ahead of time, but I find these are best rolled and sliced right before serving. The banana can brown, and the tortilla can get a little soft over time.
How to Store It
Okay, so you’ve made these amazing banana sushi bites, but maybe you have a few left over (unlikely, but possible!).
Store them in an airtight container in the refrigerator. They are definitely best enjoyed within a few hours of making them for optimal texture, but they’ll usually keep for up to 24 hours. Just know that the banana might start to brown slightly, and the tortilla might soften a bit. Still tasty though!
I don’t recommend freezing these – the texture won’t hold up well.
FAQs
Got questions? I’ve got (quick) answers!
Q: Can I use other fruits besides banana?
A: Banana is ideal because its shape works perfectly for rolling. You could potentially use slices of other firm fruits like apple or pear, but the rolling and slicing might be trickier.
Q: Are these good for lunchboxes?
A: Absolutely! They’re a fun, healthy-ish treat. Just pack them in a container, maybe with a little ice pack if it’s warm, and they should hold up fine until lunchtime.
Q: Is this recipe healthy?
A: It’s a healthier option for a sweet treat or snack! It contains fruit and some protein/fat from the spreads and nuts. The healthiness level depends on your choice of tortilla and fillings (Nutella is less “healthy” than peanut butter, for example). It’s all about balance!
Q: Can kids make this themselves?
A: Yes! With a little supervision (especially for the slicing part with a sharp knife), kids can totally handle the spreading, placing, and rolling. It’s a fantastic activity for them!
Easy 3-Flavor Banana Sushi
Equipment
- Cutting board
- Sharp knife A serrated one works well
- Plate
Ingredients
Common Base
- 1 taco-size flour tortilla or gluten-free, soft and pliable
- 1 ripe but firm banana peeled
For Peanut Butter Banana Sushi
- 3 tablespoons peanut butter creamy or crunchy
- 0.5 cup chopped peanuts
For Strawberries and Cream Banana Sushi
- 3 tablespoons softened cream cheese
- 2 strawberries thinly sliced
- 2 tablespoons crushed freeze-dried strawberries
For Chocolate Coconut Banana Sushi
- 3 tablespoons Nutella
- 2 tablespoons shredded coconut sweetened or unsweetened
Instructions
- Lay one tortilla flat on a clean surface.
- Choose your flavor: Spread the chosen spread (peanut butter, softened cream cheese, or Nutella) evenly all the way to the edges of the tortilla.
- Place the peeled banana right at one edge of the tortilla.
- Add the chosen toppings for your flavor: Sprinkle chopped peanuts over the peanut butter; Arrange thin strawberry slices and sprinkle crushed freeze-dried strawberries over the cream cheese; Sprinkle shredded coconut over the Nutella.
- Carefully but firmly roll the tortilla tightly around the banana and fillings, starting from the edge with the banana.
- Use a sharp knife to slice the roll into segments about 1 inch thick.
- Arrange on a plate. Repeat with remaining tortillas and ingredients for other flavors if desired.