
Introduction
Alright my friend, pull up a chair and let’s talk about cozy things. Is there anything that screams fall quite like an apple cider doughnut? The crisp air, the crunchy leaves underfoot, that unmistakable smell wafting from an orchard stand… pure magic, right?
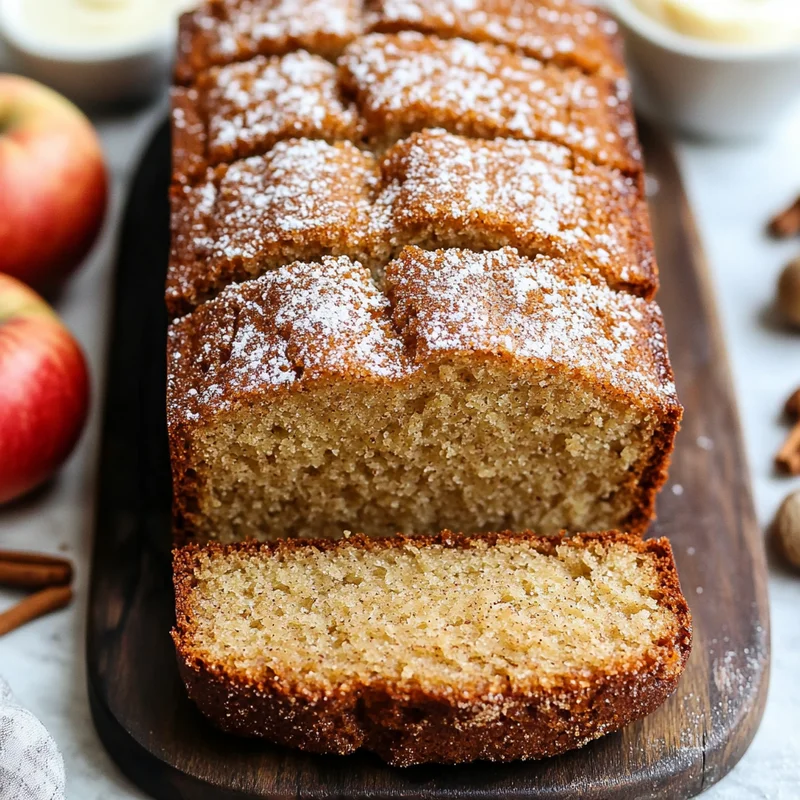
Now, imagine all that glorious flavor packed into a tender, moist loaf cake. That’s where this recipe comes in! It has all the warm spice and sweet apple cider goodness you love about those classic doughnuts, but without any of the frying hassle. It’s incredibly easy to whip up, fills your kitchen with the most amazing aroma, and is utterly perfect for a quiet morning coffee, a cozy afternoon snack, or sharing with someone special. Seriously, this is the kind of cake that makes memories.
Why You’ll Love This Recipe
- Fast: Quicker than driving to the orchard! Mostly mixing and baking time.
- Easy: No fancy techniques, just simple baking steps. Perfect for beginners or busy bakers.
- Giftable: Wrap up a loaf for a neighbor, teacher, or friend – they’ll adore you!
- Crowd-pleasing: Who can resist the comforting flavors of apple cider and cinnamon?

Ingredients
Gather ’round, here’s what you’ll need to make this little piece of fall heaven:
- 2 large Eggs: These bind everything together and give your cake structure. Make sure they’re at room temperature if you can!
- 1 3/8 cups All purpose flour: Our main dry ingredient. Makes a tender crumb.
- 1 1/4 tsp Baking powder & 1/2 tsp Baking soda: Our leavening dream team! These give the cake lift and a light texture.
- 3/4 cup Brown sugar, lightly packed: Adds moisture and that lovely, slightly caramelly depth of flavor that pairs so well with apple.
- 1 tsp Cinnamon & 1/4 tsp Nutmeg: The essential warm spices that bring that unmistakable doughnut vibe.
- 2 tbsp Cornstarch: This might seem unusual, but it helps tenderize the cake, making it extra soft.
- 1/4 cup Granulated sugar: For sweetness and structure, especially good when creamed with butter.
- 1/2 tsp Salt: Just a pinch to balance the sweetness and enhance all those lovely flavors.
- 2 tsp Vanilla extract: Always adds a touch of warmth and rounds out the flavors. Use the good stuff if you have it!
- 1 cup Apple cider: The star of the show! Gets us that authentic apple cider flavor.
- 11/16 cup Unsalted butter: Provides richness, flavor, and helps create a tender crumb. Softened, please! (11/16 cup is a little over 1/2 cup + 1 tablespoon + 1.5 teaspoons, or approximately 5.5 ounces or 155g).
- 1/2 cup Sour cream: Our secret weapon for mega moisture and a subtle tang that brightens everything up. Use full-fat for the best results.
How to Make It
Okay, let’s get baking! Don’t worry, we’ll take it step by step.
Prep Work:
Preheat your oven to 350°F (175°C). Grease and flour a standard 9×5 inch loaf pan. You can also line it with parchment paper, leaving an overhang on the long sides, which makes lifting it out a breeze!
Step 1: Reduce the Cider (Optional but Recommended!)
Pour the 1 cup of apple cider into a small saucepan. Bring it to a gentle simmer over medium heat and let it bubble away until it’s reduced by about half, leaving you with about 1/2 cup of concentrated cider. This really intensifies the apple flavor! Let it cool slightly before using. If you’re short on time, you can skip this, but I promise it’s worth the extra step!
Step 2: Whisk the Dry Ingredients
In a medium bowl, whisk together the all-purpose flour, baking powder, baking soda, cinnamon, nutmeg, cornstarch, and salt. Give it a good whisk to make sure everything is evenly distributed.
Step 3: Cream the Wet Ingredients
In a large bowl (or the bowl of your stand mixer), beat the softened unsalted butter and both sugars (brown and granulated) together until light and fluffy. This usually takes about 2-3 minutes with an electric mixer.
Step 4: Add Eggs and Vanilla
Add the eggs one at a time, beating well after each addition until fully combined. Scrape down the sides of the bowl as needed. Stir in the vanilla extract.
Step 5: Combine Wet and Dry
Now, we’ll alternate adding the dry ingredients and the wet ingredients (which is your cooled reduced cider and sour cream) to the butter/sugar mixture. Start by adding about a third of the dry ingredients to the wet ingredients and mix on low speed until just combined. Then add half of the wet ingredients (the cider/sour cream mix) and mix until just combined. Repeat, ending with the dry ingredients. Be careful not to overmix! Mix just until no streaks of flour remain.
Step 6: Bake the Cake
Pour the batter evenly into your prepared loaf pan. Bake for 50-65 minutes, or until a toothpick inserted into the center comes out clean. The top should be golden brown and spring back slightly when touched.
Step 7: Cool and Add the “Doughnut” Finish
Let the cake cool in the pan for about 10-15 minutes before carefully inverting it onto a wire rack to cool completely. While it’s still warm (not hot, but warm enough to handle), brush the top and sides lightly with melted butter (about 1-2 tablespoons). In a small shallow dish, mix together about 1/4 cup granulated sugar and 1 teaspoon cinnamon. Roll or sprinkle the warm, buttered cake in the cinnamon-sugar mixture, just like a doughnut!
Step 8: Slice and Enjoy!
Once the cake is fully cooled, slice it with a serrated knife and enjoy every single cozy bite!
Substitutions & Additions
Want to get creative? Here are a few ideas:
- Gluten-Free: You can likely swap the all-purpose flour for a good quality gluten-free all-purpose blend, though baking time might vary slightly.
- Spice It Up: Add a pinch of ground ginger or allspice along with the cinnamon and nutmeg for even more warmth.
- Add-Ins: Stir in 1/2 cup of finely chopped apple, chopped walnuts, or pecans into the batter before baking.
- Different Topping: Instead of the cinnamon sugar, you could make a simple glaze with powdered sugar and a little extra apple cider or milk.
Tips for Success
A few pointers to help you bake the perfect loaf:
- Room Temp Ingredients: Eggs, butter, and sour cream at room temperature mix together much better and create a smoother batter, leading to a more tender cake.
- Measure Flour Correctly: Spoon the flour into your measuring cup and level it off with a straight edge. Don’t scoop directly from the bag, as this can compact the flour and you’ll end up with too much!
- Don’t Overmix: Once you add the dry ingredients, mix only until they are just combined. Overmixing can develop the gluten too much, resulting in a tough cake.
- Reduce the Cider: Seriously, try reducing the cider! It concentrates that lovely apple flavor without adding excess liquid to the batter.
- Test for Doneness: Ovens vary! Use the toothpick test to ensure your cake is baked through. If the top is browning too quickly before the inside is done, you can tent it loosely with foil.
How to Store It
This cake stays wonderfully moist! Store cooled leftovers in an airtight container at room temperature for up to 3-4 days. For longer storage, you can wrap individual slices or the whole cooled loaf tightly in plastic wrap, then again in foil, and freeze for up to 3 months. Thaw at room temperature.
FAQs
Got questions? I’ve got answers!
Can I use apple juice instead of apple cider?
Yes, you can, but the flavor won’t be quite as authentic. Apple cider has a more complex, less filtered flavor than juice, which works best here. If using juice, definitely reduce it to concentrate the flavor.
Do I have to reduce the apple cider?
No, you don’t have to, but it really does make a difference in how much apple flavor comes through! If you skip reducing, your cake might be slightly less intensely flavored.
Can I make this into muffins?
Absolutely! Pour the batter into greased muffin cups (filling about two-thirds full) and bake at the same temperature for 18-25 minutes, or until a toothpick comes out clean. You can still butter and dip the warm tops in cinnamon sugar!
How do I know when the cake is done?
The best way is the toothpick test! Insert a toothpick into the center of the cake. If it comes out clean with no wet batter attached (a few moist crumbs are okay!), your cake is done. Also, the top should be golden and spring back slightly when gently pressed.
Easy Apple Cider Doughnut Loaf Cake
This recipe transforms the classic apple cider doughnut flavor into a tender, moist loaf cake. It’s an easy-to-make dessert or snack perfect for fall, featuring warm spices, apple cider goodness, and finished with a cinnamon-sugar coating like a traditional doughnut.
- Loaf pan
- Saucepan
- Medium bowl
- Large bowl
- Electric mixer
- Whisk
- Wire rack
- Small shallow dish
- Serrated knife
Cake Batter
- 2 Large Eggs (Room temperature if possible)
- 1.375 cup All purpose flour
- 1.25 tsp Baking powder
- 0.5 tsp Baking soda
- 0.75 cup Brown sugar (Lightly packed)
- 1 tsp Cinnamon
- 0.25 tsp Nutmeg
- 2 tbsp Cornstarch
- 0.25 cup Granulated sugar
- 0.5 tsp Salt
- 2 tsp Vanilla extract
- 1 cup Apple cider (Reduced to 1/2 cup)
- 0.6875 cup Unsalted butter (Softened for cake (approx 11/16 cup))
- 0.5 cup Sour cream (Full-fat recommended)
Cinnamon Sugar Finish
- 2 tbsp Unsalted butter (Melted, for brushing cake)
- 0.25 cup Granulated sugar (For coating)
- 1 tsp Cinnamon (For coating)
- Preheat your oven to 350°F (175°C). Grease and flour a standard 9×5 inch loaf pan. You can also line it with parchment paper, leaving an overhang on the long sides, which makes lifting it out a breeze!
- Pour the 1 cup of apple cider into a small saucepan. Bring it to a gentle simmer over medium heat and let it bubble away until it’s reduced by about half, leaving you with about 1/2 cup of concentrated cider. This really intensifies the apple flavor! Let it cool slightly before using. If you’re short on time, you can skip this, but it’s recommended.
- In a medium bowl, whisk together the all-purpose flour, baking powder, baking soda, cinnamon (1 tsp), nutmeg, cornstarch, and salt. Give it a good whisk to make sure everything is evenly distributed.
- In a large bowl (or the bowl of your stand mixer), beat the softened unsalted butter (for cake) and both sugars (brown and granulated – 1/4 cup) together until light and fluffy. This usually takes about 2-3 minutes with an electric mixer.
- Add the large eggs one at a time, beating well after each addition until fully combined. Scrape down the sides of the bowl as needed. Stir in the vanilla extract.
- Now, we’ll alternate adding the dry ingredients (from step 2) and the wet ingredients (which is your cooled reduced cider and sour cream) to the butter/sugar mixture. Start by adding about a third of the dry ingredients to the wet ingredients and mix on low speed until just combined. Then add half of the wet ingredients (the cider/sour cream mix) and mix until just combined. Repeat, ending with the dry ingredients. Be careful not to overmix! Mix just until no streaks of flour remain.
- Pour the batter evenly into your prepared loaf pan. Bake for 50-65 minutes, or until a toothpick inserted into the center comes out clean. The top should be golden brown and spring back slightly when touched. If the top is browning too quickly before the inside is done, you can tent it loosely with foil.
- Let the cake cool in the pan for about 10-15 minutes before carefully inverting it onto a wire rack to cool completely. While it’s still warm (not hot, but warm enough to handle), brush the top and sides lightly with melted unsalted butter (about 1-2 tablespoons). In a small shallow dish, mix together the remaining granulated sugar (1/4 cup) and cinnamon (1 tsp). Roll or sprinkle the warm, buttered cake in the cinnamon-sugar mixture, just like a doughnut!
- Once the cake is fully cooled, slice it with a serrated knife and enjoy every single cozy bite!
Tips for Success:
– Room Temp Ingredients: Eggs, butter, and sour cream at room temperature mix together much better and create a smoother batter, leading to a more tender cake.
– Measure Flour Correctly: Spoon the flour into your measuring cup and level it off with a straight edge. Don’t scoop directly from the bag, as this can compact the flour and you’ll end up with too much!
– Don’t Overmix: Once you add the dry ingredients, mix only until they are just combined. Overmixing can develop the gluten too much, resulting in a tough cake.
– Reduce the Cider: Seriously, try reducing the cider! It concentrates that lovely apple flavor without adding excess liquid to the batter.
– Test for Doneness: Ovens vary! Use the toothpick test to ensure your cake is baked through.
Substitutions & Additions:
– Gluten-Free: You can likely swap the all-purpose flour for a good quality gluten-free all-purpose blend, though baking time might vary slightly.
– Spice It Up: Add a pinch of ground ginger or allspice along with the cinnamon and nutmeg for even more warmth.
– Add-Ins: Stir in 1/2 cup of finely chopped apple, chopped walnuts, or pecans into the batter before baking.
– Different Topping: Instead of the cinnamon sugar, you could make a simple glaze with powdered sugar and a little extra apple cider or milk.
Storage:
– Store cooled leftovers in an airtight container at room temperature for up to 3-4 days.
– For longer storage, you can wrap individual slices or the whole cooled loaf tightly in plastic wrap, then again in foil, and freeze for up to 3 months. Thaw at room temperature.
FAQs:
– Can I use apple juice instead of apple cider? Yes, but the flavor won’t be quite as authentic. If using juice, definitely reduce it to concentrate the flavor.
– Do I have to reduce the apple cider? No, but it makes a big difference in flavor intensity.
– Can I make this into muffins? Absolutely! Bake in greased muffin cups at the same temperature for 18-25 minutes. You can still butter and dip the warm tops in cinnamon sugar.