
Introduction
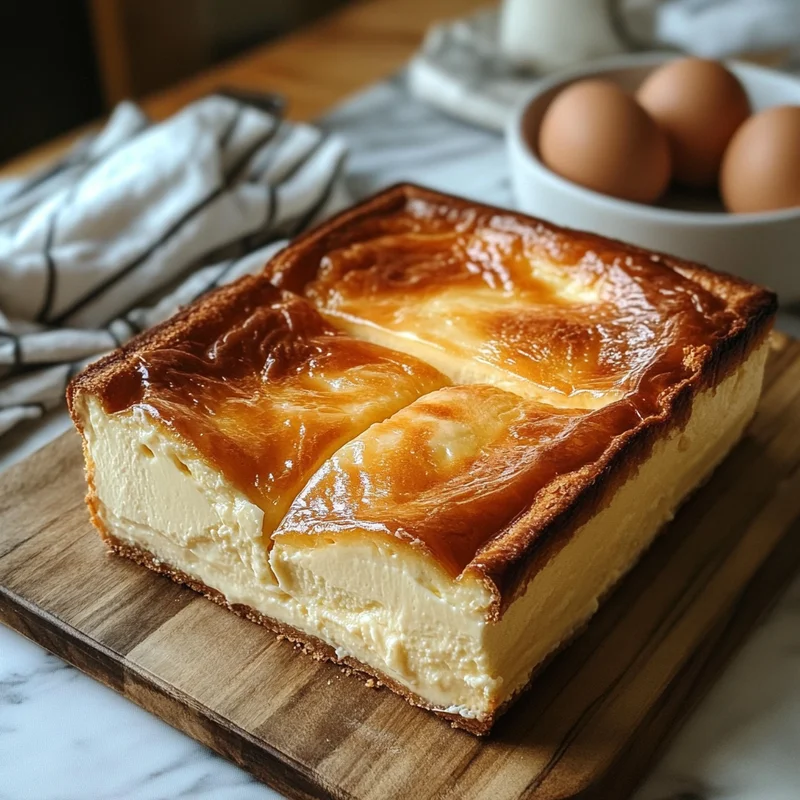
Hey there, baking buddy! Have you ever swooned over those gorgeous, slightly mysterious Basque cheesecakes you see popping up everywhere? The ones with the beautifully ‘burnt’ top and that unbelievably creamy, almost-custardy center? They look fancy, right? But guess what? They are surprisingly simple to make, and I’m about to show you how to whip one up right in your regular loaf pan!
Seriously, forget fussy water baths or worrying about cracks. This loaf pan version takes all the pressure off. It’s small, manageable, and delivers all that delicious, signature Basque cheesecake magic without breaking a sweat. It’s perfect for a smaller treat, a thoughtful homemade gift, or just because you need cheesecake (and who doesn’t?). Trust me, this recipe is going to become your new favorite simple pleasure.
Why You’ll Love This Recipe
- Fast: Minimal prep time means you can be enjoying this treat sooner than you think.
- Easy: No fancy techniques or ingredients needed. If you have a bowl and a whisk (or a mixer!), you can make this.
- Giftable: Baking it in a loaf pan makes it perfectly shaped for slicing and sharing, or wrapping up as a lovely homemade present.
- Crowd-pleasing: That unique caramelized top and creamy interior is always a showstopper, even in this humble loaf pan form!

Ingredients
Gather your goodies! Here’s what you’ll need to make this dreamy cheesecake:
- 8 oz Cream cheese, softened: Make SURE it’s soft! Leave it out on the counter for an hour or two. Cold cream cheese leads to lumpy batter, and we don’t want that.
- 1/2 cup Granulated sugar: Just the right amount of sweetness to balance the richness.
- 1/4 tsp Salt: A little pinch of salt really brings out the flavor of everything else. Don’t skip it!
- 2 large Eggs: Room temperature is best here too! It helps them incorporate smoothly into the batter.
- 1/2 cup Heavy cream: This is where that luxurious creaminess comes from.
- 1/2 tsp Vanilla extract: Pure vanilla is lovely, but use what you have!
- 1 tbsp All-purpose flour: Just a tiny bit helps stabilize everything.
How to Make It
Okay, let’s get baking! It’s way easier than you think. Just follow these steps:
- First things first, preheat your oven to 400°F (200°C). This high heat is key to getting that signature dark top! Grab your standard 9×5-inch loaf pan. Tear off a piece of parchment paper that’s long enough to line the bottom and up the sides, with plenty of overhang. I usually crumple it up first under running water, then squeeze it dry. This makes it super pliable and easy to fit into the corners of the pan. Line the pan with the crumpled-then-smoothed parchment, letting the excess hang over the sides. This overhang is your handle later!
- In a medium bowl, add your softened cream cheese, granulated sugar, and salt. Use an electric mixer (handheld or stand mixer) or even just a whisk and some elbow grease to beat these together until the mixture is super smooth and creamy, with no lumps. Scrape down the sides of the bowl as needed. This is where getting the cream cheese nice and soft really pays off!
- Add the eggs, one at a time, beating on low speed just until each egg is incorporated before adding the next. Try not to overmix here!
- Pour in the heavy cream and vanilla extract. Mix on low speed until just combined and smooth.
- Finally, add the all-purpose flour. Mix again on low speed until the flour is just incorporated and you don’t see any dry streaks. Again, don’t go crazy mixing! We want a nice, smooth batter.
- Pour the batter into your prepared loaf pan. Give the pan a gentle tap or two on the counter to release any large air bubbles.
- Carefully place the loaf pan in your preheated oven. Bake for about 40-50 minutes, or until the top is deeply golden brown, almost mahogany or even a bit black in spots (don’t be scared, this is normal!), and the center is still quite jiggly when you gently shake the pan. Remember, ovens vary, so keep an eye on it! It should look decidedly ‘burnt’ on top but shouldn’t be smoking excessively.
- Once it looks just right (nice and dark on top, jiggly center!), carefully remove the pan from the oven. Let the cheesecake cool completely in the pan on a wire rack. As it cools, it will sink in the middle – this is totally normal for Basque cheesecake!
- Once it’s at room temperature, pop the whole pan into the refrigerator and chill for at least 4 hours, or even better, overnight. This chilling time is crucial for the cheesecake to set properly and develop that amazing creamy texture.
- When you’re ready to serve, use the parchment paper overhang to lift the cheesecake out of the pan. Peel off the parchment paper. Slice and enjoy that glorious, creamy center and caramelized crust!
Substitutions & Additions
This simple recipe is a fantastic base! Here are a few ideas to play around with:
- Citrus Kick: Add the zest of half a lemon or orange to the cream cheese mixture for a bright flavor twist.
- Coffee Lover: Whisk 1/2 teaspoon of instant espresso powder into the heavy cream before adding it to the batter.
- Serving Suggestions: This cheesecake is divine on its own, but it’s also wonderful served with fresh berries, a dollop of whipped cream, a drizzle of caramel sauce, or even a sprinkle of flaky sea salt on top of a slice.
Tips for Success
Want to make sure your cheesecake turns out perfect? Keep these simple tips in mind:
- Soften That Cream Cheese! I cannot stress this enough. Take it out well in advance.
- Room Temp Eggs Help: Like the cream cheese, room temperature eggs incorporate more smoothly into the batter.
- Don’t Overmix: Once the eggs and wet ingredients are in, mix on low speed just until combined. Overmixing can incorporate too much air, which might cause more cracking.
- Embrace the “Burnt” Top: It might feel wrong, but that dark top is the goal! It’s caramelized sugar and dairy, and it adds a wonderful flavor contrast to the creamy inside.
- Chill, Chill, Chill: Don’t rush the cooling and chilling process. This is essential for the cheesecake to set up and get that classic texture.
- Parchment is Your Friend: It makes getting the cheesecake out of the pan a breeze!
How to Store It
Once your beautiful cheesecake is baked and chilled, cover it tightly with plastic wrap or pop it into an airtight container. Store it in the refrigerator. It will keep well for 3-4 days. I find the texture is best in the first couple of days, but it’s still pretty darn good later on!
FAQs
Got questions? I’ve got some answers!
Q: Why is it called “burnt” cheesecake?
A: Because the traditional method involves baking it at a very high temperature, which caramelizes the top layer intensely, making it appear dark brown or ‘burnt’. This creates a delicious, slightly bitter contrast to the sweet, creamy interior.
Q: Can I use a different size loaf pan?
A: This recipe is designed for a standard 9×5-inch loaf pan. Using a different size will affect the thickness and baking time. You might need to adjust accordingly.
Q: My cheesecake sunk a lot in the middle, did I do something wrong?
A: Nope! Sinking is totally normal for Basque cheesecake as it cools. It’s part of its rustic charm and happens because of the high baking temperature and the jiggly center setting as it cools.
Q: How do I know when it’s done baking?
A: Look for that deeply colored, caramelized top and a center that still jiggles quite a bit when you gently nudge the pan. It will continue to cook and set as it cools.
Easy Peasy Loaf Pan Basque Cheesecake

This recipe simplifies the popular Basque cheesecake by baking it in a standard loaf pan. It features the signature ‘burnt’ caramelized top and a rich, creamy, almost-custardy interior. It’s noted as fast, easy, giftable, and crowd-pleasing, requiring minimal prep and no fussy water bath.
- Loaf pan
- Electric mixer
- Whisk
- bowl
- Parchment paper
- Wire rack
Hauptzutaten
- 8 oz Cream cheese (softened)
- 0.5 cup Granulated sugar
- 0.25 tsp Salt
- 2 large Eggs (Room temperature is best)
- 0.5 cup Heavy cream
- 0.5 tsp Vanilla extract
- 1 tbsp All-purpose flour
- First things first, preheat your oven to 400°F (200°C). This high heat is key to getting that signature dark top! Grab your standard 9×5-inch loaf pan. Tear off a piece of parchment paper that’s long enough to line the bottom and up the sides, with plenty of overhang. I usually crumple it up first under running water, then squeeze it dry. This makes it super pliable and easy to fit into the corners of the pan. Line the pan with the crumpled-then-smoothed parchment, letting the excess hang over the sides. This overhang is your handle later!
- In a medium bowl, add your softened cream cheese, granulated sugar, and salt. Use an electric mixer (handheld or stand mixer) or even just a whisk and some elbow grease to beat these together until the mixture is super smooth and creamy, with no lumps. Scrape down the sides of the bowl as needed. This is where getting the cream cheese nice and soft really pays off!
- Add the eggs, one at a time, beating on low speed just until each egg is incorporated before adding the next. Try not to overmix here!
- Pour in the heavy cream and vanilla extract. Mix on low speed until just combined and smooth.
- Finally, add the all-purpose flour. Mix again on low speed until the flour is just incorporated and you don’t see any dry streaks. Again, don’t go crazy mixing! We want a nice, smooth batter.
- Pour the batter into your prepared loaf pan. Give the pan a gentle tap or two on the counter to release any large air bubbles.
- Carefully place the loaf pan in your preheated oven. Bake for about 40-50 minutes, or until the top is deeply golden brown, almost mahogany or even a bit black in spots (don’t be scared, this is normal!), and the center is still quite jiggly when you gently shake the pan. Remember, ovens vary, so keep an eye on it! It should look decidedly ‘burnt’ on top but shouldn’t be smoking excessively.
- Once it looks just right (nice and dark on top, jiggly center!), carefully remove the pan from the oven. Let the cheesecake cool completely in the pan on a wire rack. As it cools, it will sink in the middle – this is totally normal for Basque cheesecake!
- Once it’s at room temperature, pop the whole pan into the refrigerator and chill for at least 4 hours, or even better, overnight. This chilling time is crucial for the cheesecake to set properly and develop that amazing creamy texture.
- When you’re ready to serve, use the parchment paper overhang to lift the cheesecake out of the pan. Peel off the parchment paper. Slice and enjoy that glorious, creamy center and caramelized crust!
Substitutions & Additions: Add the zest of half a lemon or orange for a citrus kick, or whisk 1/2 teaspoon of instant espresso powder into the heavy cream for a coffee flavor. Serving Suggestions: Enjoy on its own or with fresh berries, whipped cream, caramel sauce, or flaky sea salt.
Tips for Success: Ensure cream cheese is softened and eggs are room temperature for a smooth batter. Avoid overmixing. Embrace the deeply colored “burnt” top – it’s intentional and adds flavor. Chill thoroughly (at least 4 hours, preferably overnight) for proper setting. Parchment paper makes removal easy.
Storage: Store covered tightly in the refrigerator for 3-4 days.
FAQs: The “burnt” top comes from high-temperature baking which caramelizes the sugar. The recipe is designed for a standard 9×5-inch loaf pan; using a different size will affect thickness and baking time. Sinking in the middle as it cools is normal for Basque cheesecake. It’s done baking when the top is deeply colored and the center is jiggly.