Introduction
Oh friend, let me tell you about a little slice of heaven that transports me right back to cozy weekend mornings, maybe even a trip to my favorite bakery. There’s just something undeniably special about a warm, sweet pastry, isn’t there? And a Blueberry Cheese Danish? Forget about it! It’s the perfect mix of tangy cream cheese, sweet bursts of blueberries, all wrapped up in a tender, golden dough.
Now, you might think making a danish from scratch sounds like a project, something only for seasoned bakers. But guess what? This recipe is SO much simpler than you might imagine! It uses a really clever, easy-to-make dough that comes together quickly, and the filling is just a few ingredients whipped up. Soon, you’ll be pulling this gorgeous, braided beauty out of your own oven, filling your kitchen with the most amazing aroma. Ready to bake up some happiness?
Why You’ll Love This Recipe
- Fast: No lengthy proofing or complicated steps here. This danish comes together surprisingly quickly for such an impressive result!
- Easy: Seriously, if you can mix ingredients and shape dough, you can make this. Perfect for beginners or busy folks.
- Giftable: Wrap up a few slices or a whole danish for friends, family, or neighbors. Homemade treats are always the best gift!
- Crowd-Pleasing: Who can resist warm pastry, creamy cheese filling, and juicy blueberries? This disappears fast whenever I make it.
Ingredients
Here’s what you’ll need to gather from your pantry and fridge. Most of these are pretty standard!
- For the Dough:
- 8 oz shredded mozzarella (about 2 cups): This is our secret weapon for a tender, pliable dough! Makes sure it’s shredded low-moisture mozzarella.
- 2 oz cream cheese: Adds richness and helps create that lovely dough texture.
- 1 egg: Our binder! Helps hold everything together.
- 1/3 cup almond flour: Gives the dough structure and a nice subtle flavor.
- 1/3 cup coconut flour: A little goes a long way! It helps absorb moisture and adds a unique texture.
- 1/3 cup ground golden flax (or additional almond flour): Another binder and adds a touch of nutty flavor. You can swap this for more almond flour if that’s easier.
- 1 tbsp Joy Filled Eats Sweetener: This is a specific sweetener blend, but feel free to use your favorite cup-for-cup granulated sweetener here!
- 1 tsp vanilla: A splash of warmth for the dough.
- For the Cream Cheese Filling:
- 8 oz cream cheese, softened: Let this sit out on the counter for a bit so it’s easy to whip up smooth and creamy.
- 1 tsp vanilla: Enhances that lovely cream cheese flavor.
- 1 egg: Helps the filling set up beautifully as it bakes.
- 1/4 cup Joy Filled Eats Sweetener: Again, use your preferred cup-for-cup granulated sweetener.
- 3/4 cup fresh or frozen blueberries (do not thaw if using frozen): The stars of the show! If using frozen, just toss them in frozen, no need to thaw first.
How to Make It
Alright, let’s bake this beauty! Follow these simple steps and you’ll be enjoying homemade danish in no time.
Step 1: Make the Dough
Get a microwave-safe bowl and add the shredded mozzarella and cream cheese. Pop it in the microwave for about 1-2 minutes, stirring halfway, until the cheeses are completely melted and gooey. Stir it really well to combine.
Step 2: Add the Dry Ingredients
To the melted cheese mixture, add the egg, almond flour, coconut flour, ground flax (or extra almond flour), sweetener, and vanilla. Stir everything together with a spoon or spatula until it starts to come together like a thick dough. It might be a little sticky at first.
Step 3: Form the Dough
Turn the dough out onto a piece of parchment paper. You might need to lightly wet your hands or use a piece of plastic wrap on top to press it into a ball, then a rough rectangle. This dough is easiest to work with while it’s warm, but be careful it’s not too hot! I find using the parchment paper is essential here.
Step 4: Make the Filling
In a medium bowl, beat the softened cream cheese, vanilla, egg, and sweetener together until it’s smooth and creamy. A hand mixer works great for this, but you can do it with a whisk and some elbow grease too.
Step 5: Shape and Fill
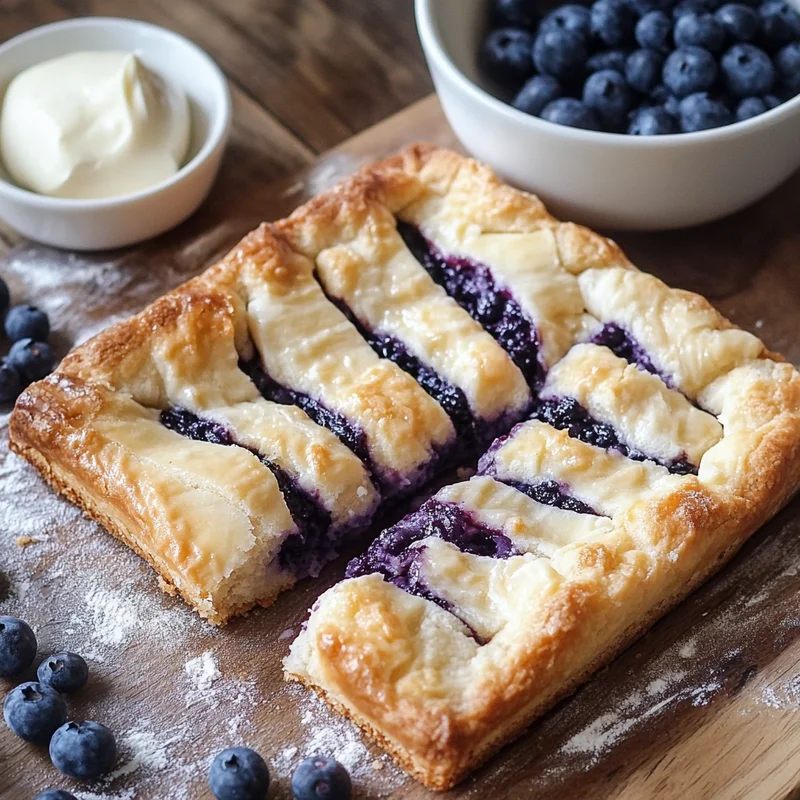
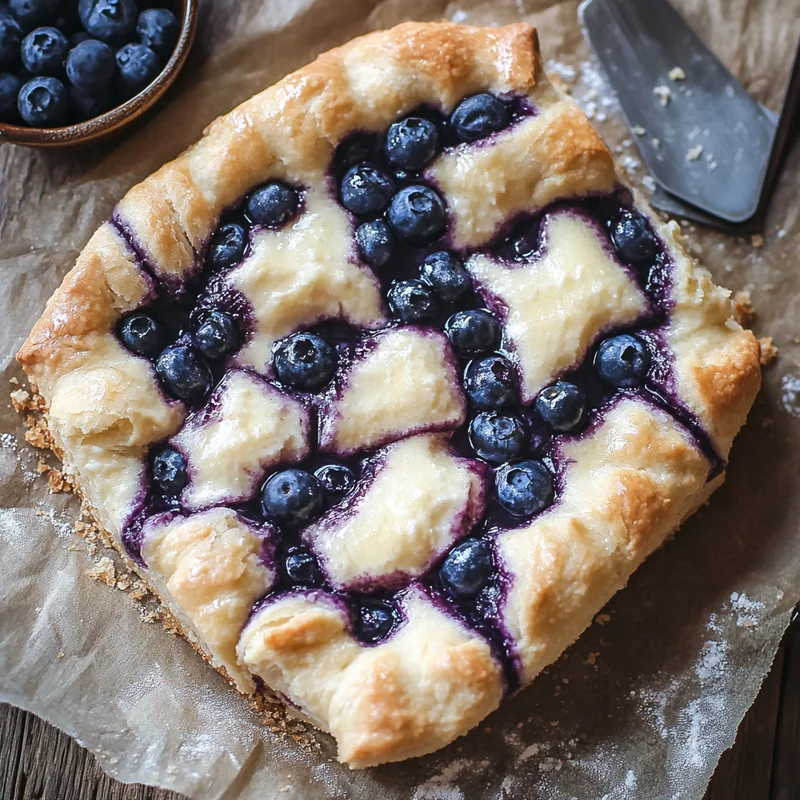
On the parchment paper, press or roll the dough into a rectangle, roughly 10×12 inches. Don’t worry about perfect edges. Spread the cream cheese filling down the center third of the rectangle, leaving about an inch clear at the top and bottom. Scatter the blueberries evenly over the cream cheese filling.
Step 6: Cut and Braid
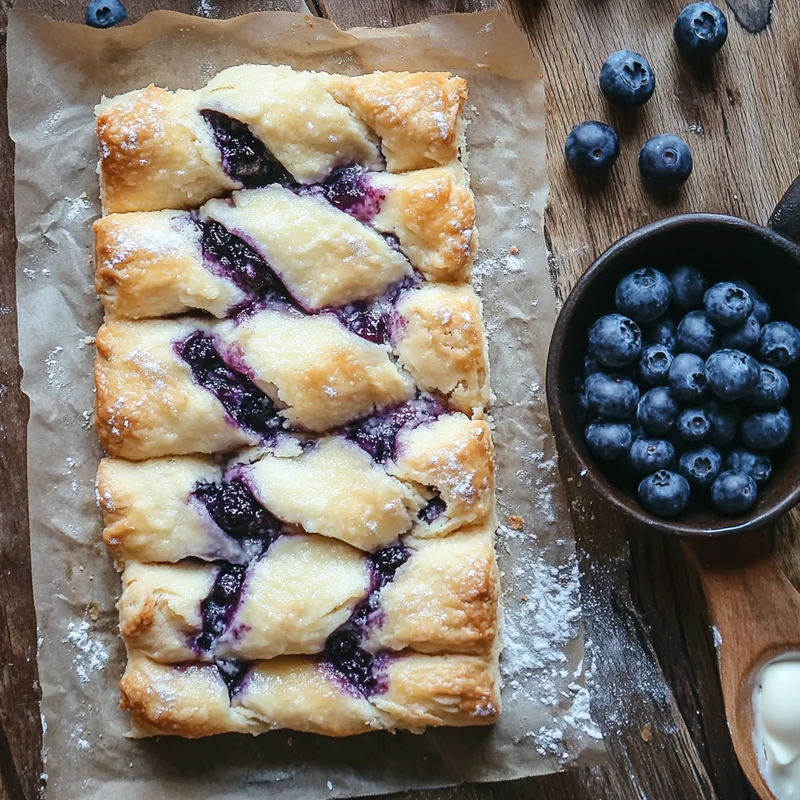
Using a knife or pizza cutter, cut diagonal strips about 1 inch wide along both long sides of the dough rectangle, from the edge of the filling out to the edge of the dough. You should have strips of dough on either side of the filling.
Now, starting from the top, fold the top edge of the dough over the filling. Then, take the top strip from one side and fold it diagonally over the filling. Take the top strip from the other side and fold it diagonally over the filling, overlapping slightly. Continue alternating strips down the length of the danish, creating a braided look. When you get to the bottom, fold the bottom edge of the dough up over the filling before crossing the last couple of strips.
Step 7: Bake!
Carefully slide the danish (still on the parchment paper) onto a baking sheet. I sometimes brush the top with a little egg wash (one egg beaten with a tablespoon of water) for extra shine and golden color, but that’s optional. Bake in a preheated oven (usually around 350-375°F, check your dough type’s recommendation if you know it’s fathead-style, but 350°F is a safe bet) for 20-25 minutes, or until the danish is golden brown and the filling is bubbly.
Step 8: Cool and Enjoy
Let the danish cool on the baking sheet for a few minutes before transferring it to a wire rack. It’s best served warm, but it’s still delicious at room temperature! Slice and enjoy your beautiful homemade danish!
Substitutions & Additions
Get creative! This recipe is pretty forgiving.
- Sweetener: Swap the Joy Filled Eats Sweetener for any other granulated sugar substitute you prefer, like erythritol, xylitol (be careful if you have pets, it’s toxic to dogs!), or a blend. You can also use regular sugar if you’re not worried about keeping it low-carb, just adjust the amount to your taste.
- Flour: While the almond and coconut flour blend works great here, you might be able to experiment with other nut flours, though you may need to adjust quantities slightly as they absorb moisture differently.
- Berries: No blueberries? Try raspberries, blackberries, or a mix! Just make sure they are not overly watery.
- Additions: Stir some lemon zest into the cream cheese filling for a bright, citrusy twist. You could also sprinkle some slivered almonds on top before baking for extra crunch.
- Glaze: While not strictly needed, a simple drizzle of powdered sweetener mixed with a little milk or lemon juice makes a lovely glaze once the danish has cooled slightly.
Tips for Success
A few little pointers to help you nail this danish on your first try!
- Parchment Paper is Your Friend: Seriously, making and shaping the dough directly on parchment paper makes transferring it to the baking sheet SO much easier.
- Work While Warm: The dough is most pliable right after mixing the wet and dry ingredients. Shape it fairly quickly before it cools down too much. If it gets hard to work with, you can pop it back in the microwave for 10-15 seconds to soften it slightly.
- Don’t Overfill: Piling the filling too high can make braiding tricky and might cause it to ooze out excessively while baking.
- Using Frozen Blueberries: As noted in the ingredients, add frozen blueberries directly to the filling without thawing. Thawing them first can make the filling too watery.
- Check for Doneness: The danish should be nicely golden brown on top and around the edges. The filling should look set, maybe slightly bubbly in spots.
How to Store It
If you happen to have any leftovers (a big IF!), here’s how to keep them fresh.
Once the danish has cooled completely, store it in an airtight container in the refrigerator. It will keep well for 3-4 days. You can gently reheat slices in the microwave or oven if you like warm pastry, or enjoy it chilled straight from the fridge!
You can also freeze individual slices or the whole danish (cooled and wrapped tightly) for up to 2-3 months. Thaw in the refrigerator overnight and reheat if desired.
FAQs
Got questions? I’ve got some answers!
- Can I use a different fruit? Yes, absolutely! Raspberries, blackberries, or even sliced strawberries would be lovely. Just be mindful of fruits that release a lot of water.
- What’s the best sweetener to use? Any granulated cup-for-cup sweetener blend that you enjoy the taste of will work well here. My favorite is a blend of erythritol, xylitol, and stevia.
- Can I make the dough ahead of time? You can make the dough and store it wrapped tightly in the fridge for a day or two, but it’s definitely easiest to work with when it’s freshly made and warm.
- How do I know when it’s baked through? The crust will be golden brown, and the cream cheese filling should look set and maybe slightly puffed up.

Easy Braided Blueberry Cheese Danish
Equipment
- Microwave-safe bowl
- Spoon
- Spatula
- Parchment paper
- Plastic wrap Optional, for shaping dough
- Medium bowl
- Hand mixer Optional, or whisk
- Whisk Optional, or hand mixer
- Knife Or pizza cutter
- Pizza Cutter Or knife
- Baking Sheet
- Wire rack For cooling
Ingredients
For the Dough
- 8 oz shredded mozzarella about 2 cups; use low-moisture mozzarella
- 2 oz cream cheese
- 1 egg
- 0.33 cup almond flour
- 0.33 cup coconut flour
- 0.33 cup ground golden flax or additional almond flour
- 1 tbsp Joy Filled Eats Sweetener or favorite cup-for-cup granulated sweetener
- 1 tsp vanilla extract
For the Cream Cheese Filling
- 8 oz cream cheese softened
- 1 tsp vanilla extract
- 1 egg
- 0.25 cup Joy Filled Eats Sweetener or preferred cup-for-cup granulated sweetener
- 0.75 cup fresh or frozen blueberries do not thaw if using frozen
Instructions
- Make the Dough: Get a microwave-safe bowl and add the shredded mozzarella and cream cheese. Pop it in the microwave for about 1-2 minutes, stirring halfway, until the cheeses are completely melted and gooey. Stir it really well to combine.
- Add the Dry Ingredients: To the melted cheese mixture, add the egg, almond flour, coconut flour, ground flax (or extra almond flour), sweetener, and vanilla. Stir everything together with a spoon or spatula until it starts to come together like a thick dough. It might be a little sticky at first.
- Form the Dough: Turn the dough out onto a piece of parchment paper. You might need to lightly wet your hands or use a piece of plastic wrap on top to press it into a ball, then a rough rectangle. This dough is easiest to work with while it's warm, but be careful it's not too hot! I find using the parchment paper is essential here.
- Make the Filling: In a medium bowl, beat the softened cream cheese, vanilla, egg, and sweetener together until it's smooth and creamy. A hand mixer works great for this, but you can do it with a whisk and some elbow grease too.
- Shape and Fill: On the parchment paper, press or roll the dough into a rectangle, roughly 10x12 inches. Don't worry about perfect edges. Spread the cream cheese filling down the center third of the rectangle, leaving about an inch clear at the top and bottom. Scatter the blueberries evenly over the cream cheese filling.
- Cut and Braid: Using a knife or pizza cutter, cut diagonal strips about 1 inch wide along both long sides of the dough rectangle, from the edge of the filling out to the edge of the dough. You should have strips of dough on either side of the filling.
- Bake!: Carefully slide the danish (still on the parchment paper) onto a baking sheet. I sometimes brush the top with a little egg wash (one egg beaten with a tablespoon of water) for extra shine and golden color, but that's optional. Bake in a preheated oven (usually around 350-375°F, check your dough type's recommendation if you know it's fathead-style, but 350°F is a safe bet) for 20-25 minutes, or until the danish is golden brown and the filling is bubbly.
- Cool and Enjoy: Let the danish cool on the baking sheet for a few minutes before transferring it to a wire rack. It's best served warm, but it's still delicious at room temperature! Slice and enjoy your beautiful homemade danish!