Introduction
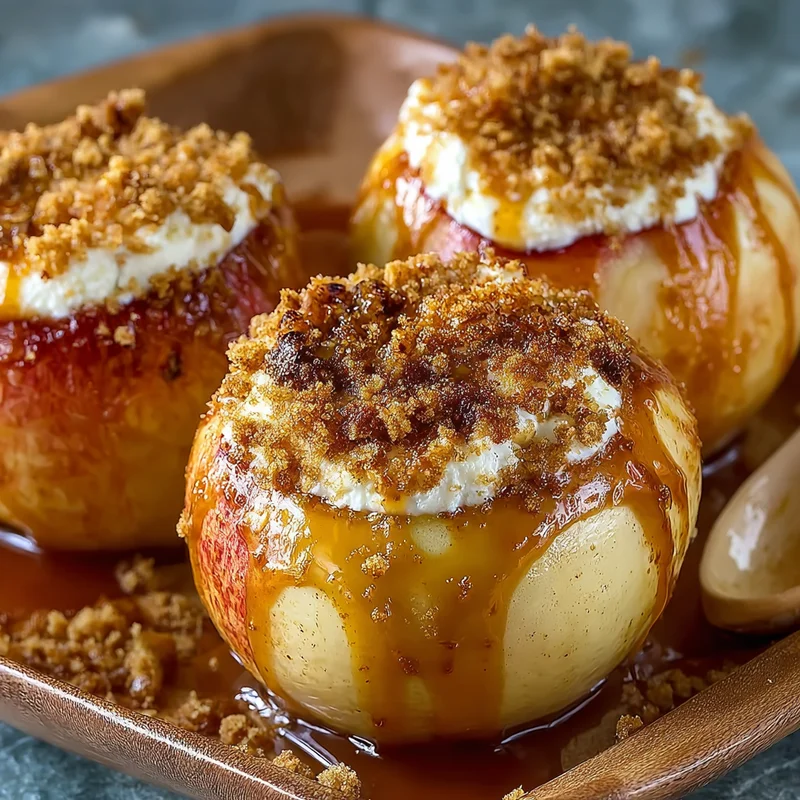
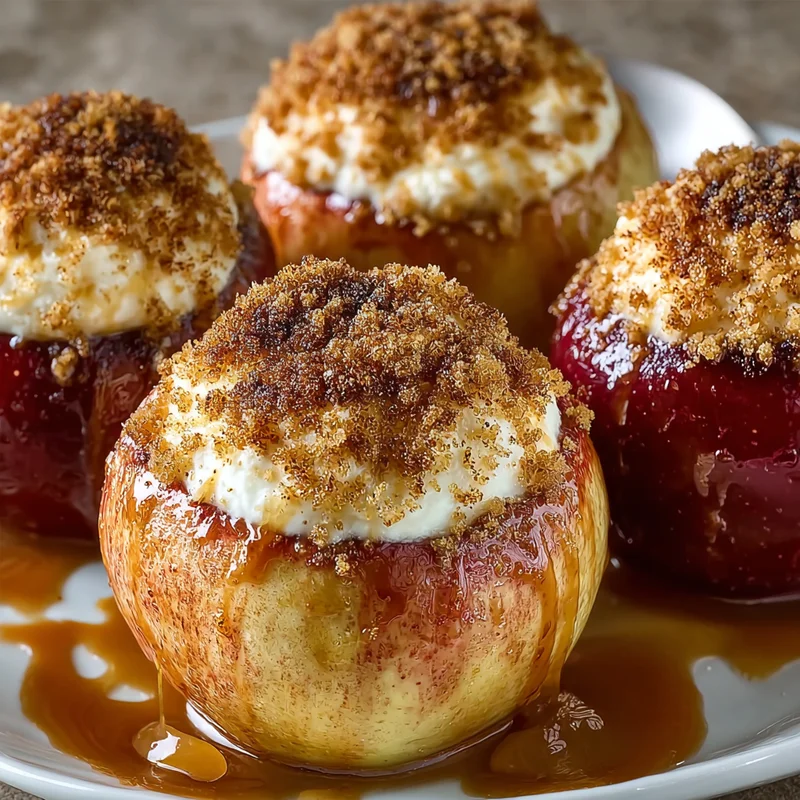
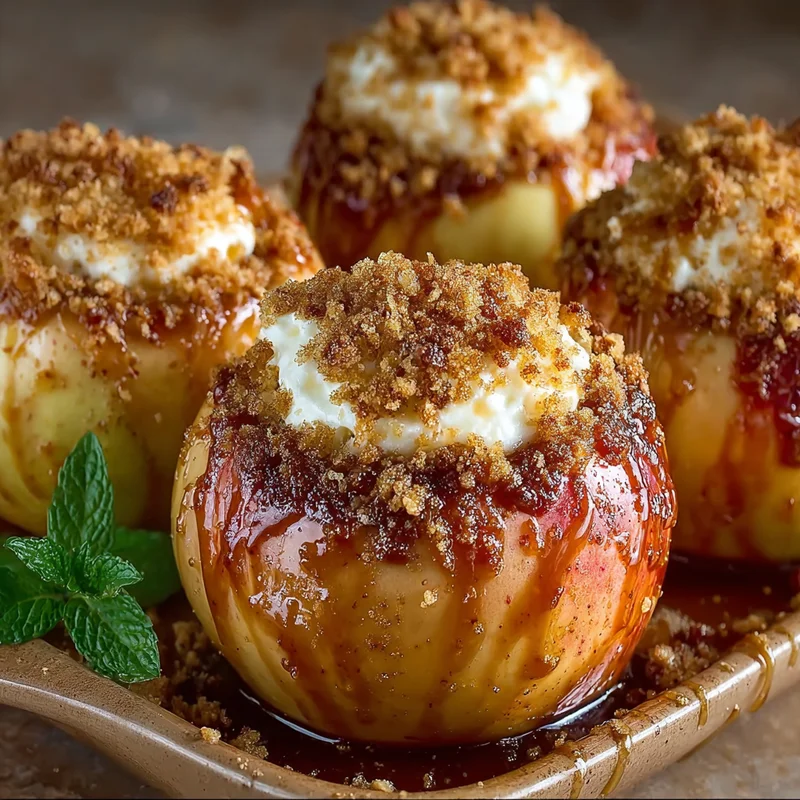
Oh, the smell of fall in the air! It always makes me think of cozy evenings, warm spices, and comforting desserts. And when I think of comforting desserts, my mind immediately goes to baked apples. But this isn’t just any baked apple; this is a cheesecake-stuffed baked apple. Seriously, how good does that sound? This recipe is like a warm hug in a dessert, and the best part? It’s ridiculously easy to make. You can whip these up for a special occasion or just because you deserve a treat. It’s one of those recipes that feels fancy but is secretly a breeze, making it perfect for impressing guests or just treating yourself.
Why You’ll Love This Recipe
- Fast: Ready to bake in under 20 minutes!
- Easy: Simple steps, perfect for beginner bakers.
- Giftable: Pack these up in cute boxes for a homemade holiday gift.
- Crowd-pleasing: Who can resist warm, tender apples with a creamy, sweet center?
Ingredients
Gathering your ingredients is the first step to dessert magic! Here’s what you’ll need for these delightful cheesecake-stuffed baked apples:
- 8 large apples: I like using a mix of sweet and tart apples, like Honeycrisp and Fuji, for the best flavor.
- 1 pound full-fat cream cheese, at room temperature: Make sure it’s softened – it makes mixing so much smoother!
- 2 large eggs, at room temperature: Just like the cream cheese, room temperature eggs will incorporate better.
- 3/4 cup graham cracker crumbs: These add a lovely texture and a subtle hint of graham cracker goodness.
- 3/4 cup granulated sugar, divided: We’ll use some in the filling and some for that delicious topping.
- 1 teaspoon vanilla extract: A little splash of vanilla really makes the flavors sing.
- 3/4 teaspoon ground cinnamon, divided: The quintessential fall spice!
- 1/4 teaspoon plus 1/8 teaspoon ground nutmeg, divided: Nutmeg and cinnamon are best friends, especially in baked goods.
- 4 tablespoons unsalted butter, divided: We’ll melt some for brushing and some for drizzling.
- Caramel sauce, for serving: This is the cherry on top, or rather, the caramel drizzle!
How to Make It
Alright, let’s get our hands a little sticky and create some dessert magic!
- Preheat your oven to 375°F (190°C). This is the golden temperature for perfectly baked apples.
- Prep those apples! Carefully core the apples, making sure to leave about 1/2 inch at the bottom intact. You want to create a nice cavity for our delicious filling. Think of it as making a little edible bowl.
- Whip up the creamy filling. In a medium bowl, beat the cream cheese until it’s wonderfully smooth and creamy. No lumps allowed here!
- Add the magic ingredients to the cream cheese. Now, stir in the eggs, 1/4 cup of the granulated sugar, 1/4 teaspoon of cinnamon, 1/8 teaspoon of nutmeg, and that splash of vanilla extract. Beat it all together until everything is perfectly combined.
- Incorporate the graham cracker crumbs. Gently stir the graham cracker crumbs into the cream cheese mixture. This is going to add such a delightful texture.
- Get ready for some spice! In a small bowl, melt 2 tablespoons of butter. Stir in the remaining 1/2 teaspoon of cinnamon and the remaining 1/4 teaspoon of nutmeg. This is our secret flavor booster!
- Brush the insides. Using a pastry brush (or a spoon if you don’t have one!), brush the insides of your cored apples with that lovely cinnamon-nutmeg butter mixture.
- Fill ’em up! Spoon or pipe the cream cheese mixture generously into the cavities of each apple. Don’t be shy; pack it in there!
- Arrange for baking. Place your beautiful stuffed apples in a baking dish. This helps them bake evenly and catches any drips.
- Drizzle and top. Melt the remaining 2 tablespoons of butter and drizzle it evenly over the tops of the stuffed apples. Then, sprinkle the remaining 1/2 cup of granulated sugar over everything. This creates a lovely caramelized crust.
- Bake to perfection. Pop them into your preheated oven and bake for 35-45 minutes. You’ll know they’re ready when the apples are tender when you gently pierce them with a fork.
- Serve and enjoy! Let them cool just slightly, then serve them warm with a generous drizzle of caramel sauce. Ahh, pure bliss!
Substitutions & Additions
This recipe is fantastic as is, but if you’re feeling adventurous, here are some ways to make it your own!
- Spice it up: Add a pinch of ground ginger or cardamom to the cream cheese filling for an extra layer of warmth.
- Nutty goodness: Chop up some pecans or walnuts and stir them into the cream cheese filling or sprinkle them on top before baking.
- Berry boost: A few fresh or frozen cranberries tucked into the apple cavity before stuffing can add a lovely tartness.
- Different crust: If you don’t have graham crackers, digestive biscuits or even crushed shortbread cookies would work beautifully as a substitute for the crumbs.
- Maple magic: Swap out some of the granulated sugar for brown sugar or a drizzle of maple syrup in the filling for a richer flavor.
Tips for Success
A few little tricks can make these baked apples even more spectacular:
- Choose the right apples: Firmer apples hold their shape better during baking. Avoid overly soft or bruised apples.
- Don’t over-core: Be careful not to pierce through the bottom of the apple when coring. You want a secure “cup” for the filling.
- Room temperature is key: Cream cheese and eggs that are at room temperature will blend into a much smoother, lump-free filling. If you forget to take them out ahead of time, you can gently warm the cream cheese in the microwave for short bursts (15-20 seconds) and quickly warm the eggs in a bowl of warm water.
- Prep ahead: You can core the apples and prepare the cream cheese filling a day in advance. Store them separately in the refrigerator. Then, all you have to do is stuff and bake when you’re ready!
How to Store It
These cheesecake-stuffed baked apples are best enjoyed fresh and warm, but if you have any leftovers (which is unlikely!), here’s how to store them:
Once cooled completely, store any leftover baked apples in an airtight container in the refrigerator for up to 2-3 days. To reheat, you can gently warm them in a low oven (around 300°F or 150°C) for about 10-15 minutes or in the microwave for a quick reheat. Be aware that the texture of the cream cheese filling might change slightly upon reheating.
FAQs
Got questions? We’ve got answers!
Q: Can I use different types of apples?
A: Absolutely! While firm apples like Honeycrisp, Fuji, or Gala are recommended for holding their shape, you can experiment with others. Just be mindful that softer apples might break down a bit more during baking.
Q: Can I make this recipe dairy-free?
A: It’s a bit trickier to make this exact recipe dairy-free, as the cream cheese and butter are central to the flavor and texture. However, you could experiment with dairy-free cream cheese alternatives and plant-based butter, though the results might vary.
Q: What if my apples are very small?
A: If your apples are smaller, you might have a little extra cream cheese filling. You can either bake the extra filling in a small ramekin alongside the apples (it’ll be like a mini cheesecake!) or simply use slightly less filling per apple.
Cheesecake-Stuffed Baked Apples
Equipment
- Oven Preheat to 375°F (190°C)
- Medium bowl For mixing the cream cheese filling
- Small bowl For mixing the cinnamon-nutmeg butter
- Pastry brush Or a spoon for brushing the apple insides
- Baking dish To hold the stuffed apples
- Fork For testing apple tenderness
Ingredients
Main ingredients
- 8 large apples Honeycrisp and Fuji recommended
- 1 pound full-fat cream cheese at room temperature
- 2 large eggs at room temperature
- 0.75 cup graham cracker crumbs
- 0.75 cup granulated sugar divided
- 1 teaspoon vanilla extract
- 0.75 teaspoon ground cinnamon divided
- 0.25 teaspoon ground nutmeg divided
- 0.125 teaspoon ground nutmeg
- 4 tablespoons unsalted butter divided
- caramel sauce for serving
Instructions
- Preheat your oven to 375°F (190°C).
- Carefully core the apples, making sure to leave about 1/2 inch at the bottom intact to create a cavity.
- In a medium bowl, beat the cream cheese until smooth and creamy.8 large apples
- Stir in the eggs, 1/4 cup of the granulated sugar, 1/4 teaspoon of cinnamon, 1/8 teaspoon of nutmeg, and vanilla extract. Beat until combined.8 large apples
- Gently stir the graham cracker crumbs into the cream cheese mixture.8 large apples
- In a small bowl, melt 2 tablespoons of butter. Stir in the remaining 1/2 teaspoon of cinnamon and the remaining 1/4 teaspoon of nutmeg.8 large apples
- Brush the insides of the cored apples with the cinnamon-nutmeg butter mixture.8 large apples
- Spoon or pipe the cream cheese mixture into the cavities of each apple.8 large apples
- Place the stuffed apples in a baking dish.8 large apples
- Melt the remaining 2 tablespoons of butter and drizzle evenly over the tops of the stuffed apples. Sprinkle with the remaining 1/2 cup of granulated sugar.8 large apples
- Bake for 35-45 minutes, or until the apples are tender when pierced with a fork.8 large apples
- Let cool slightly, then serve warm with caramel sauce.8 large apples