
Introduction
Hey there, friend! Have you ever had one of those desserts that just feels like a hug in a pan? For me, this Chocolate Cherry Lush is exactly that kind of treat. It brings back memories of family potlucks, holiday dinners, and sunny afternoon gatherings where everyone gathered around the dessert table, spoons ready. It looks fancy with all those beautiful layers, but I promise you, it’s incredibly simple to whip up. If you’re looking for a show-stopping dessert that requires zero baking skills (okay, just a little bit for the crust!), this is your new go-to. Get ready to fall in love with every single bite of this cool, creamy, chocolatey, and fruity delight!
Why You’ll Love This Recipe
- Fast: Minimal active time needed, mostly chilling!
- Easy: Seriously, anyone can make this. It’s all about layering.
- Giftable: It’s a perfect dessert to take to a friend’s house or a party.
- Crowd-pleasing: Who can resist the combo of chocolate, cherry, and creamy layers?

Ingredients
Gathering your ingredients is the first happy step! Here’s what you’ll need for this layered dream:
- 1 cup all-purpose flour: The base for our simple, buttery crust.
- ½ cup crushed nuts (such as pecans): Adds a lovely crunch and nutty flavor to the crust. Pecans are classic here!
- ¼ cup sugar: Just a little sweetness for that first layer.
- 8 tablespoons salted butter, melted: Butter makes everything better, right? It binds our crust together.
- 21 ounces cherry pie filling (1 can): The star fruit layer! Use your favorite brand.
- 8 ounces cream cheese, softened: Make sure it’s nice and soft so it whips up smooth!
- 1 cup powdered sugar: Gives that creamy layer its sweetness and smooth texture.
- 1 cup Cool Whip (from 8 oz container): This is for our creamy, dreamy third layer. You’ll use the rest later!
- 6.8 ounces chocolate instant pudding (2 packages): Instant is key here! Grab your favorite chocolate flavor.
- 3 cups milk: To whisk up that luscious pudding layer.
- Remaining Cool Whip from 8 oz container: For the fluffy topping.
- ½ cup chocolate shavings or chocolate jimmies (optional): The perfect finishing touch to make it extra pretty!
How to Make It
Alright, let’s get layering! It’s easier than stacking blocks, I promise.
First things first, preheat your oven to 350°F (175°C). Get that pan ready – a 9×13 inch baking pan is just right for this.
Layer One: The Crust! In a medium bowl, toss together the flour, crushed nuts, and ¼ cup sugar. Pour in the melted butter and stir everything together until it looks like wet sand or coarse crumbs. Press this mixture firmly and evenly into the bottom of your baking pan. I like to use the bottom of a glass or a flat measuring cup to really get it packed down nicely.
Pop the crust into the preheated oven and bake for 15-20 minutes, or until the edges look lightly golden brown. This is crucial: Let the crust cool completely before you even think about adding the next layer. A warm crust will mess with your cold layers!
Layer Two: The Cherry Surprise! Once the crust is completely cool, grab that can of cherry pie filling. Gently spread it evenly over the cooled crust. Try not to disturb the crust too much. Those bright red cherries are going to look so pretty!
Layer Three: The Creamy Dream! In a separate bowl, beat the softened cream cheese and powdered sugar together until it’s super smooth and no lumps remain. Now, gently fold in that 1 cup of Cool Whip. Folding means you’re being delicate, not stirring vigorously, to keep the airiness. Carefully spread this creamy mixture over the cherry layer. Take your time smoothing it out.
Layer Four: Chocolate Magic! In another bowl, whisk together the two packages of chocolate instant pudding mix and the 3 cups of milk. Whisk for about 2 minutes until it starts to thicken slightly. Don’t overmix, just until it’s smooth and pudding-like. Now, carefully spread this chocolate pudding layer over the cream cheese layer. I find it helps to dollop spoonfuls over the surface and then gently spread them out.
Layer Five: The Fluffy Crown! Remember the rest of that Cool Whip? Spread it evenly over the chocolate pudding layer. This is your cloud-like topping!
Finishing Touches! Sprinkle your beautiful dessert with chocolate shavings or jimmies if you like. It adds a little extra flair and chocolatey goodness.
Now comes the hardest part: waiting! Cover the pan gently with plastic wrap and pop it into the refrigerator. It needs at least 3-4 hours to chill and let those layers firm up and meld together. Honestly, I think it’s best if you can let it chill overnight. It makes slicing and serving so much easier, and the flavors deepen beautifully.
Slice and serve! Get ready for oohs and aahs.
Substitutions & Additions
One of the best things about this kind of dessert is how easy it is to customize! Here are a few ideas:
- Nut-Free Crust: Skip the nuts and increase the flour slightly, or use graham cracker crumbs mixed with butter for a different kind of base.
- Different Fruit: Not a cherry fan? Try strawberry pie filling, blueberry, or even mixed berry!
- Pudding Power: Swap the chocolate pudding for vanilla, cheesecake, white chocolate, or even butterscotch instant pudding.
- Extra Texture: Sprinkle some mini chocolate chips, toasted coconut, or chopped nuts over the top Cool Whip layer before serving.
- Cream Cheese Layer Boost: Add a splash of almond extract or vanilla extract to the cream cheese mixture for extra flavor.
Tips for Success
Making this lush is pretty foolproof, but here are a few simple tips to ensure perfection:
- Soften That Cream Cheese: Let your cream cheese sit at room temperature for at least 30 minutes to an hour before mixing. It makes a world of difference in getting a smooth, lump-free layer.
- Cool the Crust COMPLETELY: I know I mentioned it before, but seriously, wait until the crust is totally cool. Warmth melts the layers above it!
- Be Gentle When Spreading: When adding the creamy and pudding layers, try to dollop them over the surface first and then gently spread them out to avoid swirling into the layer below.
- Chill Time is Key: Do not skimp on the refrigeration time! This dessert relies on being well-chilled to set up properly and make clean slices. Overnight is always best if you can plan ahead.
How to Store It
Good news! This dessert stores beautifully. Just keep it covered tightly with plastic wrap in the refrigerator. It’s usually best enjoyed within 3-4 days. While you could freeze a layered dessert, the texture of the Cool Whip and pudding can change upon thawing, so I really recommend enjoying this one fresh from the fridge.
FAQs
Got questions? I’ve got answers!
Q: Can I use regular pudding instead of instant?
A: No, this recipe specifically calls for instant pudding because it sets up quickly and firmly without cooking. Regular pudding requires cooking and won’t give you the right texture for these layers.
Q: Can I make this dessert ahead of time?
A: Absolutely! In fact, it needs to be made ahead of time to chill and set. Making it the day before you plan to serve it is perfect.
Q: Why is it called “Lush”?
A: These layered desserts are often called “Lush,” “Delight,” “Dream,” or “Dessert Lasagna” because of their rich, layered, and utterly satisfying nature. It’s just a fun name for a delicious layered treat!
Q: Can I use homemade whipped cream instead of Cool Whip?
A: While homemade whipped cream is delicious, Cool Whip is stabilized and holds up much better in layered desserts like this for several days. If you use homemade, the layers might not stay as distinct and the texture could change faster.
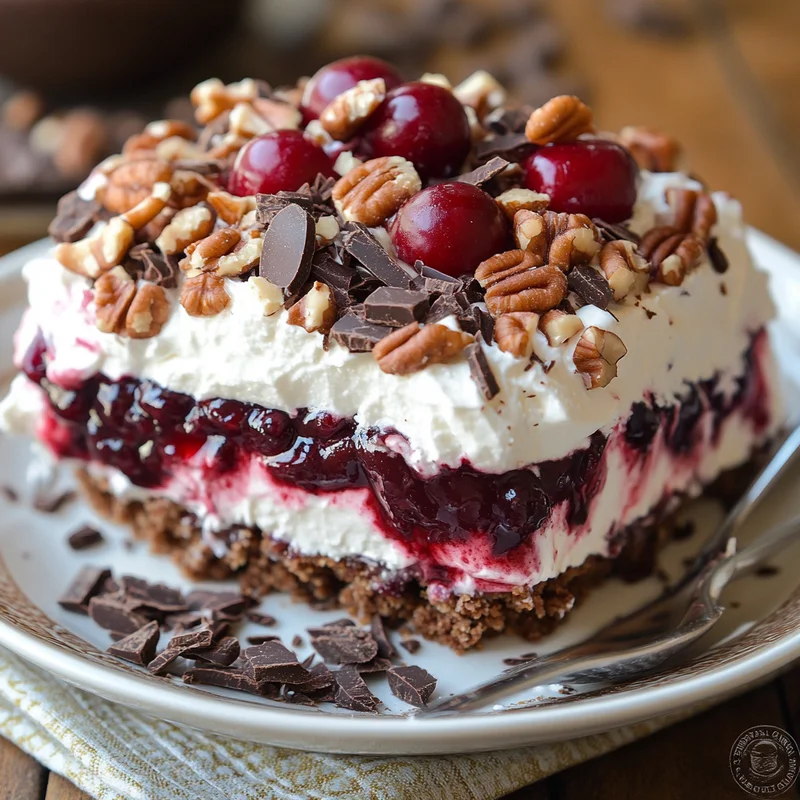
Heavenly Chocolate Cherry Lush: The Easy, Dreamy Layered Dessert
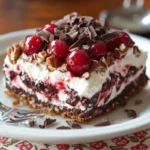
This Chocolate Cherry Lush is a simple, no-bake (mostly) layered dessert perfect for potlucks, parties, and family gatherings. It features a buttery nut crust, cherry pie filling, a creamy cream cheese layer, chocolate pudding, and a fluffy Cool Whip topping, creating a show-stopping treat that’s easy to assemble and requires minimal active time.
- Oven
- 9×13 inch baking pan
- Medium bowl
- Mixing bowls
- Plastic wrap
- Refrigerator
Main Ingredients
- 1 cup all-purpose flour
- 0.5 cup crushed nuts (such as pecans)
- 0.25 cup sugar
- 8 tablespoons salted butter (melted)
- 21 ounces cherry pie filling (1 can)
- 8 ounces cream cheese (softened)
- 1 cup powdered sugar
- 1 cup Cool Whip (from 8 oz container, for the creamy layer)
- 6.8 ounces chocolate instant pudding (2 packages)
- 3 cups milk
- Remaining Cool Whip (from 8 oz container, for the topping)
- 0.5 cup chocolate shavings or chocolate jimmies ((optional))
- Preheat your oven to 350°F (175°C). Get a 9×13 inch baking pan ready.
- Layer One: The Crust! In a medium bowl, toss together the flour, crushed nuts, and ¼ cup sugar. Pour in the melted butter and stir everything together until it looks like wet sand or coarse crumbs.
- Press this mixture firmly and evenly into the bottom of your baking pan. Use the bottom of a glass or a flat measuring cup to pack it down nicely.
- Pop the crust into the preheated oven and bake for 15-20 minutes, or until the edges look lightly golden brown.
- Let the crust cool completely before adding the next layer.
- Layer Two: The Cherry Surprise! Once the crust is completely cool, grab that can of cherry pie filling. Gently spread it evenly over the cooled crust.
- Layer Three: The Creamy Dream! In a separate bowl, beat the softened cream cheese and powdered sugar together until it’s super smooth and no lumps remain.
- Gently fold in that 1 cup of Cool Whip (from the 8 oz container). Carefully spread this creamy mixture over the cherry layer.
- Layer Four: Chocolate Magic! In another bowl, whisk together the two packages of chocolate instant pudding mix and the 3 cups of milk. Whisk for about 2 minutes until it starts to thicken slightly.
- Carefully spread this chocolate pudding layer over the cream cheese layer. Dollop spoonfuls over the surface and then gently spread them out.
- Layer Five: The Fluffy Crown! Spread the remaining Cool Whip (from the 8 oz container) evenly over the chocolate pudding layer.
- Finishing Touches! Sprinkle your beautiful dessert with chocolate shavings or jimmies if you like.
- Cover the pan gently with plastic wrap and pop it into the refrigerator. It needs at least 3-4 hours to chill and set up properly. For best results, chill overnight.
- Slice and serve.
This dessert stores beautifully, covered tightly with plastic wrap in the refrigerator, for 3-4 days. Ensure cream cheese is softened completely for a smooth layer. Always cool the crust completely before adding layers to prevent melting. Be gentle when spreading layers to keep them distinct. Do not skip the chilling time; it’s crucial for setting and easy slicing. Instant pudding is required, not regular pudding.