Introduction
Oh, friends, let me tell you about a little bite of heaven! Do you ever get those cravings for something sweet, creamy, and utterly comforting? Maybe it reminds you of grandma’s famous pie, or perhaps a sunny vacation somewhere tropical? That’s exactly what these Coconut Cream Pie Cookie Cups do for me. They capture all the magic of a classic coconut cream pie – that silky filling, the sweet coconut, the hint of vanilla – but tuck it into the most adorable, easy-to-handle cookie cup. No slicing required, just pure, unadulterated joy in every single bite. And the best part? They are SO much easier than making a whole pie from scratch. Seriously, if you can scoop cookie dough and whisk a few ingredients, you can make these!
Why You’ll Love This Recipe
- Fast: Using store-bought cookie dough is a total game-changer!
- Easy: Minimal steps, maximum deliciousness.
- Giftable: Pack these up in a cute box, and you’ve got the perfect sweet treat for friends or neighbors.
- Crowd-pleasing: Who can resist a mini pie in a cookie? Not me!
Ingredients
Gather ’round the counter, let’s look at what you’ll need. Most of these are pantry staples, but get ready for some tropical vibes!
- Refrigerated Sugar Cookie Dough (33 ounces, 2 rolls): Your shortcut hero! This gets us straight to the cookie cup base without the mixing and chilling.
- All-Purpose Flour (⅔ cup): A little flour helps thicken our cookie cups and gives them structure so they hold that yummy filling.
- Coconut Milk (13.5 ounces, 1 can): Go for the full-fat, canned kind for the richest, creamiest flavor. This is the heart of our coconut cream filling!
- Half and Half (1½ cups): Adds extra richness and smooth texture to the custard. You can substitute with whole milk or even light cream if you prefer.
- Eggs (2, beaten) & Egg Yolk (1): These are our binding agents, helping the filling set up into that perfect, sliceable (well, scoopable in this case!) cream pie consistency. The extra yolk adds richness!
- Granulated Sugar (¾ cup): Sweetens our glorious filling.
- Corn Starch (½ cup): Our main thickener! This is what transforms the liquid ingredients into that luscious, pudding-like filling.
- Salt (¼ teaspoon): Just a pinch to balance the sweetness and bring out all those lovely flavors.
- Sweetened Flaked Coconut (1½ cups): We’ll use this both in the filling and maybe a little sprinkle on top! Sweetened gives you that classic pie flavor.
- Coconut Extract (1 teaspoon): Boosts that beautiful coconut flavor. A little goes a long way!
- Garnish (Optional): Whipped cream, Toasted coconut: For that extra touch of elegance and flavor! Totally optional, but highly recommended.
How to Make It
Okay, apron on? Let’s get these little beauties made. It’s easier than you think, I promise!
Step 1: Prep Your Cookie Cups
First things first, let’s get those cookie bases ready. Preheat your oven according to the cookie dough package directions. Grab a mini muffin tin – this is key for getting those perfect cup shapes. You don’t usually need to grease it since sugar cookies have plenty of butter, but if your pan is notorious for sticking, a quick spray won’t hurt.
Take your refrigerated cookie dough and combine it with the ⅔ cup of all-purpose flour in a bowl. This extra flour helps the cookies hold their shape better while baking, preventing them from spreading too much and losing their ‘cup’ potential. Roll the dough into small balls, about 1 to 1.5 inches in diameter, and press one into each cavity of the mini muffin tin. You want to press down and up the sides a little to create a shell or cup shape.
Bake for about 10-14 minutes, or until the edges are lightly golden. As soon as they come out of the oven, you might need to gently press the centers down again with a spoon or a small tart shaper to ensure they have a nice deep well for the filling. Let them cool in the tin for about 10-15 minutes before carefully removing them to a wire rack to cool completely.
Step 2: Whip Up the Creamy Filling
While your cookie cups are cooling, let’s make the star of the show – the coconut cream filling! In a medium saucepan, whisk together the granulated sugar, corn starch, and salt. This helps prevent lumps later.
In a separate bowl, whisk together the coconut milk, half and half, beaten eggs, and the extra egg yolk until well combined. Slowly pour this wet mixture into the saucepan with the dry ingredients, whisking constantly to make sure everything is smooth.
Place the saucepan over medium heat. Cook, whisking constantly, until the mixture thickens significantly and comes to a gentle simmer. It should be thick enough to coat the back of a spoon. This usually takes about 8-12 minutes. Don’t rush it, and keep whisking so the bottom doesn’t scorch!
Once thickened, remove the pan from the heat and stir in the sweetened flaked coconut and the coconut extract. Whisk until everything is combined and the coconut is distributed throughout the filling.
Step 3: Chill and Assemble
Pour the hot filling into a heatproof bowl. To prevent a skin from forming on top, press a piece of plastic wrap directly onto the surface of the filling. Pop it in the refrigerator for at least 2-3 hours, or until it’s completely chilled and firmly set. This is crucial for that perfect cream pie texture!
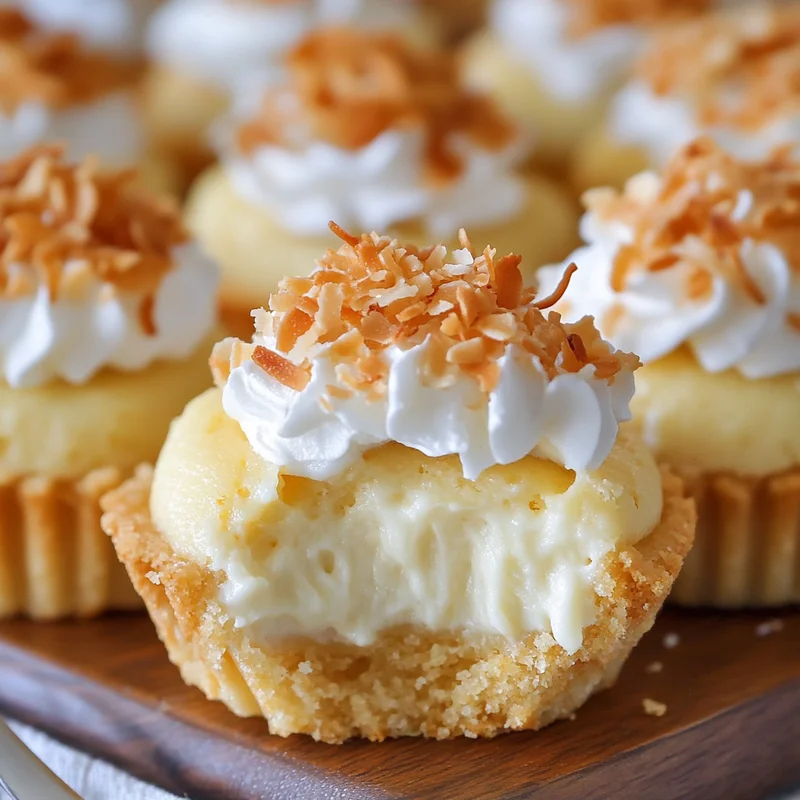
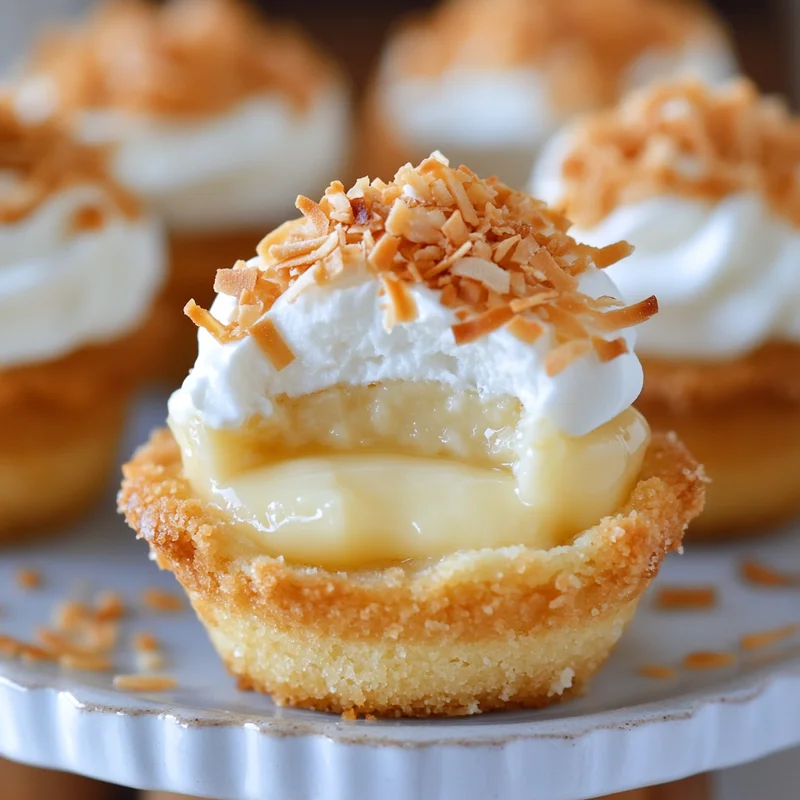
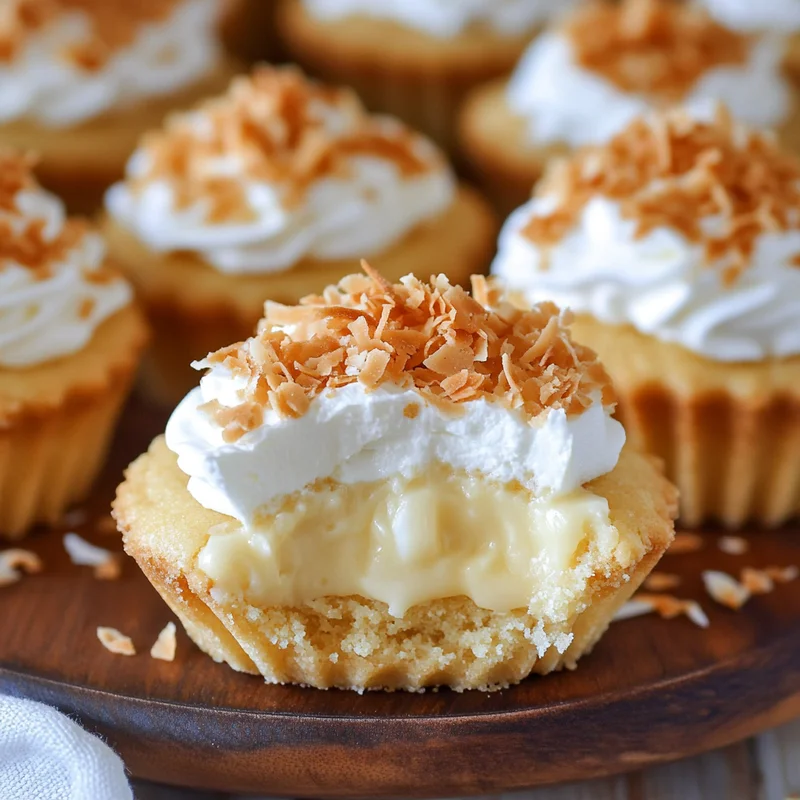
Once the cookie cups are cool and the filling is chilled, it’s assembly time! Spoon or pipe the coconut cream filling into each cookie cup. Fill them generously!
Now for the optional, but highly recommended, garnish. Top each cup with a swirl of whipped cream and a sprinkle of toasted coconut. Toasted coconut adds such a wonderful nutty depth of flavor!
Substitutions & Additions
Want to play around a little? Here are some ideas:
- Dairy-Free? You could try using full-fat canned coconut milk instead of half and half, but you’ll need to adjust the cornstarch slightly as it might not thicken the same. Look for vegan sugar cookie dough options.
- Different Milk? Whole milk works instead of half and half, the filling might be slightly less rich.
- Less Sweet? Use unsweetened flaked coconut, though you might need to add a touch more sugar to the filling depending on your preference.
- Chocolate Lover? Add a layer of melted chocolate to the bottom of the cooled cookie cups before adding the filling, or sprinkle mini chocolate chips on top.
- Different Extracts? A tiny drop of rum extract or vanilla extract along with the coconut extract can add complexity.
Tips for Success
A few little pointers to make sure your cookie cups are perfect:
- Flour Power: Don’t skip mixing the flour into the store-bought dough. It really helps the cups keep their shape!
- Cup Shape: Press firmly when forming the cups in the muffin tin, and repress gently right after they come out of the oven if they’ve puffed up.
- Whisk Constantly: While making the filling, keep whisking! This prevents lumps and burning.
- Chill Time is Crucial: Don’t shortcut the chilling time for the filling. It needs to be completely cold and set to have the right texture.
- Prep Ahead: You can bake the cookie cups a day ahead of time and store them in an airtight container at room temperature. You can also make the filling a day ahead and keep it chilled in the fridge. Assemble right before serving for the freshest results.
How to Store It
Once assembled, these Coconut Cream Pie Cookie Cups need to be stored in the refrigerator due to the creamy filling. Keep them in a single layer in an airtight container if possible. They are best enjoyed within 3-4 days.
FAQs
Can I use homemade sugar cookie dough?
Absolutely! Just make sure it’s a recipe that doesn’t spread too much. You might still want to add a couple of tablespoons of extra flour to the dough portion you use for the cups.
My filling isn’t thick enough. What happened?
This usually means it didn’t cook long enough at a high enough temperature after adding the wet ingredients, or it didn’t chill long enough. Make sure you bring it to a gentle simmer while whisking constantly, and ensure it chills for the full time until firmly set.
Can I freeze these?
I don’t recommend freezing the assembled cups. The texture of the filling can change when frozen and thawed, and the cookies might get soggy. You could potentially freeze the baked cookie cups before filling, then thaw and fill later.
Do I have to use sweetened coconut?
Nope! You can use unsweetened flaked coconut, but the overall sweetness level of the final dessert might be lower. Adjust the sugar in the filling if you prefer it sweeter.

Easy Coconut Cream Pie Cookie Cups
Equipment
- Mini muffin tin
- bowl for cookie dough
- Medium saucepan
- Whisk
- Separate bowl for wet ingredients
- Heatproof bowl for cooling filling
- Plastic wrap
- spoon or small tart shaper for pressing centers
- Wire rack
- Airtight container for storage
Ingredients
Main Ingredients
- 33 ounces Refrigerated Sugar Cookie Dough 2 rolls
- 0.6666 cup All-Purpose Flour
- 13.5 ounces Coconut Milk 1 can, full-fat, canned kind
- 1.5 cups Half and Half Substitute with whole milk or even light cream if you prefer
- 2 Eggs beaten
- 1 Egg Yolk
- 0.75 cup Granulated Sugar
- 0.5 cup Corn Starch
- 0.25 teaspoon Salt
- 1.5 cups Sweetened Flaked Coconut
- 1 teaspoon Coconut Extract
- Whipped cream Optional garnish
- Toasted coconut Optional garnish
Instructions
- Prep Your Cookie Cups: First things first, let's get those cookie bases ready. Preheat your oven according to the cookie dough package directions. Grab a mini muffin tin – this is key for getting those perfect cup shapes. You don't usually need to grease it since sugar cookies have plenty of butter, but if your pan is notorious for sticking, a quick spray won't hurt. Take your refrigerated cookie dough and combine it with the ⅔ cup of all-purpose flour in a bowl. This extra flour helps the cookies hold their shape better while baking, preventing them from spreading too much and losing their 'cup' potential. Roll the dough into small balls, about 1 to 1.5 inches in diameter, and press one into each cavity of the mini muffin tin. You want to press down and up the sides a little to create a shell or cup shape. Bake for about 10-14 minutes, or until the edges are lightly golden. As soon as they come out of the oven, you might need to gently press the centers down again with a spoon or a small tart shaper to ensure they have a nice deep well for the filling. Let them cool in the tin for about 10-15 minutes before carefully removing them to a wire rack to cool completely.
- Whip Up the Creamy Filling: While your cookie cups are cooling, let's make the star of the show – the coconut cream filling! In a medium saucepan, whisk together the granulated sugar, corn starch, and salt. This helps prevent lumps later. In a separate bowl, whisk together the coconut milk, half and half, beaten eggs, and the extra egg yolk until well combined. Slowly pour this wet mixture into the saucepan with the dry ingredients, whisking constantly to make sure everything is smooth. Place the saucepan over medium heat. Cook, whisking constantly, until the mixture thickens significantly and comes to a gentle simmer. It should be thick enough to coat the back of a spoon. This usually takes about 8-12 minutes. Don't rush it, and keep whisking so the bottom doesn't scorch! Once thickened, remove the pan from the heat and stir in the sweetened flaked coconut and the coconut extract. Whisk until everything is combined and the coconut is distributed throughout the filling.
- Chill and Assemble: Pour the hot filling into a heatproof bowl. To prevent a skin from forming on top, press a piece of plastic wrap directly onto the surface of the filling. Pop it in the refrigerator for at least 2-3 hours, or until it's completely chilled and firmly set. This is crucial for that perfect cream pie texture! Once the cookie cups are cool and the filling is chilled, it's assembly time! Spoon or pipe the coconut cream filling into each cookie cup. Fill them generously! Now for the optional, but highly recommended, garnish. Top each cup with a swirl of whipped cream and a sprinkle of toasted coconut. Toasted coconut adds such a wonderful nutty depth of flavor!
Notes
- Flour Power: Don't skip mixing the flour into the store-bought dough. It really helps the cups keep their shape!
- Cup Shape: Press firmly when forming the cups in the muffin tin, and repress gently right after they come out of the oven if they've puffed up.
- Whisk Constantly: While making the filling, keep whisking! This prevents lumps and burning.
- Chill Time is Crucial: Don't shortcut the chilling time for the filling. It needs to be completely cold and set to have the right texture.
- Prep Ahead: You can bake the cookie cups a day ahead of time and store them in an airtight container at room temperature. You can also make the filling a day ahead and keep it chilled in the fridge. Assemble right before serving for the freshest results. Substitutions & Additions:
- Dairy-Free: You could try using full-fat canned coconut milk instead of half and half, but you'll need to adjust the cornstarch slightly as it might not thicken the same. Look for vegan sugar cookie dough options.
- Different Milk: Whole milk works instead of half and half, the filling might be slightly less rich.
- Less Sweet: Use unsweetened flaked coconut, though you might need to add a touch more sugar to the filling depending on your preference.
- Chocolate Lover: Add a layer of melted chocolate to the bottom of the cooled cookie cups before adding the filling, or sprinkle mini chocolate chips on top.
- Different Extracts: A tiny drop of rum extract or vanilla extract along with the coconut extract can add complexity. Storage:
- Once assembled, these Coconut Cream Pie Cookie Cups need to be stored in the refrigerator due to the creamy filling. Keep them in a single layer in an airtight container if possible. They are best enjoyed within 3-4 days. FAQs:
- Can I use homemade sugar cookie dough? Absolutely! Just make sure it's a recipe that doesn't spread too much. You might still want to add a couple of tablespoons of extra flour to the dough portion you use for the cups.
- My filling isn't thick enough. What happened? This usually means it didn't cook long enough at a high enough temperature after adding the wet ingredients, or it didn't chill long enough. Make sure you bring it to a gentle simmer while whisking constantly, and ensure it chills for the full time until firmly set.
- Can I freeze these? I don't recommend freezing the assembled cups. The texture of the filling can change when frozen and thawed, and the cookies might get soggy. You could potentially freeze the baked cookie cups before filling, then thaw and fill later.
- Do I have to use sweetened coconut? Nope! You can use unsweetened flaked coconut, but the overall sweetness level of the final dessert might be lower. Adjust the sugar in the filling if you prefer it sweeter.