Introduction
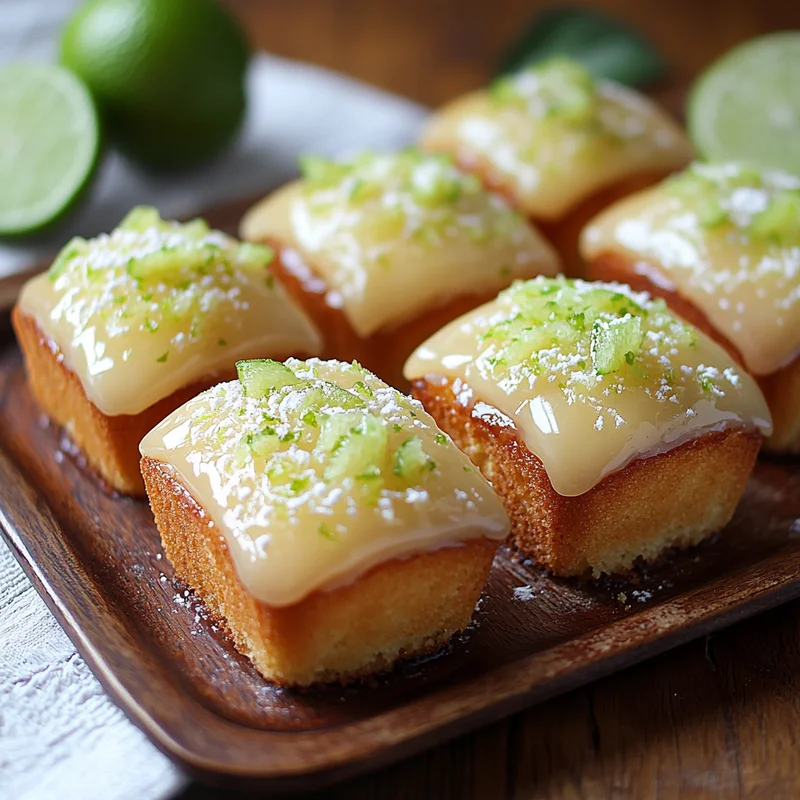
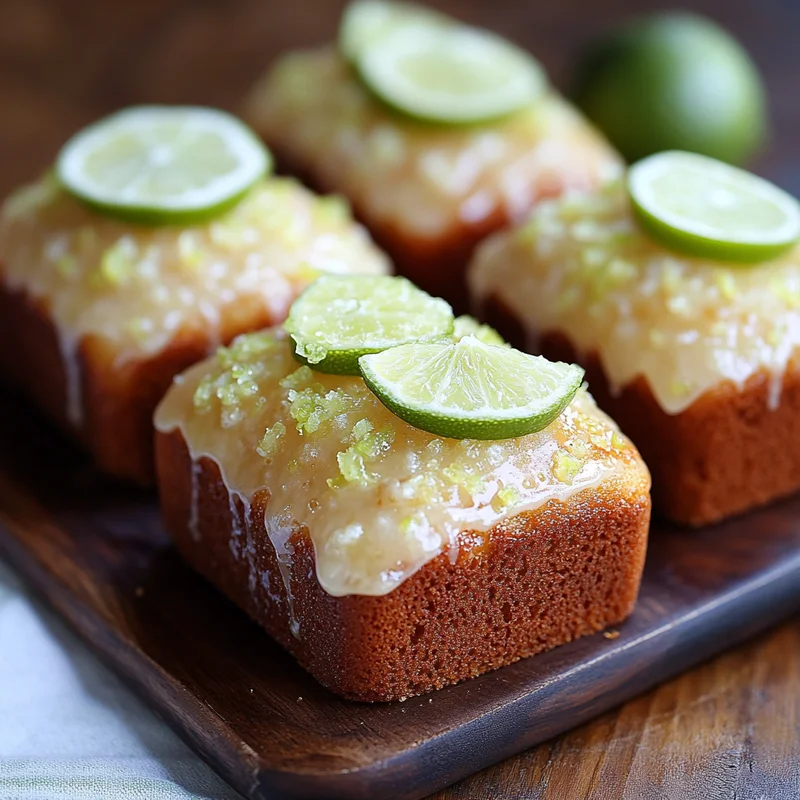
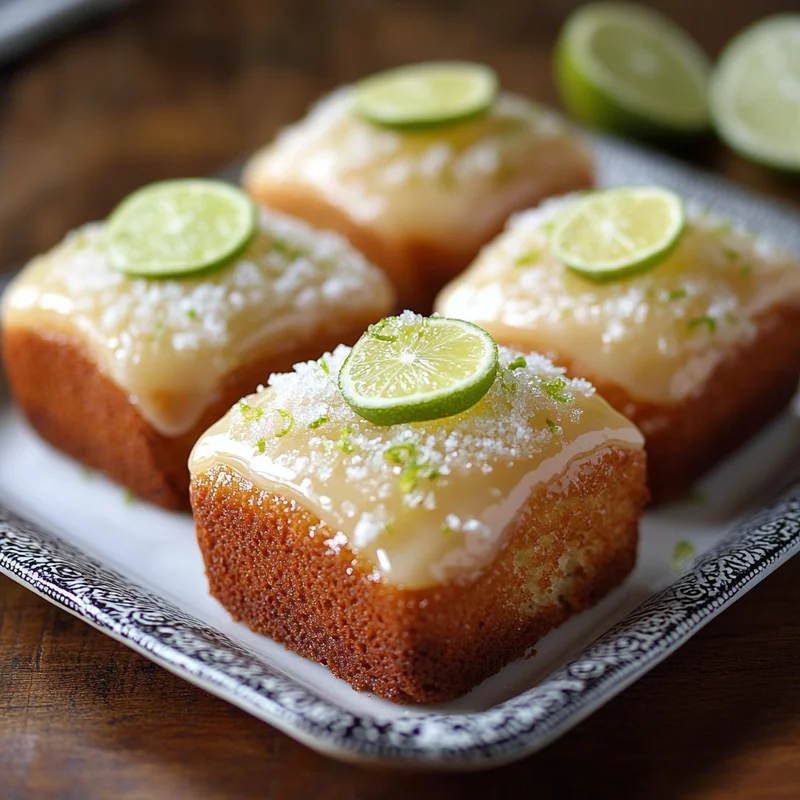
Hey baking buddies! Remember those moments when you bite into something so perfectly tangy, sweet, and moist that it just transports you? That’s exactly what happens with these Key Lime Mini Loaf Cakes. They’re like little bursts of sunshine, perfect for lifting your spirits on any day.
I whipped up a batch of these recently, and the smell filling my kitchen was just heavenly! What I love most is how incredibly simple they are. No fancy techniques, just straightforward baking magic. If you’ve got a craving for something bright and delightful, and maybe want a sweet treat that feels a little bit special without a lot of fuss, you are in the right place. These mini loaves are super quick to mix up and bake, making them ideal for a spontaneous baking session or when you need a charming homemade gift.
Why You’ll Love This Recipe
- Fast: Seriously, you can have these mixed and in the oven in no time. Perfect for when a citrus craving strikes!
- Easy: If you can stir, you can make these! Great for beginner bakers and seasoned pros alike.
- Giftable: Wrap these up with a ribbon and you’ve got the cutest, most delicious homemade gift for friends, neighbors, or teachers.
- Crowd-pleasing: That sweet and tart key lime flavor? It’s a universal favorite! Watch them disappear quickly.
Ingredients
Gather your goodies! Here’s what you’ll need to make these sunny little loaves:
- 1 ½ cups All-purpose flour: Our trusty foundation for a tender crumb.
- 1 cup Sugar: For the perfect amount of sweetness in the cake.
- ¾ cup Powdered sugar: This is mostly for that gorgeous, tangy glaze we’re going to drizzle over the top!
- ½ cup Butter: Make sure it’s softened to room temperature! This is key for a smooth batter. (That’s half a cup, or one stick).
- ½ cup Milk: Whole milk works great here, but whatever you have on hand is likely just fine.
- 6 tbsp Key lime juice: Freshly squeezed is always best for that vibrant flavor! It might take about 6-8 key limes depending on how juicy they are.
- 3 tbsp Key lime zest: Don’t skip this! The zest holds so much of that intense limey goodness. Use a microplane for best results, and only get the green part, not the white pith.
- 2 Eggs: Room temperature eggs mix into the batter more smoothly. If you forget, just pop them in a bowl of warm water for a few minutes.
- 1 tsp Baking powder: This is our leavening agent, helping the cakes rise nicely and become light.
- ⅛ tsp Salt: Just a tiny pinch to balance the sweetness and brighten all the flavors.
How to Make It
Okay, aprons on! Let’s bake these beauties:
- Prep Your Pans: Preheat your oven to 350°F (175°C). Grease and flour your mini loaf pans really well, or use baking spray with flour. Mini loaf pans come in different sizes, so baking time might vary slightly, but typically standard ones hold about 1/2 cup of batter.
- Cream the Butter and Sugar: In a large bowl, using an electric mixer (or a whisk and some arm power!), cream together the softened butter and the 1 cup of granulated sugar until it’s light and fluffy. This usually takes a couple of minutes. Scrape down the sides of the bowl as needed.
- Add the Eggs: Beat in the eggs one at a time, mixing well after each addition. Make sure each egg is fully incorporated before adding the next.
- Combine Dry Ingredients: In a separate medium bowl, whisk together the all-purpose flour, baking powder, and salt.
- Combine Wet Ingredients: In a small bowl or liquid measuring cup, whisk together the milk and the 6 tablespoons of key lime juice.
- Alternate Wet and Dry: Add about a third of the dry ingredients to the butter mixture and mix on low speed until just combined. Then add about half of the wet ingredients and mix until combined. Repeat, ending with the dry ingredients. Be careful not to overmix the batter – a few streaks of flour are okay; you’ll mix them in in the next step.
- Stir in the Zest: Gently fold in the key lime zest with a spatula. Oh, that smell!
- Fill the Pans: Divide the batter evenly among your prepared mini loaf pans. Fill them about two-thirds full.
- Bake: Bake for 20-25 minutes, or until a toothpick inserted into the center of a loaf comes out clean. The tops should be golden brown.
- Cool: Let the mini loaves cool in the pans for about 10 minutes before carefully removing them to a wire rack to cool completely.
- Make the Glaze: While the cakes cool, whisk together the ¾ cup powdered sugar with 1-2 tablespoons of key lime juice (or milk, if you prefer a less intense lime glaze) in a small bowl until smooth and drizzly. Start with 1 tablespoon of liquid and add more just a tiny bit at a time until you reach your desired consistency.
- Glaze: Once the cakes are completely cool, drizzle the glaze generously over the tops. Let the glaze set before serving.
Substitutions & Additions
Want to play around a little? Here are some ideas:
- Regular Limes: Can’t find key limes? Regular Persian limes work too! The flavor is slightly different (key limes are more aromatic and a little less tart), but they will still be delicious.
- Add White Chocolate: Stir in ½ cup of white chocolate chips to the batter with the zest for an extra treat. Key lime and white chocolate are a match made in heaven!
- Coconut Twist: Add a little shredded coconut to the batter or sprinkle some on top of the wet glaze. Key lime and coconut are classic companions!
- Other Extracts: A tiny splash (½ tsp) of vanilla extract or coconut extract in the batter can add another layer of flavor.
Tips for Success
A few little pointers to make sure your mini loaves turn out perfectly:
- Room Temperature Ingredients: This really helps everything combine smoothly and results in a better texture.
- Don’t Overmix: Once you add the flour, mix until just combined. Overmixing develops the gluten too much and can result in tough cakes.
- Zest Carefully: Use a fine grater or microplane and only grate the green part of the lime peel. The white pith underneath is bitter!
- Check for Doneness: A toothpick test is your best friend. If it comes out clean or with just a few moist crumbs attached, they’re done.
- Cool Completely Before Glazing: If the cakes are warm, the glaze will just melt and run off instead of setting nicely.
How to Store It
These little cakes keep quite well! Once the glaze has set, store them in an airtight container at room temperature for up to 3-4 days. If you want to keep them longer, you can store them in the refrigerator for about a week. For longer storage, wrap individual cooled (and unglazed) loaves tightly in plastic wrap and then aluminum foil, and freeze for up to 3 months. Thaw at room temperature.
FAQs
Got questions? I’ve got answers!
- What are key limes? Key limes are smaller, rounder, and more aromatic than regular limes. They are also slightly more tart and acidic.
- Can I use bottled key lime juice? Yes, you can! Fresh is always best for the brightest flavor, but bottled will work in a pinch.
- How many mini loaves does this make? This recipe typically makes about 6-8 standard mini loaf cakes, depending on the size of your pans.
- Can I make this in a regular loaf pan? Yes, you can! Pour the batter into one standard 9×5 inch loaf pan. The baking time will be longer, likely around 45-55 minutes. Check for doneness with a toothpick in the center.
I hope you love these Key Lime Mini Loaf Cakes as much as I do! They are truly a ray of sunshine in cake form. Happy baking!

Key Lime Mini Loaf Cakes
Equipment
- Mini loaf pans standard size holds about 1/2 cup batter
- Electric mixer optional, a whisk works too
- Whisk
- Spatula
- Large bowl
- Medium bowl
- Small bowl
- Liquid measuring cup
- Microplane for zesting
- Wire rack for cooling
- toothpick for testing doneness
Ingredients
For the Cakes
- 1.5 cups All-purpose flour
- 1 cup Sugar granulated
- 0.5 cup Butter softened to room temperature (one stick)
- 0.5 cup Milk whole milk works well, room temperature recommended
- 6 tbsp Key lime juice freshly squeezed is best, about 6-8 key limes
- 3 tbsp Key lime zest green part only, from 6-8 key limes
- 2 Eggs room temperature
- 1 tsp Baking powder
- 0.125 tsp Salt
For the Glaze
- 0.75 cup Powdered sugar
- 1 tbsp Key lime juice or Milk add more tiny bit at a time until desired consistency
Instructions
- Preheat your oven to 350°F (175°C). Grease and flour your mini loaf pans really well, or use baking spray with flour.
- In a large bowl, using an electric mixer (or a whisk and some arm power!), cream together the softened butter and the 1 cup of granulated sugar until it's light and fluffy. Scrape down the sides of the bowl as needed.
- Beat in the eggs one at a time, mixing well after each addition. Make sure each egg is fully incorporated before adding the next.
- In a separate medium bowl, whisk together the all-purpose flour, baking powder, and salt.
- In a small bowl or liquid measuring cup, whisk together the milk and the 6 tablespoons of key lime juice.
- Add about a third of the dry ingredients to the butter mixture and mix on low speed until just combined. Then add about half of the wet ingredients and mix until combined. Repeat, ending with the dry ingredients. Be careful not to overmix the batter.
- Gently fold in the key lime zest with a spatula.
- Divide the batter evenly among your prepared mini loaf pans. Fill them about two-thirds full.
- Bake for 20-25 minutes, or until a toothpick inserted into the center of a loaf comes out clean. The tops should be golden brown.
- Let the mini loaves cool in the pans for about 10 minutes before carefully removing them to a wire rack to cool completely.
- While the cakes cool, whisk together the ¾ cup powdered sugar with 1-2 tablespoons of key lime juice (or milk, if you prefer a less intense lime glaze) in a small bowl until smooth and drizzly. Start with 1 tablespoon of liquid and add more just a tiny bit at a time until you reach your desired consistency.
- Once the cakes are completely cool, drizzle the glaze generously over the tops. Let the glaze set before serving.
Notes
- Use room temperature ingredients for smooth combining and better texture.
- Don't overmix the batter once flour is added to avoid tough cakes.
- Zest carefully, only grating the green part of the peel, avoiding the bitter white pith.
- Check for doneness with a toothpick; it should come out clean or with a few moist crumbs.
- Cool cakes completely before glazing, or the glaze will melt. Storage:
- Store in an airtight container at room temperature for up to 3-4 days.
- Can store in the refrigerator for about a week.
- For longer storage, wrap individual cooled (and unglazed) loaves tightly and freeze for up to 3 months. Thaw at room temperature. Substitutions:
- Regular Persian limes can be used instead of key limes, though the flavor is slightly different.
- Bottled key lime juice can be used if fresh is unavailable. Additions:
- Stir in ½ cup white chocolate chips with the zest.
- Add shredded coconut to the batter or sprinkle on wet glaze.
- Add ½ tsp vanilla extract or coconut extract to the batter for another layer of flavor.