
Introduction
Oh, friends, do I have a treat for you! Today, we’re diving into something truly special: Lemon Lava Cakes. Imagine this: a warm, gooey center bursting with bright, sunny lemon flavor, all wrapped up in a delicate cake. It’s the kind of dessert that instantly transports you to a happy place, maybe a cozy kitchen on a spring afternoon. And the best part? These little wonders are surprisingly simple to whip up, perfect for a weeknight pick-me-up or an impressive dessert for guests that requires hardly any fuss. I remember the first time I made these, and the “oohs” and “aahs” were immediate. Let’s get baking!
Why You’ll Love This Recipe
- Fast: From start to finish, you can have these beautiful cakes ready in under 30 minutes. Perfect for when a craving strikes!
- Easy: No fancy techniques here! Just simple steps that anyone can follow.
- Giftable: Imagine presenting a beautifully packaged ramekin with these ready to bake. They make for a thoughtful and delicious homemade gift!
- Crowd-Pleasing: Who can resist a warm, molten dessert with a burst of citrus? These are always a hit!

Ingredients
Gathering your ingredients is half the fun! Here’s what you’ll need to create these delightful Lemon Lava Cakes:
- 1 cup white chocolate baking chips: These create that luscious, creamy base for our molten center.
- ½ cup unsalted butter, cubed: The richer, the better! Cubing it helps it melt smoothly.
- ⅔ cup all-purpose flour: Just enough to give our cakes a lovely structure.
- ½ cup + 1 tbsp granulated sugar: For that perfect touch of sweetness.
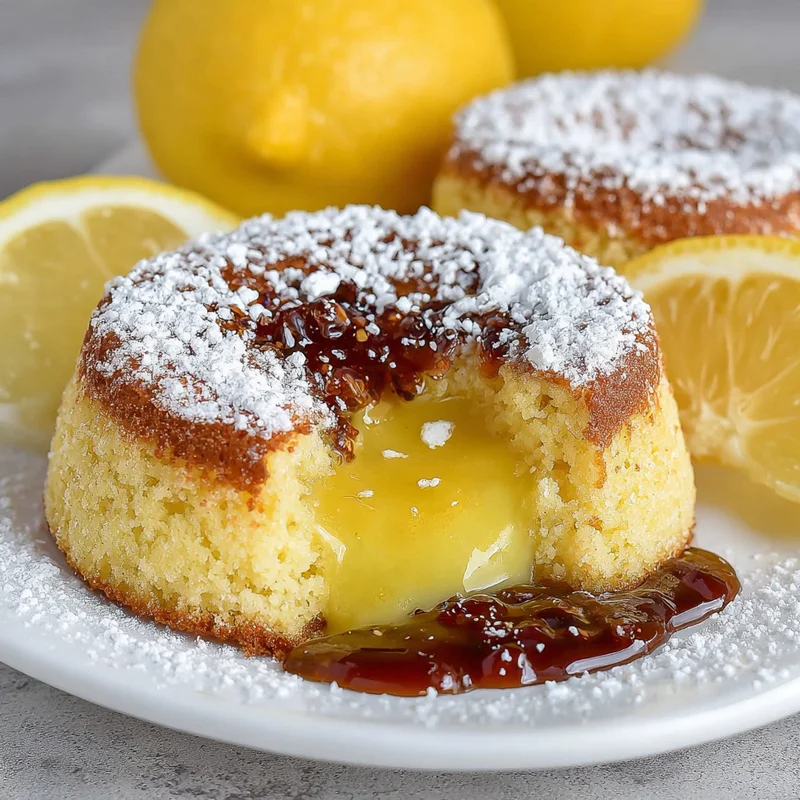
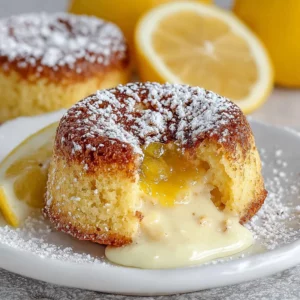
- ⅔ cup lemon curd: This is where all that vibrant lemon flavor comes from! You can find this in most grocery stores, or if you’re feeling adventurous, make your own.
- 2 tbsp lemon zest (from about 2 lemons): Don’t skip this! It adds an incredible punch of fresh lemon aroma and taste.
- 1 tsp pure vanilla extract: A little goes a long way to enhance all those delicious flavors.
- 4 large eggs: The foundation of our cake batter.
- 4 large egg yolks: These add extra richness and help create that irresistibly gooey center.
- 2 tbsp powdered sugar, for dusting (optional): A little snowdrift on top makes them look extra special!
How to Make It
Alright, apron on? Let’s get down to business. It’s easier than you think!
- Preheat and Prep: First things first, let’s get that oven all warm and cozy. Preheat your oven to 400°F (200°C). While it’s heating up, grab four 6-ounce ramekins. Give them a good grease with butter and then a light dusting of flour. This is key to ensuring your beautiful cakes slide right out later!
- Melt the Magic: Grab a heatproof bowl. Set it over a saucepan with a little bit of simmering water – not boiling, just gently simmering. Add your white chocolate chips and the cubed butter to the bowl. Stir them gently until everything is melted and wonderfully smooth. Once it’s all melty and gorgeous, take it off the heat and let it cool just a touch.
- Dry Ingredients Mix: In a separate bowl, whisk together your flour and granulated sugar. A quick whisk to combine is all you need here.
- Wet Ingredients Unite: Now for the stars of the show! In a nice, big bowl, whisk together the eggs, egg yolks, that lovely lemon curd, the fresh lemon zest, and the vanilla extract. Whisk it all up until it’s a beautiful, uniform color.
- Chocolate Meets Egg: Slowly, and I mean slowly, whisk the slightly cooled melted chocolate mixture into your egg mixture. Keep whisking until it’s all nicely combined and smooth. This is where the magic starts to happen!
- Combine and Conquer: Now, gently add the flour and sugar mixture to your wet ingredients. Whisk it all together until it’s just combined. Be careful not to overmix here – a few little streaks of flour are totally fine. Overmixing can make your cakes tough, and we want them tender!
- Portion Perfection: Divide your gorgeous batter evenly among the prepared ramekins. Fill them about two-thirds of the way full.
- Bake to Perfection: Place the ramekins on a baking sheet. Pop them into your preheated oven and bake for 12-15 minutes. You’re looking for the edges to be set, but the centers should still look a little soft and wiggly. That’s the secret to the lava effect!
- A Moment of Patience: Let your lava cakes sit in their ramekins for just 1 minute. This tiny rest period helps them hold their shape when you flip them.
- The Grand Reveal: Carefully invert each lava cake onto a serving plate. Give them a gentle tap if needed. If you like, a light dusting of powdered sugar over the top looks absolutely darling. Serve them up immediately while they’re warm and the centers are perfectly molten. Enjoy that burst of sunshine!
Substitutions & Additions
Feeling creative? Or maybe you’re missing an ingredient? No worries! Here are some ideas:
- White Chocolate Alternative: If white chocolate isn’t your jam, you can try milk or dark chocolate chips, though the lemon flavor will be less prominent.
- Citrus Swap: Lime curd and lime zest would be a delicious alternative for a slightly different zing!
- Add a Berry: Tuck a fresh raspberry or a couple of blueberries into the center of each ramekin before baking for a fruity surprise.
- Boozy Twist: A tablespoon of limoncello or Grand Marnier stirred into the batter adds a sophisticated touch.
Tips for Success
A few little tricks can make these even more foolproof:
- Don’t Overbake: This is the most important tip for achieving that glorious molten center. Keep an eye on them, and err on the side of underbaking. The residual heat will continue to cook them slightly after you take them out.
- Room Temperature Eggs: While not strictly necessary, using room temperature eggs can help your batter emulsify more smoothly.
- Prep Ahead: You can actually prepare the batter up to a day in advance and store it in the refrigerator in an airtight container. Just give it a gentle stir before dividing into ramekins and adjust the baking time slightly (you might need an extra minute or two if the batter is cold).
- Ramekin Size Matters: Ensure your ramekins are 6-ounce capacity. If yours are larger or smaller, the baking time will need to be adjusted.
How to Store It
These are truly best enjoyed fresh from the oven. However, if you happen to have any leftovers (which is rare in my house!), you can store them:
- Refrigerated: Once cooled, cover the lava cakes tightly and store them in the refrigerator for up to 2 days.
- Reheating: To reheat, place the lava cakes on a microwave-safe plate and microwave on 50% power for about 30-60 seconds, or until warmed through and the center is gooey again. You can also gently reheat them in a 350°F (175°C) oven for about 5-7 minutes.
FAQs
Q: Can I make the batter ahead of time?
A: Yes! You can refrigerate the batter for up to 24 hours. Just give it a good stir before portioning into ramekins and you might need to add a minute or two to the baking time.
Q: What if I don’t have ramekins?
A: You can use other oven-safe small dishes, like muffin tins (though they might bake a bit faster) or even small ceramic bowls.
Q: How do I know when they are done?
A: The edges of the cakes should look set and slightly puffed, while the very center should still look soft and slightly jiggly. They will continue to set up a bit as they cool.
Lemon Lava Cakes
Equipment
- Ramekins four 6-ounce ramekins
- Heatproof bowl
- Saucepan for simmering water
- Baking Sheet
- Whisk
- Mixing bowls
Ingredients
Hauptzutaten
- 1 cup white chocolate baking chips These create that luscious, creamy base for our molten center.
- 0.5 cup unsalted butter cubed, richer the better
- 0.67 cup all-purpose flour Just enough to give our cakes a lovely structure.
- 0.5 cup + 1 tbsp granulated sugar For that perfect touch of sweetness.
- 0.67 cup lemon curd This is where all that vibrant lemon flavor comes from!
- 2 tbsp lemon zest from about 2 lemons, Don't skip this! It adds an incredible punch of fresh lemon aroma and taste.
- 1 tsp pure vanilla extract A little goes a long way to enhance all those delicious flavors.
- 4 large eggs The foundation of our cake batter.
- 4 large egg yolks These add extra richness and help create that irresistibly gooey center.
- 2 tbsp powdered sugar for dusting (optional), A little snowdrift on top makes them look extra special!
Instructions
- Preheat oven to 400°F (200°C). Grease and flour four 6-ounce ramekins.
- In a heatproof bowl set over simmering water, melt white chocolate chips and butter until smooth. Let cool slightly.1 cup white chocolate baking chips
- In a separate bowl, whisk together flour and granulated sugar.1 cup white chocolate baking chips
- In a large bowl, whisk together eggs, egg yolks, lemon curd, lemon zest, and vanilla extract until uniform.1 cup white chocolate baking chips
- Slowly whisk the cooled melted chocolate mixture into the egg mixture until combined and smooth.1 cup white chocolate baking chips
- Gently fold in the flour and sugar mixture until just combined. Do not overmix.1 cup white chocolate baking chips
- Divide batter evenly among prepared ramekins, filling about two-thirds full.
- Place ramekins on a baking sheet and bake for 12-15 minutes. Edges should be set, centers soft and wiggly.
- Let cakes sit in ramekins for 1 minute.
- Carefully invert each lava cake onto a serving plate. Dust with powdered sugar if desired and serve immediately.1 cup white chocolate baking chips