Introduction
Hey there, friend! Ever have one of those days where you just crave something utterly comforting, something that wraps you up like a warm blanket but still feels a little special? For me, that’s often a pot pie. There’s just something magical about that golden, flaky crust hiding a rich, creamy filling. And today, we’re elevating that classic comfort to something truly spectacular with this incredibly easy Lobster Pot Pie.
Now, I know “lobster” might sound fancy or complicated, but I promise you, this recipe is anything but! We’re taking a few smart shortcuts (hello, store-bought crust!) to bring you a dish that tastes like a million bucks but is totally doable on a weeknight or when you just want to impress without the stress. Get ready to make some delicious memories!
Why You’ll Love This Recipe
- Fast-ish: While not lightning speed, it comes together quicker than you’d think, especially using pre-cooked lobster and a ready crust. Weeknight worthy? Absolutely.
- Easy Peasy: If you can chop veggies and stir a pot, you can make this. No complicated pastry work here!
- Giftable Goodness: Bake this in smaller ramekins, and you’ve got the most thoughtful (and delicious) food gift for a friend who needs a pick-me-up.
- Crowd-Pleasing: Who doesn’t love a pot pie? Add lobster, and you’ve got a guaranteed hit for dinner parties or family gatherings.
Ingredients
Gather your ingredients! Here’s what you’ll need to create this creamy, dreamy pot pie filling:
- 3 tbsp butter: The base for our flavorful start.
- 1/2 cup chopped onion: Adds that essential aromatic foundation.
- 1/2 cup chopped celery: A classic partner to the onion and carrot, adding subtle flavor and texture.
- 1/2 cup chopped carrots: Adds sweetness and color to our veggie trio.
- 3 tbsp all-purpose flour: Our thickening agent for that luscious, creamy sauce.
- 1 cup chicken or seafood broth: Adds liquid and depth of flavor. Seafood broth is amazing if you have it!
- 1 cup heavy cream: This is where the magic happens! It makes the filling incredibly rich and smooth.
- 1/2 tsp dried thyme: A little herb-y goodness to complement the seafood.
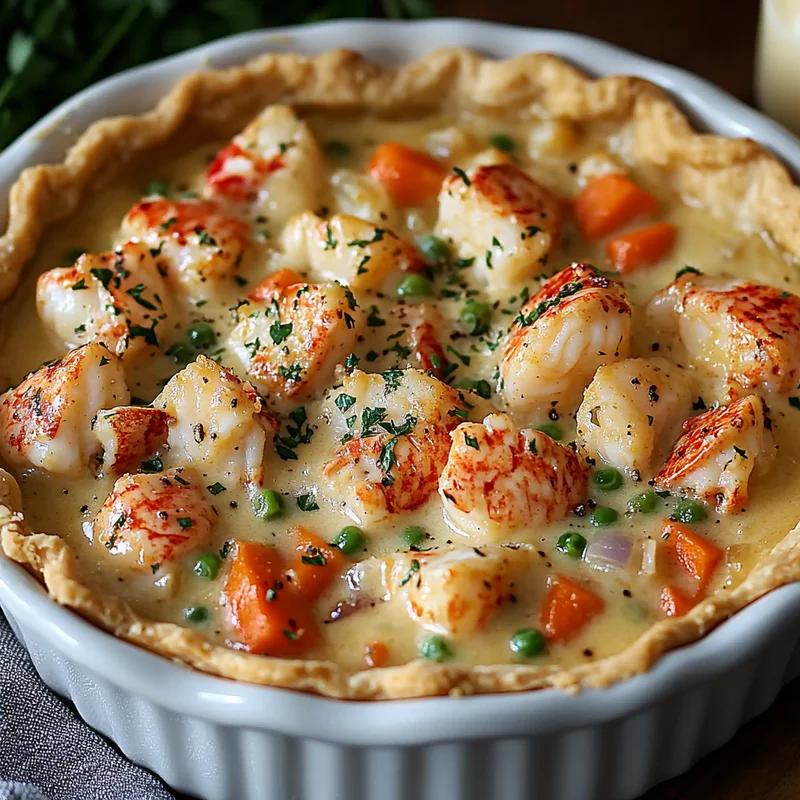
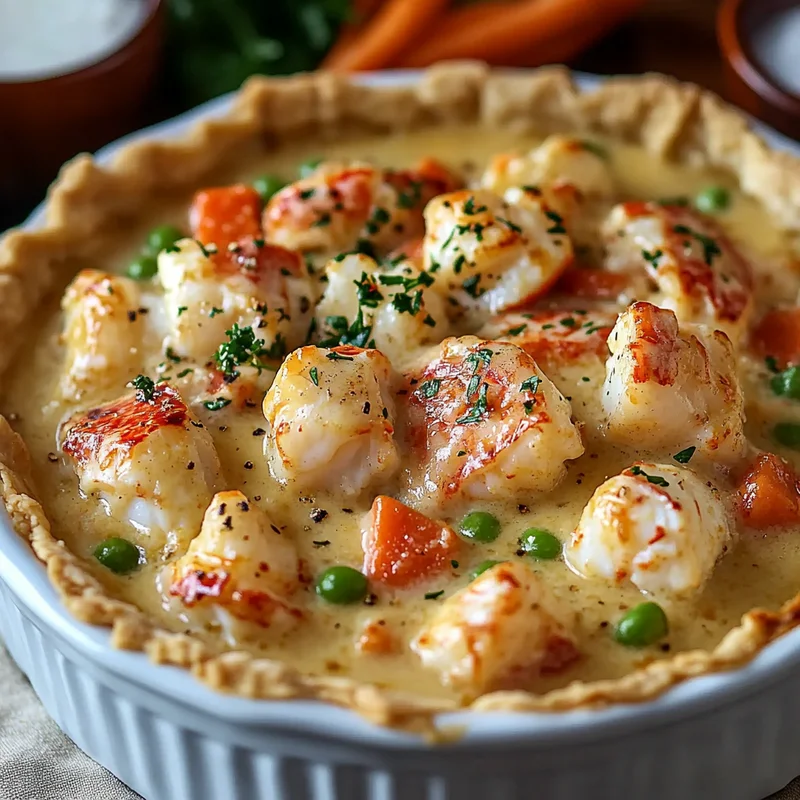
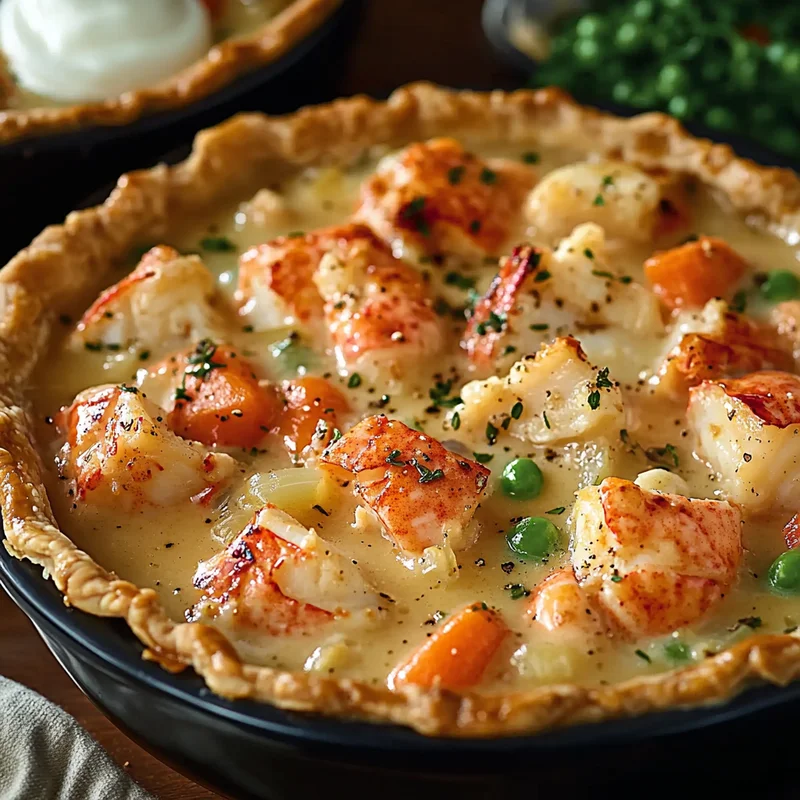
- 2 cups cooked lobster meat, cut into bite-sized pieces: The star of the show! Use leftover lobster, pre-cooked tails, or even frozen cooked lobster (just thaw and pat dry).
- 1/2 cup frozen peas: Adds a pop of color and sweetness right at the end.
- 1 tbsp chopped fresh parsley: Brightens everything up just before baking.
- Salt and pepper to taste: Don’t forget to season your masterpiece!
- 1 store-bought pie crust: Our little secret for speed and ease! Makes this recipe totally approachable.
- 1 egg, beaten: For that beautiful golden shine on top.
How to Make It
Okay, apron on? Let’s get cooking! It’s simpler than you think.
- Get Heated Up: Preheat your oven to 400°F (200°C). Get your pie dish ready too!
- Veggie Sauté Time: Grab a nice big pot or a Dutch oven and melt the butter over medium heat. Toss in your chopped onion, celery, and carrots. Stir them around every now and then until they start to soften up, about 5-7 minutes. They’ll get fragrant and look just right.
- Flour Power: Sprinkle that flour over the softened veggies. Give it a good stir and cook for just one minute, stirring constantly. This cooks out the raw flour taste.
- Build the Creamy Dream: Now, slowly pour in the broth and heavy cream. Whisk constantly as you pour to make sure it stays smooth with no lumps. Keep stirring frequently and let it come to a gentle simmer. Watch it thicken up nicely over the next 5-7 minutes. It should be thick enough to coat the back of a spoon.
- Add the Good Stuff: Time for the main event! Stir in the dried thyme, your lovely chunks of cooked lobster, the frozen peas, and the fresh parsley. Give it all a gentle mix to distribute everything evenly. Now, taste it! Add salt and pepper until it tastes perfect to you. Remember the lobster might be a little salty already, so taste first!
- Fill ‘Er Up: Pour this glorious, creamy filling into your 9-inch pie dish. Spread it out evenly.
- Top It Off: Carefully lay your store-bought pie crust over the filling. Use scissors or a knife to trim the edges so they overhang by about an inch. Crimp those edges around the rim of the pie dish using your fingers or a fork – this seals the filling in and looks pretty! Don’t forget to cut several slits in the top crust with a knife. This lets steam escape so your crust doesn’t puff up like a balloon.
- Give It Shine: Brush the top of the pie crust all over with the beaten egg. This gives it that beautiful golden-brown color as it bakes.
- Bake Until Bubbly: Pop the pie dish onto a baking sheet (this catches any potential drips, saving you oven-cleaning headaches!). Bake for 25-35 minutes. You’re looking for a gorgeous golden-brown crust and the filling to be hot and bubbling up through those steam vents.
- Rest & Serve: The hardest part! Let the pie stand for 5-10 minutes before you slice into it. This lets the filling set up a little so it doesn’t all run out when you cut.
Substitutions & Additions
Want to mix things up or use what you have? Here are a few ideas:
- Swap the Veggies: Feel free to add other quick-cooking veggies like mushrooms, corn, or finely chopped bell peppers along with the mirepoix.
- Different Herbs: Not a fan of thyme? Try a pinch of dried tarragon or even a little Old Bay seasoning for a different twist.
- Add a Splash: A little splash of dry white wine added after the flour and cooked for a minute before adding the broth can add extra depth.
- Make it Puff: Instead of a pie crust, you can use puff pastry! Just lay a sheet over the top, trim, egg wash, and bake until golden and puffed. Follow package directions for temperature and time if they differ from the recipe.
- Cream Cheese Boost: Stir in a few tablespoons of cream cheese with the heavy cream for an even richer, tangier sauce.
Tips for Success
A few little pointers to help you nail this pot pie:
- Don’t Rush the Veggies: Make sure the onion, celery, and carrots are softened before adding the flour. This ensures they are tender in the final pie.
- Whisk Smooth: When adding the liquids, pour gradually and whisk constantly to avoid lumps in your sauce.
- Pre-cook Lobster: Using already cooked lobster is key for this recipe’s speed. Adding raw lobster won’t work as it will overcook by the time the crust is ready.
- Taste and Season: Always taste your filling before pouring it into the crust. It’s your last chance to adjust salt and pepper!
- Catch Drips: Seriously, use that baking sheet! It’s a lifesaver.
- Prep Ahead: You can make the filling entirely ahead of time! Let it cool completely, then store it in the fridge for up to 2 days. When you’re ready to bake, pour the chilled filling into the pie dish, top with the crust, egg wash, and bake as directed (you might need a few extra minutes since the filling is cold).
How to Store It
Got leftovers? Lucky you!
Once the pie has cooled completely, cover it tightly with plastic wrap or foil. It will keep in the refrigerator for 3-4 days. To reheat, you can warm individual slices in the microwave, but for the best texture, reheat portions in the oven at 350°F (175°C) for about 15-20 minutes, or until heated through and the crust is crisp again.
FAQs
Got questions? I’ve got answers!
Can I use frozen lobster?
Absolutely! Just make sure it’s fully thawed and patted dry before adding it to the filling.
What about other seafood?
Yes! Cooked shrimp, crab meat, or even chunks of firm white fish (like cod or halibut, cooked first) would be delicious in this base recipe. A mix is great too!
Can I make my own pie crust?
Of course! If you have a favorite homemade crust recipe, go for it. This recipe uses store-bought for convenience, but homemade is lovely too.
My crust is browning too fast! Help!
No problem! If the crust looks perfectly golden but the filling isn’t quite bubbling yet, loosely tent the top of the pie with aluminum foil. This will protect the crust while the filling finishes heating through.

Lobster Pot Pie
Equipment
- Pie Dish 9-inch
- Large pot or Dutch oven
- Baking Sheet
- Knife or Scissors For trimming crust and cutting slits
- Fork Optional, for crimping crust edges
- Whisk For sauce
Ingredients
Filling
- 3 tbsp butter
- 0.5 cup chopped onion
- 0.5 cup chopped celery
- 0.5 cup chopped carrots
- 3 tbsp all-purpose flour
- 1 cup chicken or seafood broth
- 1 cup heavy cream
- 0.5 tsp dried thyme
- 2 cup cooked lobster meat cut into bite-sized pieces
- 0.5 cup frozen peas
- 1 tbsp chopped fresh parsley
- Salt to taste
- Pepper to taste
Topping
- 1 store-bought pie crust
- 1 egg beaten
Instructions
- Get Heated Up: Preheat your oven to 400°F (200°C). Get your pie dish ready too!
- Veggie Sauté Time: Grab a nice big pot or a Dutch oven and melt the butter over medium heat. Toss in your chopped onion, celery, and carrots. Stir them around every now and then until they start to soften up, about 5-7 minutes. They'll get fragrant and look just right.
- Flour Power: Sprinkle that flour over the softened veggies. Give it a good stir and cook for just one minute, stirring constantly. This cooks out the raw flour taste.
- Build the Creamy Dream: Now, slowly pour in the broth and heavy cream. Whisk constantly as you pour to make sure it stays smooth with no lumps. Keep stirring frequently and let it come to a gentle simmer. Watch it thicken up nicely over the next 5-7 minutes. It should be thick enough to coat the back of a spoon.
- Add the Good Stuff: Time for the main event! Stir in the dried thyme, your lovely chunks of cooked lobster, the frozen peas, and the fresh parsley. Give it all a gentle mix to distribute everything evenly. Now, taste it! Add salt and pepper until it tastes perfect to you. Remember the lobster might be a little salty already, so taste first!
- Fill 'Er Up: Pour this glorious, creamy filling into your 9-inch pie dish. Spread it out evenly.
- Top It Off: Carefully lay your store-bought pie crust over the filling. Use scissors or a knife to trim the edges so they overhang by about an inch. Crimp those edges around the rim of the pie dish using your fingers or a fork – this seals the filling in and looks pretty! Don't forget to cut several slits in the top crust with a knife. This lets steam escape so your crust doesn't puff up like a balloon.
- Give It Shine: Brush the top of the pie crust all over with the beaten egg. This gives it that beautiful golden-brown color as it bakes.
- Bake Until Bubbly: Pop the pie dish onto a baking sheet (this catches any potential drips, saving you oven-cleaning headaches!). Bake for 25-35 minutes. You're looking for a gorgeous golden-brown crust and the filling to be hot and bubbling up through those steam vents.
- Rest & Serve: The hardest part! Let the pie stand for 5-10 minutes before you slice into it. This lets the filling set up a little so it doesn't all run out when you cut.
Notes
Feel free to add other quick-cooking veggies like mushrooms, corn, or finely chopped bell peppers. Try a pinch of dried tarragon or a little Old Bay seasoning instead of thyme. A splash of dry white wine added after the flour and cooked for a minute can add depth. Use puff pastry instead of pie crust. Stir in a few tablespoons of cream cheese for an even richer sauce. Tips for Success:
Make sure the onion, celery, and carrots are softened before adding the flour. Pour liquids gradually and whisk constantly to avoid lumps. Using already cooked lobster is key for speed; raw lobster will overcook. Always taste and season your filling before pouring it into the crust. Use a baking sheet to catch drips. You can make the filling entirely ahead of time; let it cool completely and store in the fridge for up to 2 days. If baking with cold filling, you might need a few extra minutes. If the crust is browning too fast, loosely tent the top with aluminum foil. How to Store It:
Once the pie has cooled completely, cover it tightly and keep in the refrigerator for 3-4 days. To reheat, warm individual slices in the microwave or reheat portions in the oven at 350°F (175°C) for about 15-20 minutes, or until heated through and the crust is crisp.