Introduction
Oh, hello there, my friend! Come on in. Can you smell that? There’s just something magical about the aroma of warm spices and pumpkin filling wafting from the kitchen, isn’t there? It instantly brings back memories of cozy evenings, family gatherings, and the simple joys of fall.
But sometimes, making a big pie feels like a whole thing, right? That’s where these adorable, utterly perfect Mini Pumpkin Pies come in! They capture all the deliciousness of a classic pumpkin pie but in the cutest, most convenient bite-sized package. Trust me, this recipe is so easy, so quick, and so incredibly satisfying. It’s the perfect way to get that classic fall flavor without all the fuss.
Why You’ll Love This Recipe
There are so many reasons to fall head over heels for these little pies!
- Fast: From mixing bowl to oven, they come together in a flash.
- Easy: No fancy techniques needed – just simple whisking and baking.
- Giftable: Pack a few in a box, and you’ve got the sweetest homemade gift!
- Crowd-Pleasing: Everyone loves their own personal mini pie!
Ingredients
Here’s what you’ll need to whip up a batch of these mini delights. Most of these are probably already in your pantry or fridge this time of year!
- 2 9-inch unbaked pie crusts: Use your favorite! Store-bought is totally fine for making this speedy, or if you have a go-to homemade recipe, go for it!
- 1/3 cup brown sugar: Adds that lovely depth and touch of caramel sweetness.
- 2 tablespoons granulated sugar: Just enough to balance the sweetness.
- 1 1/2 teaspoons pumpkin pie spice: Ah, the smell of fall! This blend usually includes cinnamon, nutmeg, cloves, and ginger.
- 1/4 teaspoon salt: Don’t skip this! It brings out all those wonderful flavors.
- 1 cup canned pumpkin puree: IMPORTANT! Make sure it’s 100% pumpkin puree, not pumpkin pie filling (which already has sugar and spices added).
- 3/4 cup evaporated milk: This gives the filling its creamy, dreamy texture.
- 1 large egg, lightly beaten: Helps bind everything together and gives the filling structure.
- 1/2 teaspoon vanilla extract: A little splash of warmth and flavor.
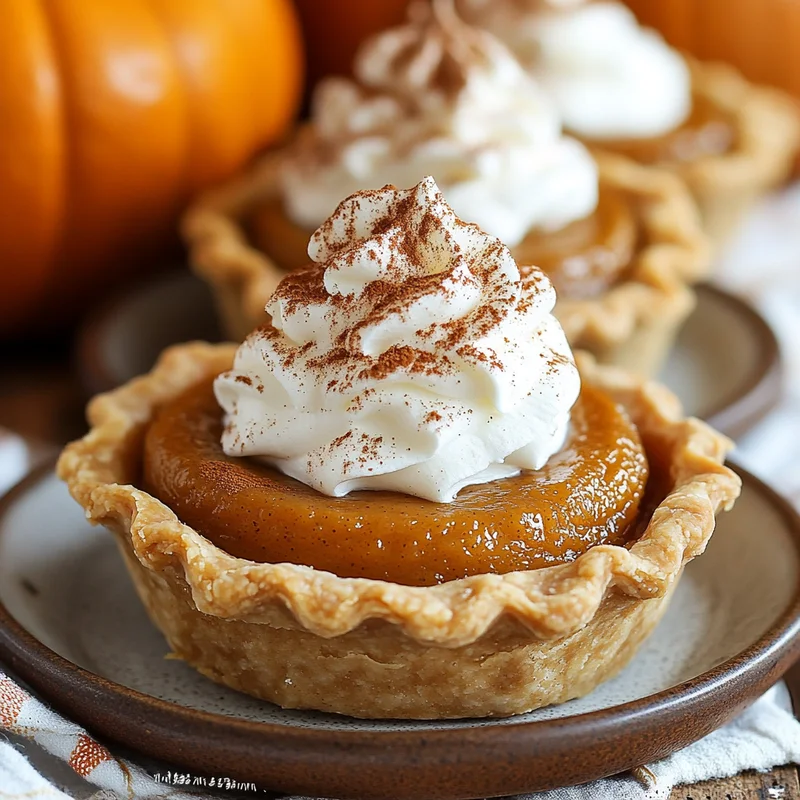
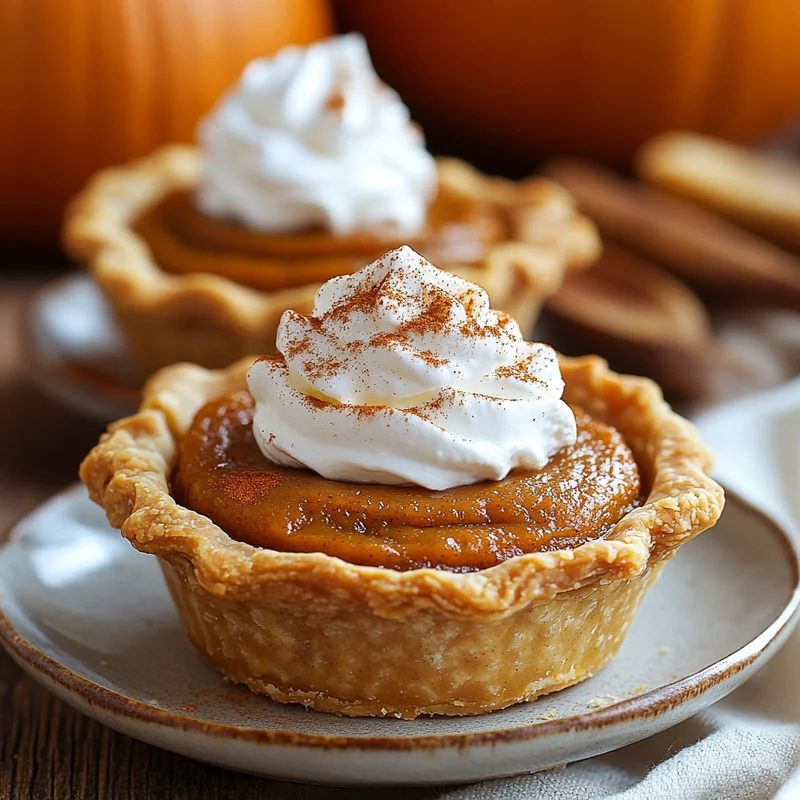
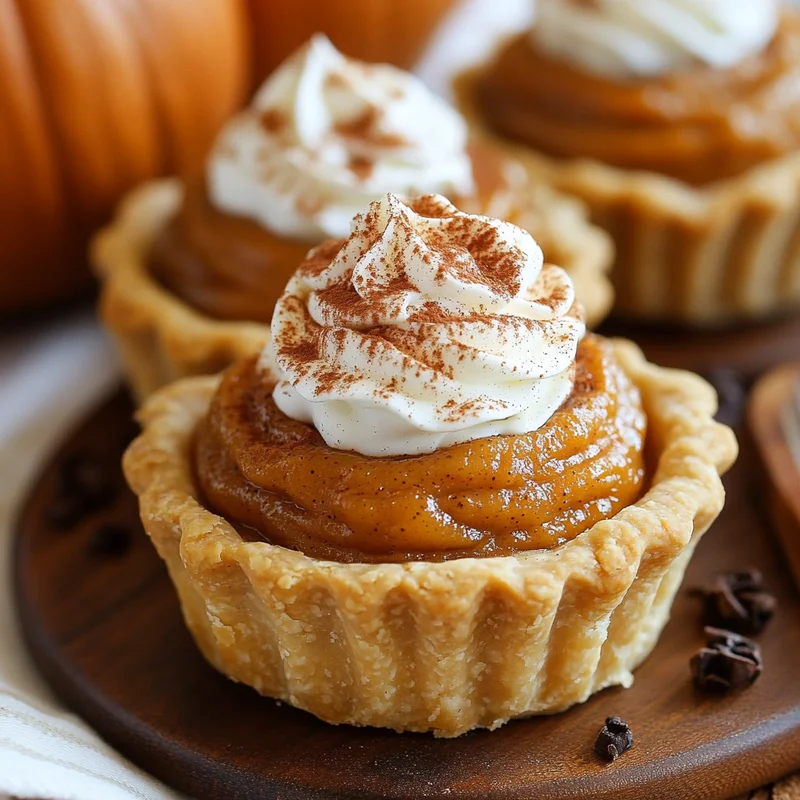
- Homemade whipped cream, for topping: Optional, but highly, highly recommended! A dollop of fluffy whipped cream is the perfect finish.
How to Make It
Alright, let’s get baking! You’ve got this.
- First things first, preheat your oven to 375°F (190°C). Get that heat ready for our little pies!
- Time for the crusts. Unroll or get out your homemade dough. You’ll need to cut out circles that will fit nicely into your muffin tins or mini tart pans. I usually use a round cookie cutter or even the rim of a glass that’s just the right size. Gently press each dough circle into the cavities, shaping it to fit the bottom and sides. Don’t worry if they aren’t perfectly uniform – homemade charm!
- Now, let’s make the filling! In a medium bowl, grab your whisk and combine the brown sugar, granulated sugar, pumpkin pie spice, and salt. Give it a good whisk to get rid of any clumps and make sure all those lovely spices are mixed in.
- Add the wet ingredients to the sugar mixture. Pour in the pumpkin puree, evaporated milk, your lightly beaten egg, and the vanilla extract.
- Whisk it all together until it’s smooth and beautifully combined. We want a silky-smooth filling, so keep whisking until there are no streaks.
- Carefully pour your gorgeous pumpkin filling into each prepared mini pie crust. Don’t overfill them! Aim to fill each one about two-thirds full. This gives them room to puff up slightly without spilling over.
- Pop the muffin tin into your preheated oven. Bake for 20-25 minutes. How do you know they’re done? The filling should look set (not jiggly in the center) and a knife inserted near the center of one of the pies should come out clean.
- Once they’re baked to perfection, carefully remove the pan from the oven. Let those little pies cool completely on a wire rack. This is important! They need time to set up properly.
- Serve them chilled or at room temperature. The ultimate finishing touch? A generous dollop of homemade whipped cream!
Substitutions & Additions
Want to play around with the recipe? Here are a few ideas:
- Crust Options: Not feeling traditional pie crust? Try using crushed graham crackers mixed with melted butter pressed into the cups for a different twist! Or even crumbled gingersnaps.
- Spice It Up: If you don’t have pumpkin pie spice, you can make your own! A common mix is 1 tsp cinnamon, 1/4 tsp nutmeg, 1/4 tsp ginger, and 1/8 tsp cloves. You can adjust these to your liking.
- Add a Swirl: How about a little cream cheese swirl on top of the filling before baking? Mix softened cream cheese with a little sugar and vanilla, then dollop and swirl. Yum!
- Crunchy Topping: A sprinkle of chopped pecans or walnuts on top of the filling before baking adds lovely texture.
Tips for Success
Here are a few little nuggets of wisdom to make sure your mini pies turn out perfectly:
- Don’t Overfill: As I mentioned before, leaving a little room prevents spills and helps the filling bake properly.
- Cool Completely: Patience is key here! Let them cool fully on the wire rack before handling or serving. This allows the filling to finish setting.
- Chill for Best Slicing (if that were a thing): Even though they are mini, chilling them for an hour or two after cooling can really firm up the filling nicely.
- Prep Ahead: You can mix the pumpkin filling a day in advance and keep it covered in the fridge. Cut out the crust circles too and store them between layers of parchment paper.
How to Store It
These little beauties need to be stored properly because they contain dairy and egg.
Once completely cooled, cover them tightly (plastic wrap, aluminum foil, or an airtight container works great) and keep them in the refrigerator. They’ll stay fresh and delicious for about 3-4 days.
FAQs
Got questions? Let’s tackle a couple!
Q: Can I use fresh pumpkin puree?
A: Absolutely! Just make sure it’s thick enough. If it seems very watery, you might need to cook it down a bit on the stovetop first to evaporate some of the excess liquid.
Q: Can I use regular milk instead of evaporated milk?
A: Evaporated milk is concentrated, which contributes to the rich, creamy texture. Using regular milk might result in a thinner, less rich filling. I highly recommend sticking with evaporated milk for the best results.
Q: Do I have to use homemade whipped cream?
A: Nope! Store-bought whipped cream or even a spray topping works just fine if that’s easier for you. The homemade touch is lovely, but the goal is deliciousness, however you get there!
I hope you enjoy making (and eating!) these delightful Mini Pumpkin Pies as much as I do. Happy baking!

Easy Mini Pumpkin Pies
Equipment
- Muffin tins or mini tart pans
- Round cookie cutter or rim of a glass
- Medium bowl
- Whisk
- Wire rack for cooling
Ingredients
Hauptzutaten
- 2 9-inch unbaked pie crusts store-bought or homemade
- 0.33 cup Brown sugar
- 2 tablespoons Granulated sugar
- 1.5 teaspoons Pumpkin pie spice usually includes cinnamon, nutmeg, cloves, and ginger
- 0.25 teaspoon Salt
- 1 cup Canned pumpkin puree IMPORTANT! Make sure it's 100% pumpkin puree, not pumpkin pie filling
- 0.75 cup Evaporated milk
- 1 Large egg lightly beaten
- 0.5 teaspoon Vanilla extract
- Homemade whipped cream optional, for topping
Instructions
- First things first, preheat your oven to 375°F (190°C). Get that heat ready for our little pies!
- Time for the crusts. Unroll or get out your homemade dough. You'll need to cut out circles that will fit nicely into your muffin tins or mini tart pans. I usually use a round cookie cutter or even the rim of a glass that's just the right size. Gently press each dough circle into the cavities, shaping it to fit the bottom and sides. Don't worry if they aren't perfectly uniform – homemade charm!
- Now, let's make the filling! In a medium bowl, grab your whisk and combine the brown sugar, granulated sugar, pumpkin pie spice, and salt. Give it a good whisk to get rid of any clumps and make sure all those lovely spices are mixed in.
- Add the wet ingredients to the sugar mixture. Pour in the pumpkin puree, evaporated milk, your lightly beaten egg, and the vanilla extract.
- Whisk it all together until it's smooth and beautifully combined. We want a silky-smooth filling, so keep whisking until there are no streaks.
- Carefully pour your gorgeous pumpkin filling into each prepared mini pie crust. Don't overfill them! Aim to fill each one about two-thirds full. This gives them room to puff up slightly without spilling over.
- Pop the muffin tin into your preheated oven. Bake for 20-25 minutes. How do you know they're done? The filling should look set (not jiggly in the center) and a knife inserted near the center of one of the pies should come out clean.
- Once they're baked to perfection, carefully remove the pan from the oven. Let those little pies cool completely on a wire rack. This is important! They need time to set up properly.
- Serve them chilled or at room temperature. The ultimate finishing touch? A generous dollop of homemade whipped cream!
Notes
- Crust Options: Use crushed graham crackers mixed with melted butter or crumbled gingersnaps pressed into cups.
- Spice It Up: If you don't have pumpkin pie spice, make your own (e.g., 1 tsp cinnamon, 1/4 tsp nutmeg, 1/4 tsp ginger, 1/8 tsp cloves).
- Add a Swirl: Mix softened cream cheese with a little sugar and vanilla, dollop, and swirl on top of the filling before baking.
- Crunchy Topping: Sprinkle chopped pecans or walnuts on top of the filling before baking. Tips for Success:
- Don't Overfill: Leave room in the crusts to prevent spills.
- Cool Completely: Let pies cool fully on a wire rack to allow the filling to set.
- Chill for Best Slicing (if applicable): Chilling for an hour or two after cooling helps firm the filling.
- Prep Ahead: Mix filling and cut crust circles a day in advance and store in the fridge. Storage:
- Once completely cooled, cover tightly and store in the refrigerator for about 3-4 days. FAQs:
- Fresh Pumpkin Puree: Can be used if thick enough; cook down on stovetop if watery.
- Regular Milk: Evaporated milk provides a richer, creamier texture; regular milk may result in a thinner filling.
- Whipped Cream: Store-bought is fine; homemade is optional.