Introduction
Hey there, kitchen friend! Do you ever get that craving for something utterly decadent, something that feels fancy and indulgent, but you just don’t have the time (or the energy!) for complicated baking projects? Me too! That’s where this incredible No Bake Black Forest Cheesecake swoops in to save the day. Black Forest cake has always held a special place in my heart – those layers of chocolate, cherries, and cream just scream comfort and celebration. But let’s be real, making a traditional one can be a whole thing. This recipe? It captures all those beloved flavors in the EASIEST, most chill way possible. Seriously, if you can stir and chill, you can make this masterpiece. It’s perfect for last-minute get-togethers, busy weeknights when you need a sweet treat, or just because you deserve it!
Why You’ll Love This Recipe
Seriously, what’s not to love? Here are just a few reasons this No Bake Black Forest Cheesecake is about to become your new favorite:
- Fast: Minimal prep time means dessert is ready to chill in a flash.
- Easy: No oven required! Simple mixing and chilling steps anyone can follow.
- Giftable: It looks stunning and makes a perfect edible gift for friends or family (if you can bear to part with it!).
- Crowd-Pleasing: The classic combo of chocolate, cherry, and cream is a guaranteed hit with almost everyone.

Ingredients
Gathering your ingredients is the first step to dessert bliss! You’ll find everything you need right here:
- Oreo Crust:
- 32 Oreos (whole cookies, filling included): The magic base! You’ll crush these up, filling and all.
- 4 tablespoons salted butter, melted: Gives the crust that perfect bind and a little hint of saltiness.
- Chocolate Cheesecake:
- 16 ounces cream cheese, room temperature: This is KEY for a smooth, lump-free filling. Let it sit out for an hour or two before you start!
- ¾ cup granulated sugar: Sweetens our creamy chocolate dream.
- ½ cup unsweetened cocoa powder: Brings that deep, rich chocolate flavor.
- 1 cup sour cream or plain Greek yogurt: Adds a lovely tang and extra creaminess.
- 1 cup cherry pie filling: Swirls that classic Black Forest cherry flavor right into the filling!
- 8 ounces whipped topping, thawed: The secret ingredient for that light, airy, no-bake texture.
- Toppings:
- 1 cup whipped cream or whipped topping: For that cloud-like finish on top.
- 1 cup cherry pie filling: Spooned over the top for ultimate Black Forest vibes.
- Optional Garnish:
- Chocolate shavings: A sprinkle of these makes it look extra fancy and adds a little chocolatey flourish.
How to Make It
Alright, let’s make some magic! Follow these simple steps, and you’ll be chilling your way to cheesecake heaven.
- Prep Your Pan: Lightly grease a 9-inch pie plate or springform pan.
- Make the Oreo Crust: Place the whole Oreos (yes, with the filling!) into a food processor and pulse until you have fine crumbs. If you don’t have a food processor, put them in a zip-top bag and crush them with a rolling pin or the bottom of a glass. Pour the crumbs into a medium bowl.
- Add the Butter: Pour the melted butter over the Oreo crumbs and stir with a fork until everything is evenly moistened and resembles wet sand.
- Press the Crust: Pour the crumb mixture into your prepared pan. Use the bottom of a glass or a flat measuring cup to firmly press the crumbs into the bottom and up the sides of the pan. Make sure it’s nice and compact so it holds together. Pop the crust into the freezer while you make the filling.
- Make the Cheesecake Filling: In a large bowl, beat the softened cream cheese with an electric mixer until it’s super smooth and creamy, with no lumps.
- Add Sugar and Cocoa: Add the granulated sugar and cocoa powder to the cream cheese and beat again until fully combined and smooth. Scrape down the sides of the bowl as needed.
- Mix in Wet Ingredients: Add the sour cream (or Greek yogurt) and 1 cup of cherry pie filling to the chocolate mixture. Beat on low speed until just combined. Don’t overmix!
- Fold in Whipped Topping: Gently fold in the thawed whipped topping using a spatula. Do this carefully to keep the filling light and airy. Fold until no streaks of whipped topping remain.
- Fill the Crust: Pour the chocolate cheesecake filling into the chilled Oreo crust. Spread it evenly with a spatula.
- Chill, Chill, Chill: This is the hardest part – waiting! Cover the cheesecake loosely with plastic wrap and refrigerate for at least 4-6 hours, or ideally, overnight, until it’s completely set.
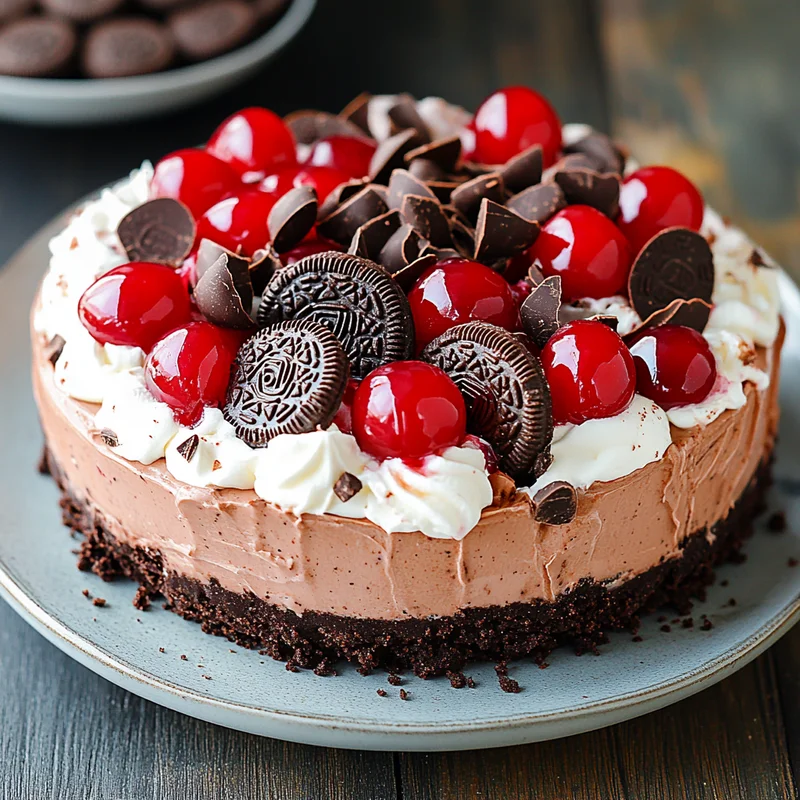
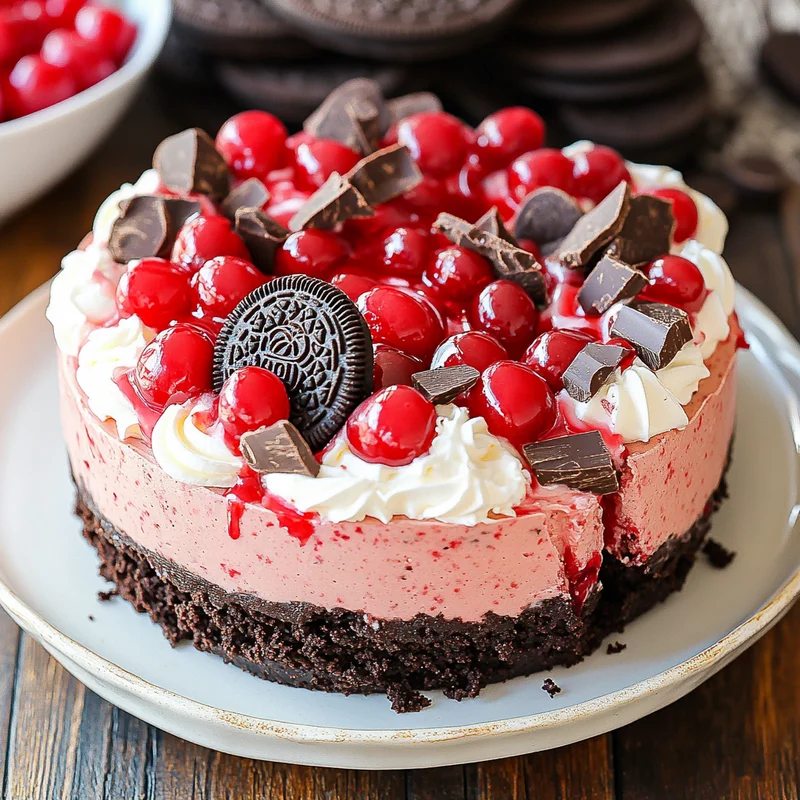
- Add Toppings & Serve: Just before serving, spread the cup of whipped cream or whipped topping over the set cheesecake. Spoon the remaining cup of cherry pie filling over the whipped topping. If using, sprinkle with chocolate shavings. Slice and enjoy your incredible No Bake Black Forest Cheesecake!
Substitutions & Additions
Get creative! Here are a few ideas to switch things up or add a little extra pizzazz:
- Crust: Don’t have Oreos? You can use other chocolate sandwich cookies, or even graham crackers mixed with a little cocoa powder.
- Sour Cream/Yogurt: Use whichever you prefer or have on hand! Greek yogurt adds a little extra protein and tang.
- Cherry Pie Filling: While classic, you could experiment with other fruit fillings like raspberry or strawberry for a different twist.
- Add-ins: Fold ½ cup of mini chocolate chips or chopped chocolate chunks into the filling for extra chocolatey goodness. A teaspoon of almond extract in the filling can also enhance the cherry flavor.
- Garnishes: Instead of just shavings, top with fresh cherries, chocolate curls, or even a drizzle of chocolate syrup.
Tips for Success
Making this is easy, but a few little tips can ensure it turns out perfectly every time:
- Room Temperature Cream Cheese: I can’t stress this enough! Cold cream cheese will leave you with lumps in your filling.
- Don’t Overmix: Once you add the whipped topping, fold gently. Overmixing can deflate the filling and make it less set.
- Chill Time is Crucial: The 4-6 hours is really a minimum. Overnight chilling gives the best, firmest texture. Don’t rush this step!
- For Easy Slicing: Use a sharp knife dipped in hot water and wiped clean between each slice.
How to Store It
Leftovers (if there are any!) should be stored in the refrigerator. Keep the cheesecake covered loosely with plastic wrap or in an airtight container. It will stay delicious for 3-4 days. I don’t typically recommend freezing no-bake cheesecakes as the texture can change upon thawing, but if you absolutely must, wrap it very well before freezing for up to 1 month. Thaw in the refrigerator.
FAQs
- Q: Can I make this ahead of time?
A: Absolutely! This cheesecake is perfect for making a day or two in advance. Just hold off on adding the final toppings until just before serving. - Q: My filling seems a little soft. What went wrong?
A: The most common culprit is not enough chilling time! Make sure it chills for the full recommended time, or even longer. Using full-fat cream cheese and not overmixing can also help with firmness. - Q: Do I have to use a springform pan?
A: No, a standard 9-inch pie plate works great! A springform makes it easier to remove the sides for a prettier presentation, but isn’t necessary if you’re just serving it from the dish. - Q: Can I make individual cheesecakes?
A: Yes! You can press the crust mixture into muffin liners set in a muffin tin, then top with the filling. The chilling time might be slightly less for individual servings.

Easy No Bake Black Forest Cheesecake Recipe
Equipment
- 9-inch pie plate or springform pan
- Food processor Optional, for crushing Oreos
- zip-top bag Alternative to food processor
- Rolling pin or bottom of a glass For crushing Oreos in a bag
- Medium bowl
- Fork
- Bottom of a glass or flat measuring cup For pressing crust
- Large bowl
- Electric mixer
- Spatula
- Plastic wrap
- Airtight container For storage
- Sharp knife For slicing
Ingredients
Oreo Crust
- 32 Oreos whole cookies, filling included
- 4 tablespoons salted butter melted
Chocolate Cheesecake
- 16 ounces cream cheese room temperature
- 0.75 cup granulated sugar
- 0.5 cup unsweetened cocoa powder
- 1 cup sour cream or plain Greek yogurt
- 1 cup cherry pie filling for the filling
- 8 ounces whipped topping thawed
Toppings
- 1 cup whipped cream or whipped topping for topping
- 1 cup cherry pie filling for topping
Optional Garnish
- Chocolate shavings
Instructions
- Prep Your Pan: Lightly grease a 9-inch pie plate or springform pan.
- Make the Oreo Crust: Place the whole Oreos (yes, with the filling!) into a food processor and pulse until you have fine crumbs. If you don't have a food processor, put them in a zip-top bag and crush them with a rolling pin or the bottom of a glass. Pour the crumbs into a medium bowl.
- Add the Butter: Pour the melted butter over the Oreo crumbs and stir with a fork until everything is evenly moistened and resembles wet sand.
- Press the Crust: Pour the crumb mixture into your prepared pan. Use the bottom of a glass or a flat measuring cup to firmly press the crumbs into the bottom and up the sides of the pan. Make sure it's nice and compact so it holds together. Pop the crust into the freezer while you make the filling.
- Make the Cheesecake Filling: In a large bowl, beat the softened cream cheese with an electric mixer until it's super smooth and creamy, with no lumps.
- Add Sugar and Cocoa: Add the granulated sugar and cocoa powder to the cream cheese and beat again until fully combined and smooth. Scrape down the sides of the bowl as needed.
- Mix in Wet Ingredients: Add the sour cream (or Greek yogurt) and 1 cup of cherry pie filling to the chocolate mixture. Beat on low speed until just combined. Don't overmix!
- Fold in Whipped Topping: Gently fold in the thawed whipped topping using a spatula. Do this carefully to keep the filling light and airy. Fold until no streaks of whipped topping remain.
- Fill the Crust: Pour the chocolate cheesecake filling into the chilled Oreo crust. Spread it evenly with a spatula.
- Chill, Chill, Chill: This is the hardest part – waiting! Cover the cheesecake loosely with plastic wrap and refrigerate for at least 4-6 hours, or ideally, overnight, until it's completely set.
- Add Toppings & Serve: Just before serving, spread the cup of whipped cream or whipped topping over the set cheesecake. Spoon the remaining cup of cherry pie filling over the whipped topping. If using, sprinkle with chocolate shavings. Slice and enjoy your incredible No Bake Black Forest Cheesecake!