
Introduction
Hey there, dessert lovers! Are you ready for a little slice of sunshine that requires absolutely no oven time? Because let me tell you, this No-Bake Peach Yum Yum is about to become your new obsession, especially when those warmer days hit or you just need a sweet escape. Growing up, desserts like this were the stars of potlucks and family gatherings – simple, creamy, and bursting with fruity flavor. There was always that one dish that disappeared first, and more often than not, it was something easy and crowd-pleasing, just like this!
This recipe brings all those happy, lazy summer vibes straight to your kitchen, without breaking a sweat. It’s so incredibly simple, comes together in a flash, and tastes like a dream. Seriously, if you can crush cookies and use a mixer, you’ve got this! Get ready to whip up something truly special that everyone will adore.
Why You’ll Love This Recipe
- Fast: You can have this assembled and chilling in under 30 minutes!
- Easy: No baking required, simple steps perfect for beginners.
- Giftable: Makes a beautiful dish to bring to picnics, parties, or share with neighbors.
- Crowd-Pleasing: Peaches + creamy layers = pure happiness for almost everyone!
Ingredients
Gather ’round, let’s look at what you’ll need for this peachy masterpiece. Each ingredient plays a crucial role in creating those dreamy layers!
- 1 1/2 cups graham cracker crumbs: The perfect sturdy, slightly sweet base. You can buy pre-crushed or crush your own from about 10-12 full graham cracker sheets.
- 6 tablespoons unsalted butter, melted: This binds those crumbs together into a perfect crust. Unsalted is best so you control the saltiness.
- 1/2 teaspoon cinnamon: Adds a warm, cozy spice note to the crust.
- Pinch ground cloves: Just a tiny pinch! It enhances the cinnamon and peach flavors beautifully without being overpowering.
- 1 (8 ounce) package cream cheese, softened: The heart of the creamy layer! Make sure it’s good and soft so it whips up smoothly with no lumps.
- 1/2 cup + 3 tablespoons granulated sugar, divided: Sweetness for both the cream cheese and whipped cream layers.
- 2 cups whipping cream: This is what gives you that light, airy texture in the top layer. Heavy cream works too!
- 1/2 teaspoon vanilla extract: A touch of classic vanilla enhances all the other flavors.
- 1 (21 ounce) can peach pie filling: The star of the show! Sweet, peachy, and already thickened for easy spreading.
How to Make It
Alright, let’s get this yumminess assembled! It’s broken down into simple steps.
Step 1: Make the Crust. Grab a medium bowl. Pour in your graham cracker crumbs, cinnamon, and cloves. Give them a little stir to combine. Now, drizzle in the melted butter. Stir with a fork until the crumbs are evenly moistened and look like wet sand.
Step 2: Press the Crust. Pour the crumb mixture into the bottom of an 8×8 inch or 9×9 inch baking dish (a square or rectangle dish works best here). Use the back of a spoon or the bottom of a glass to firmly press the crumbs into an even layer covering the bottom. Pop this into the fridge while you make the next layers.
Step 3: Prepare the Cream Cheese Layer. In a large bowl, beat the softened cream cheese with the 1/2 cup of granulated sugar until it’s smooth and creamy. An electric mixer makes this super easy, but you can do it by hand with some elbow grease! Make sure there are no lumps.
Step 4: Make the Whipped Cream Layer. In a separate, clean large bowl (preferably chilled!), whip the cold whipping cream with the remaining 3 tablespoons of sugar and the vanilla extract. Whip until stiff peaks form. Be careful not to over-whip or you’ll end up with butter! Stop when the cream holds its shape firmly.
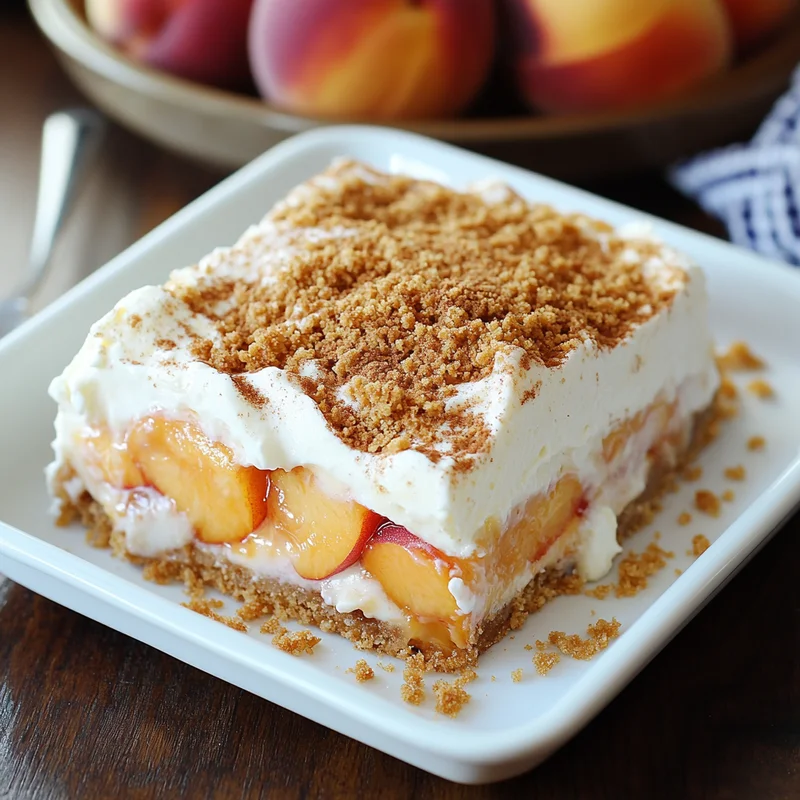
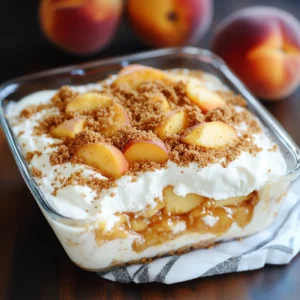
Step 5: Layer It Up! Now for the fun part! Get your chilled crust out of the fridge. Gently spread the cream cheese mixture evenly over the graham cracker crust. Next, carefully spread the whipped cream layer over the cream cheese layer, taking care not to mix them. Finally, spoon the peach pie filling over the top of the whipped cream, spreading it out to cover the surface. You can leave some peaches whole or gently break them up a bit as you spread.
Step 6: Chill! Chill! Chill! This is arguably the most important step. Cover the dish tightly with plastic wrap and refrigerate for at least 4 hours, but ideally overnight. This time allows the crust to set, the layers to firm up, and all those delicious flavors to meld together perfectly. The longer it chills, the easier it is to cut and serve.
Step 7: Serve and Enjoy! Once properly chilled, slice into squares and serve. Get ready for smiles!
Substitutions & Additions
This recipe is pretty forgiving and open to your creative touches! Here are a few ideas:
- Different Crust: Swap graham crackers for vanilla wafers, shortbread cookies, or even gingersnaps for a different flavor profile. Just use the same quantity of crumbs and butter.
- Other Fruits: Not a peach fan, or want to mix it up? Canned cherry, blueberry, or even apple pie filling would work beautifully here!
- Add Texture: Sprinkle chopped nuts (pecans or walnuts would be great) over the top layer of peach filling for a little crunch.
- Extra Flavor Boost: Add a tiny pinch of almond extract to the cream cheese layer or a splash of rum extract to the whipped cream layer for a unique twist.
- Fresh Fruit Option: While the pie filling is easiest, you can use fresh peaches. You’d need to peel, slice, and cook them down slightly with sugar and a thickener (like cornstarch) to get a similar consistency to pie filling. It adds an extra step but gives a fresh taste!

Tips for Success
Want to make sure your Peach Yum Yum is absolutely perfect? Keep these tips in mind:
- Soften That Cream Cheese: I cannot stress this enough! Cold cream cheese will result in a lumpy layer. Let it sit out on the counter for at least an hour (or gently warm it) until it’s truly soft and easy to whip smooth.
- Don’t Rush the Chill Time: Seriously, resist the urge to cut into it too soon. The chilling is essential for setting the crust and firming up the creamy layers so you get clean slices and a lovely texture. Overnight is best!
- Whip Cream Properly: Start with very cold cream and a cold bowl. Whip until stiff peaks form – the cream should hold its shape when you lift the whisk. Stop there to avoid over-whipping.
- Gentle Spreading: When adding the cream cheese and whipped cream layers, spread gently to avoid lifting the layer beneath it. An offset spatula works wonders here!
How to Store It
This dessert needs to be kept cold! Cover the dish tightly with plastic wrap or transfer leftovers to an airtight container. Store it in the refrigerator for up to 3-4 days. The crust might soften slightly over time, but the flavors will still be fantastic.
Freezing isn’t recommended as the texture of the cream cheese and whipped cream layers can become watery and lose their creaminess upon thawing. It’s best enjoyed fresh from the fridge within a few days.
FAQs
Got questions? I’ve got some quick answers!
Q: Can I use a different size dish?
A: Yes, you can use a 9×13 inch dish for a thinner dessert, or an 8×8 or 9×9 inch for a thicker one. Just make sure the crust covers the bottom and adjust chilling time slightly if needed.
Q: Can I use light or low-fat cream cheese?
A: While you can, full-fat cream cheese will give you the best texture and richness in the creamy layer. Low-fat versions might make the layer a bit softer.
Q: Can I make individual servings?
A: Absolutely! Press the crust into the bottom of individual serving glasses or jars, then layer the cream cheese, whipped cream, and peach filling. Chill as directed.
Q: My whipped cream isn’t stiffening. What went wrong?
A: Make sure your cream was very cold, and ideally, chill your bowl and whisk beforehand. Sometimes older cream doesn’t whip as well. Ensure you’re using whipping cream or heavy cream, not half-and-half or milk.
There you have it! Your guide to making the easiest, most delicious No-Bake Peach Yum Yum. I just know you’re going to love this simple, sweet treat. Happy no-baking!
Easy No-Bake Peach Yum Yum
Equipment
- Medium bowl
- Fork
- 8x8 inch baking dish or 9x9 inch baking dish
- Spoon or bottom of a glass
- Large bowl
- Electric mixer optional, or by hand
- Separate large bowl preferably chilled
- Whisk
- Offset spatula optional, for spreading
Ingredients
Crust
- 1.5 cups graham cracker crumbs about 10-12 full graham cracker sheets
- 6 tablespoons unsalted butter melted
- 0.5 teaspoon cinnamon
- 1 pinch ground cloves
Cream Cheese Layer
- 1 package cream cheese 8 ounce, softened
- 0.5 cup granulated sugar for cream cheese layer
Whipped Cream Layer
- 2 cups whipping cream cold, heavy cream works too
- 3 tablespoons granulated sugar remaining, for whipped cream layer
- 0.5 teaspoon vanilla extract
Topping
- 1 can peach pie filling 21 ounce
Instructions
- Make the Crust: In a medium bowl, combine graham cracker crumbs, cinnamon, and cloves. Stir to combine. Drizzle in melted butter and stir with a fork until crumbs are evenly moistened.
- Press the Crust: Pour crumb mixture into the bottom of an 8x8 or 9x9 inch baking dish. Use the back of a spoon or the bottom of a glass to firmly press into an even layer. Refrigerate while preparing next layers.
- Prepare the Cream Cheese Layer: In a large bowl, beat softened cream cheese with 1/2 cup granulated sugar until smooth and creamy. Ensure no lumps.
- Make the Whipped Cream Layer: In a separate, clean large bowl, whip cold whipping cream with the remaining 3 tablespoons sugar and vanilla extract until stiff peaks form. Be careful not to over-whip.
- Layer It Up: Get chilled crust from the fridge. Gently spread the cream cheese mixture evenly over the crust. Carefully spread the whipped cream layer over the cream cheese layer. Spoon peach pie filling over the whipped cream layer, spreading to cover the surface (can leave peaches whole or break up).
- Chill! Chill! Chill!: Cover dish tightly with plastic wrap and refrigerate for at least 4 hours, ideally overnight. This is essential for setting and melding flavors.
- Serve and Enjoy!: Once properly chilled, slice into squares and serve.