
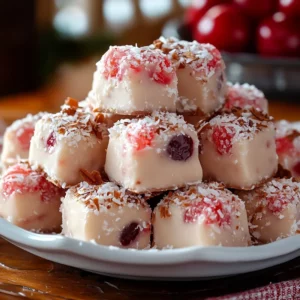
Introduction
Hey there, sweet friend! Does the mention of homemade candy bring back warm memories for you? Maybe of holidays past, or just a simple, sweet moment shared with someone special? These classic Martha Washington Candies do just that for me. They feel wonderfully old-fashioned and special, but here’s the best part – they are ridiculously easy to make! Seriously, no baking required, just a little mixing, chilling, and dipping. If you’re looking for a charming, homemade treat that feels fancy but is totally beginner-friendly, you’ve found it right here.
Why You’ll Love This Recipe
- Fast (Aside from chilling, they come together quickly!)
- Easy (Seriously, anyone can make these!)
- Giftable (They look beautiful in a little box or bag!)
- Crowd-pleasing (Classic flavors everyone loves!)

Ingredients
Gather ’round, let’s look at what you’ll need to whip up these delightful bites:
- 1 cup butter, melted: This is the base of our creamy filling. Make sure it’s fully melted!
- 1 pound powdered sugar: The essential sweetener and thickener that gives it that classic candy texture.
- 1 tablespoon vanilla extract: A splash of warmth and classic flavor.
- 14 ounces sweetened shredded coconut: Adds lovely texture and tropical sweetness. Don’t skip this signature ingredient!
- 14 ounces sweetened condensed milk: Our binding agent and source of incredible creaminess.
- 10 ounces maraschino cherries, drained and chopped: These add beautiful color and a sweet, slightly tangy chewiness. Make sure they’re well-drained!
- 3 cups finely chopped pecans: Toasted pecans would be amazing, but regular chopped ones work perfectly too, adding that nutty crunch.
- 16 ounces candy coating: You can use melting wafers, almond bark, or even tempered chocolate. This gives our candies their lovely shell.
How to Make It
Okay, ready to get your hands a little sticky (in the best way)? Let’s make some candy!
First things first, grab your biggest mixing bowl. You’re going to add your melted butter, the whole box of powdered sugar, that tablespoon of vanilla extract, the sweet shredded coconut, the can of sweetened condensed milk, your drained and chopped maraschino cherries, and the finely chopped pecans. Get in there with a sturdy spoon or even your hands (if you don’t mind a little mess!) and mix everything together really, really well. You want all those yummy ingredients to be totally incorporated.
Once everything is beautifully mixed, cover the bowl. Now, pop it into the refrigerator. It needs to chill for at least one hour, or until the mixture is firm enough that you can easily roll it into balls without it falling apart. Chilling is key for shaping!
After your mixture is nicely chilled and firm, it’s time to roll! Take small amounts of the mixture, about an inch in diameter, and roll them into little balls. Don’t worry too much about perfect uniformity, but try to keep them roughly the same size so they look pretty and dip evenly. Place these little candy balls on a baking sheet that you’ve lined with parchment paper. The parchment paper is your friend here – it prevents sticking!
Now, let’s get that candy coating ready. Follow the package instructions carefully to melt your candy coating. This usually involves a microwave or a double boiler. You want it smooth and ready for dipping!
Time for the fun part: dipping! Take each candy ball and carefully drop it into the melted coating, making sure it’s fully submerged. I find using two forks is super helpful here – one to gently lower the ball in and push it around, and the other to lift it out. As you lift it, gently tap the fork against the side of the bowl to let any excess coating drip back off. You want a nice, even layer.
As you dip each candy, place it back onto your parchment-lined baking sheet. Give them a little space so they don’t touch while the coating is setting.
Finally, just let the coating set completely. You can leave them at room temperature, or pop the baking sheet back into the refrigerator for a little while to speed things up. Once the coating is hard and not sticky to the touch, they’re ready to enjoy!
Substitutions & Additions
Want to put your own spin on these? Go for it! You could swap the pecans for chopped walnuts or even almonds. If you’re not a fan of cherries, try dried cranberries or even mini chocolate chips for a different twist. A different extract like almond extract could also be a fun variation. You could also use different colors of candy melts for festive occasions!

Tips for Success
- Chill Adequately: Don’t rush the chilling step. If the mixture is too soft, it will be frustrating to roll.
- Drain Those Cherries! Excess liquid from the cherries can make the mixture too wet. Pat them dry if needed after chopping.
- Finely Chop Nuts/Cherries: Keeping the pieces small helps the mixture roll more smoothly and evenly.
- Don’t Overheat Coating: Melt the candy coating slowly and according to package directions to prevent it from seizing or burning.
- Use Parchment Paper: Essential for easy cleanup and preventing the candies from sticking.
How to Store It
These Martha Washington candies keep really well! Once the coating is fully set, store them in an airtight container. You can keep them at room temperature in a cool, dry place for about a week, or store them in the refrigerator for two weeks or maybe even a bit longer. Just layer them with parchment or wax paper between layers to prevent sticking.
FAQs
- What exactly are Martha Washington Candies? They’re a classic no-bake confection, typically made with a creamy base of butter, powdered sugar, condensed milk, coconut, cherries, and nuts, then dipped in a candy coating. They’re known for their rich texture and sweet, fruity, and nutty flavor combination.
- Can I use different nuts or fruit? Absolutely! While pecans and maraschino cherries are traditional, you can swap the nuts for walnuts or almonds, or the cherries for drained chopped dried cranberries or other dried fruits you love.
- Can I freeze these candies? Yes, you can! Place the set candies in a single layer on a baking sheet to freeze completely, then transfer them to an airtight freezer-safe container or bag. They should keep for 1-2 months. Thaw in the refrigerator before serving.
Easy Old-Fashioned Martha Washington Candies
Equipment
- Mixing bowl Biggest size
- Spoon Sturdy, or use hands
- Baking Sheet
- Parchment paper To line baking sheet
- Microwave Or double boiler
- Two forks For dipping
Ingredients
Hauptzutaten
- 1 cup butter melted
- 1 pound powdered sugar
- 1 tablespoon vanilla extract
- 14 ounces sweetened shredded coconut
- 14 ounces sweetened condensed milk
- 10 ounces maraschino cherries drained and chopped
- 3 cups pecans finely chopped
- 16 ounces candy coating melting wafers, almond bark, or tempered chocolate
Instructions
- Grab your biggest mixing bowl. Add your melted butter, the whole box of powdered sugar, the tablespoon of vanilla extract, the sweet shredded coconut, the can of sweetened condensed milk, your drained and chopped maraschino cherries, and the finely chopped pecans. Mix everything together really, really well with a sturdy spoon or your hands until all ingredients are totally incorporated.
- Once beautifully mixed, cover the bowl and pop it into the refrigerator. Chill for at least one hour, or until the mixture is firm enough to easily roll into balls without falling apart.
- After chilling and the mixture is firm, take small amounts (about an inch in diameter) and roll them into little balls. Place the balls on a baking sheet lined with parchment paper.
- Get the candy coating ready by following the package instructions to melt it. This usually involves a microwave or a double boiler. You want it smooth and ready for dipping.
- Time for dipping! Take each candy ball and carefully drop it into the melted coating, ensuring it's fully submerged. Use two forks to gently lower, push, and lift the ball out. Gently tap the fork against the side of the bowl to let any excess coating drip back off, aiming for a nice, even layer.
- Place each dipped candy back onto your parchment-lined baking sheet, giving them space so they don't touch while setting.
- Let the coating set completely. This can be done at room temperature or by popping the baking sheet back into the refrigerator to speed things up. Once the coating is hard and not sticky, they are ready to enjoy!
Notes
- Chill Adequately: Don't rush the chilling step. If the mixture is too soft, it will be frustrating to roll.
- Drain Those Cherries! Excess liquid from the cherries can make the mixture too wet. Pat them dry if needed after chopping.
- Finely Chop Nuts/Cherries: Keeping the pieces small helps the mixture roll more smoothly and evenly.
- Don't Overheat Coating: Melt the candy coating slowly and according to package directions to prevent it from seizing or burning.
- Use Parchment Paper: Essential for easy cleanup and preventing the candies from sticking. Storage:
Store set candies in an airtight container. Keep at room temperature in a cool, dry place for about a week, or in the refrigerator for two weeks or maybe a bit longer. Layer with parchment or wax paper between layers to prevent sticking. Freezing:
Yes, you can freeze these candies. Place set candies in a single layer on a baking sheet to freeze completely, then transfer to an airtight freezer-safe container or bag. They should keep for 1-2 months. Thaw in the refrigerator before serving.