Introduction
Oh, friends, do you ever get that craving? That perfect crunch, that tangy, dilly flavor that just screams summer, even when it’s not? For me, it always takes me back to my grandma’s kitchen, the smell of dill and vinegar wafting through the air. And you know what? I’ve got a secret weapon that lets me recreate that magic anytime: refrigerator pickles! This recipe is an absolute game-changer. It’s so ridiculously simple, you’ll wonder why you ever bought them from the store. Seriously, it’s so quick, you can whip up a batch after work and have delicious, homemade pickles ready for your sandwiches or burgers the very next day. Get ready to fall in love!
Why You’ll Love This Recipe
- Fast: Ready in just 24 hours! Perfect for those last-minute cravings.
- Easy: Seriously, minimal cooking and prep. Anyone can do this!
- Giftable: Package them up in pretty jars, and you have the most thoughtful homemade gift.
- Crowd-pleasing: From BBQs to potlucks, these pickles are always a hit.

Ingredients
Gather ’round, let’s see what we need for these delightful pickles. It’s all about fresh, simple ingredients:
- 6-7 pickling cucumbers: Look for firm, fresh cucumbers. Kirby or Persian cucumbers work beautifully.
- 2 cups water: Our base for the brine.
- 1 cup white vinegar (or apple cider vinegar): This is where the tang comes from! White vinegar gives a classic sharp pickle, while apple cider vinegar adds a little sweetness and depth. Your choice!
- 1 tablespoon kosher salt: Kosher salt dissolves nicely and gives a clean salt flavor.
- 1/2-1 teaspoon granulated sugar: Just a touch to balance out the acidity and bring out the natural cucumber flavor. You can adjust this to your liking!
- Fresh dill: Oh, the dill! You can’t have pickles without it. Use a few nice sprigs for that unmistakable aroma.
- 4-6 cloves garlic, peeled and smashed/roughly chopped: Garlic adds a wonderful pungent kick. Don’t be shy!
- 10 whole black peppercorns: For a little warmth and spice.
- 1/2 teaspoon whole yellow mustard seeds: These add a subtle tang and a tiny bit of texture.
- 1/4 teaspoon red pepper flakes: If you like a little bit of heat, this is your chance! Adjust to your spice preference.
- Pinch celery seed: This is my little secret ingredient for that classic pickle flavor! You can often find it in the spice aisle.
How to Make It
Alright, let’s get our hands dirty (but not really!). This is where the magic happens, and it’s honestly so simple. Here’s how we do it:
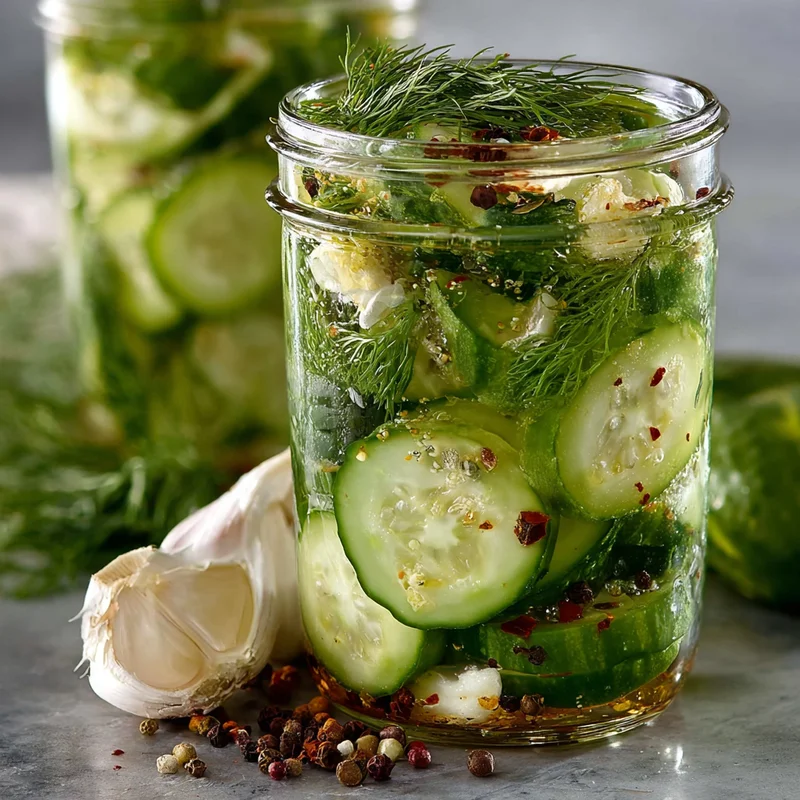
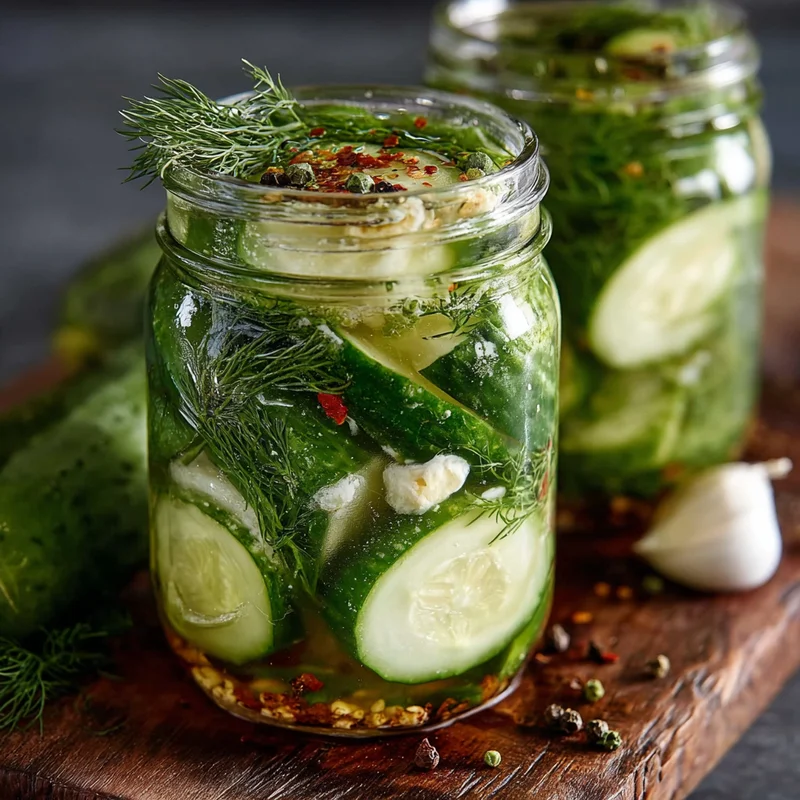
- Prep those cucumbers: First things first, give those lovely cucumbers a good scrub. You want them super clean! Trim off the very ends – I usually just trim a little off each end. Then, cut them into whatever shape makes your heart sing. Spears are classic for burgers, slices are perfect for sandwiches, and rounds are just adorable!
- Whip up the brine: Grab a small saucepan. Pour in your water and vinegar. Add the kosher salt and sugar. Pop it on the stove over medium heat. Give it a good stir until all that salt and sugar have completely dissolved. We just need to heat it enough to dissolve, then take it off the heat to cool slightly. You don’t want it piping hot when it goes into the jars.
- Pack your jars: Now, take your clean jars (pint or quart sizes work great). Start packing your prepared cucumber pieces snugly into the jars. Don’t cram them in so tight that they break, but get a good amount in there!
- Add the flavor makers: Tuck those lovely sprigs of fresh dill in amongst the cucumbers. Then, add in your smashed garlic cloves. This is where all that good stuff starts to happen!
- Spice it up: Now, let’s distribute those little flavor gems. Sprinkle the peppercorns, mustard seeds, red pepper flakes (if you’re using them!), and that pinch of celery seed evenly among your jars. This ensures every bite gets a burst of deliciousness.
- Pour on the brine: Carefully pour the slightly cooled brine over the cucumbers in each jar. Make sure you cover all the cucumbers completely. You want to leave about a 1/2 inch of space at the top of the jar – this is called headspace, and it’s important for sealing.
- Seal ’em up tight: Screw on those lids nice and tight. We want to keep all that yummy goodness locked in!
- Into the fridge they go!: And now, the hardest part – waiting! Place your sealed jars in the refrigerator. You need to let them chill for at least 24 hours before diving in. I know, it’s tough! But trust me, the flavor develops beautifully. The longer they sit, the more they pickle and soften just a bit.
Substitutions & Additions
Feeling adventurous? These pickles are a fantastic canvas for your creativity! Here are a few ideas:
- Vinegar Swap: If you don’t have white vinegar, apple cider vinegar is a wonderful substitute. You could even try a mix of both!
- More Veggies! Don’t stop at cucumbers! Add thinly sliced carrots, red onions, or even bell peppers to the jars for a more complex pickle.
- Spice Level: Want more heat? Add more red pepper flakes, or even a slice or two of a fresh jalapeño!
- Herbalicious: Experiment with other fresh herbs like oregano or thyme. A bay leaf can also add a lovely subtle flavor.
Tips for Success
A few little tricks to ensure your refrigerator pickles turn out perfectly every time:
- Cucumber Choice: Using pickling cucumbers is key as they have a better skin texture and fewer seeds. If you can’t find them, regular cucumbers will work, but you might want to consider peeling them if the skin is thick.
- Cleanliness is Crucial: Make sure your jars and lids are sparkling clean. This helps ensure a good seal and keeps your pickles fresh.
- Don’t Over-pack: While you want to pack them snugly, don’t force them in. You want the brine to be able to circulate around the cucumbers.
- Prep Ahead: You can wash and cut your cucumbers a day in advance and store them in the fridge. Make the brine right before you plan to pack the jars.
How to Store It
These delicious refrigerator pickles will last in your fridge for a good while! Once opened, or once they’ve been in the fridge for a few days, they’re best enjoyed within about 2-3 weeks. They’ll continue to soften and develop flavor over time, so the longer they sit, the more intense the pickle flavor will be. Just keep them in their original sealed jars in the refrigerator.
FAQs
Got a question? I bet I’ve got an answer!
Q: Do I need to sterilize my jars?
A: For refrigerator pickles, you don’t need to sterilize them in the same way you would for canning. Just a good thorough wash with hot, soapy water is usually sufficient, as they are stored in the fridge and consumed relatively quickly.
Q: Why are my pickles not crunchy?
A: A few things can affect crunchiness! Make sure you used fresh pickling cucumbers. Also, ensure you didn’t leave them in the brine for too long before refrigerating, and that the brine was allowed to cool slightly before pouring. For extra crunch, you can add a grape leaf or a little bit of pickle crisp to the jar!
Q: Can I use canning salt instead of kosher salt?
A: Yes, you can, but be aware that canning salt is finer, so you might want to use slightly less if the recipe specifies volume (like teaspoons). Kosher salt is generally preferred for its texture and purity.
Q: How long do they really need to sit before eating?
A: While 24 hours is the minimum for good flavor development, I find they’re even better after 48 hours! The longer they sit in the fridge, the more the flavors meld and the pickle-y goodness truly sinks in.

Easiest Refrigerator Pickles
Equipment
- Saucepan for making the brine
- Jar(s) pint or quart size, clean
- lids for jars
Ingredients
Main ingredients
- 6 7 pickling cucumbers Kirby or Persian cucumbers work beautifully.
- 2 cups water Our base for the brine.
- 1 cup white vinegar or apple cider vinegar
- 1 tablespoon kosher salt Kosher salt dissolves nicely and gives a clean salt flavor.
- 0.5 1 teaspoon granulated sugar
- fresh dill a few nice sprigs
- 4 6 cloves garlic peeled and smashed/roughly chopped
- 10 whole black peppercorns
- 0.5 teaspoon whole yellow mustard seeds
- 0.25 teaspoon red pepper flakes Adjust to your spice preference.
- celery seed Pinch
Instructions
- Prep those cucumbers: First things first, give those lovely cucumbers a good scrub. You want them super clean! Trim off the very ends – I usually just trim a little off each end. Then, cut them into whatever shape makes your heart sing. Spears are classic for burgers, slices are perfect for sandwiches, and rounds are just adorable!
- Whip up the brine: Grab a small saucepan. Pour in your water and vinegar. Add the kosher salt and sugar. Pop it on the stove over medium heat. Give it a good stir until all that salt and sugar have completely dissolved. We just need to heat it enough to dissolve, then take it off the heat to cool slightly. You don't want it piping hot when it goes into the jars.
- Pack your jars: Now, take your clean jars (pint or quart sizes work great). Start packing your prepared cucumber pieces snugly into the jars. Don't cram them in so tight that they break, but get a good amount in there!
- Add the flavor makers: Tuck those lovely sprigs of fresh dill in amongst the cucumbers. Then, add in your smashed garlic cloves. This is where all that good stuff starts to happen!
- Spice it up: Now, let's distribute those little flavor gems. Sprinkle the peppercorns, mustard seeds, red pepper flakes (if you're using them!), and that pinch of celery seed evenly among your jars. This ensures every bite gets a burst of deliciousness.
- Pour on the brine: Carefully pour the slightly cooled brine over the cucumbers in each jar. Make sure you cover all the cucumbers completely. You want to leave about a 1/2 inch of space at the top of the jar – this is called headspace, and it's important for sealing.
- Seal 'em up tight: Screw on those lids nice and tight. We want to keep all that yummy goodness locked in!
- Into the fridge they go!: And now, the hardest part – waiting! Place your sealed jars in the refrigerator. You need to let them chill for at least 24 hours before diving in. I know, it's tough! But trust me, the flavor develops beautifully. The longer they sit, the more they pickle and soften just a bit.