Introduction
Remember those classic toaster pastries? The ones with the fruit filling and the sweet icing that were the ultimate breakfast treat? Well, get ready to feel all those nostalgic warm fuzzies again, but this time, in glorious, shareable, PIE form! This Giant Strawberry Pop-Tart Pie takes everything you loved about the original and elevates it into a beautiful, bubbly, and utterly delicious dessert. It’s surprisingly easy to whip up, looks absolutely adorable with those sprinkles, and tastes like a dream. Seriously, once you make this, you’ll wonder why you didn’t think of it sooner!
Why You’ll Love This Recipe
- Fast (well, fast for a pie!)
- Easy (trust me, pie doesn’t get much simpler!)
- Giftable (everyone will swoon!)
- Crowd-pleasing (perfect for parties or just because!)

Ingredients
Here’s what you’ll need to bring this giant Pop-Tart dream to life:
- 2 lb fresh Strawberries: The star of the show! Ripe and juicy is key.
- 2/3 cup Cornstarch: Our secret weapon for thickening that beautiful berry filling.
- 3/4 cup Granulated sugar: Just enough sweetness to balance the berries.
- 1 cup Powdered sugar: For that iconic, sweet glaze topping!
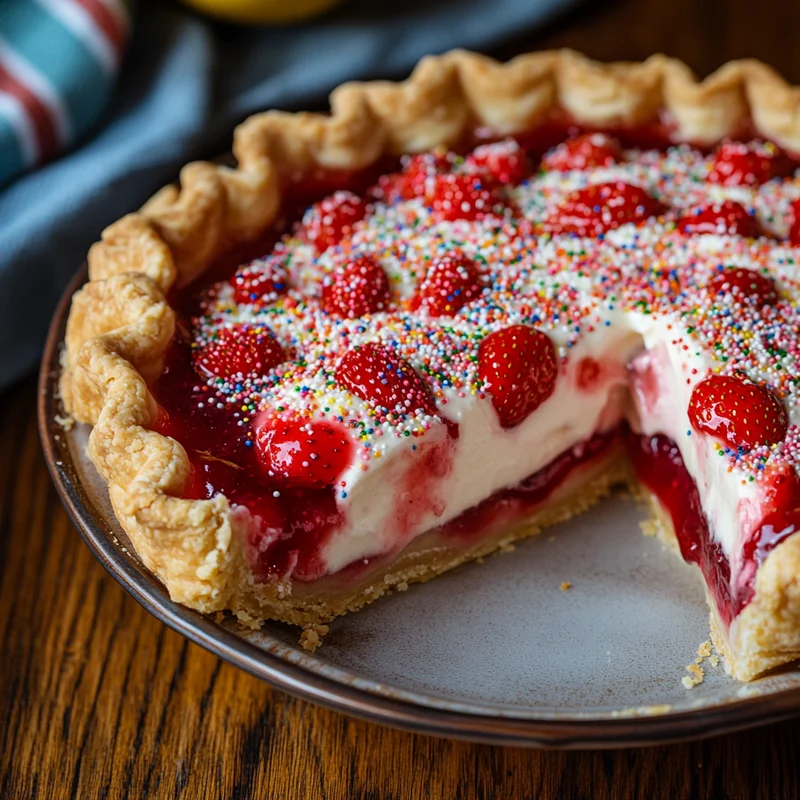
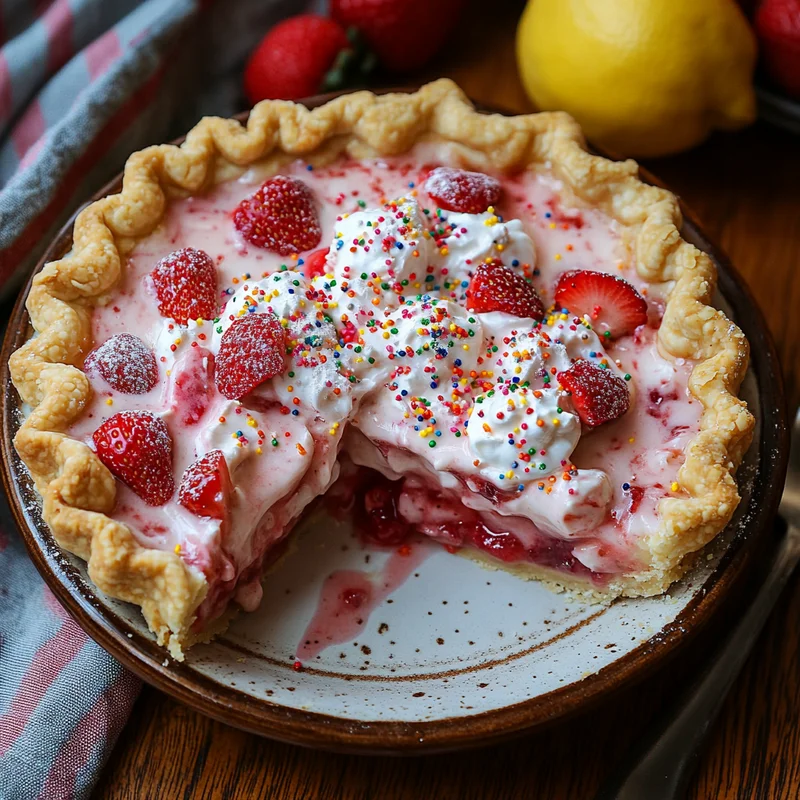
- Rainbow nonpareil sprinkles: Gotta have the sprinkles! It wouldn’t be a Pop-Tart without them, right?
- 1 pinch Salt: A tiny bit enhances all those sweet flavors.
- 1 tsp Vanilla extract: Adds a lovely depth to the glaze.
- 2 store-bought or homemade Pie crusts: Use your favorite! I often grab store-bought for convenience, and they work perfectly.
- 2 tbsp Half and half: Helps make the glaze smooth and creamy. Milk works too!
- 1/3 cup Water: Used to make a cornstarch slurry.
- 1/2 Lemon, juiced and zested: Brightens up the strawberry filling beautifully. Don’t skip the zest for extra citrusy punch!
How to Make It
Alright, let’s get baking! Don’t be intimidated; this is pretty straightforward.
Step 1: Prep the Strawberries. Wash your beautiful strawberries and hull them (remove the green tops). Slice them up. You can slice them uniformly or do a mix of slices and halves for texture – totally up to you!
Step 2: Make the Filling. In a large saucepan, combine the sliced strawberries, granulated sugar, and the zest and juice from half a lemon. Stir gently. In a small bowl, whisk together the cornstarch with the water until smooth – this is your slurry! Add the slurry to the strawberry mixture in the saucepan. Stir everything together.
Step 3: Cook the Filling. Place the saucepan over medium heat. Stir constantly as the mixture heats up. It will start to bubble and thicken. Keep stirring until it’s nice and thick, like a jammy filling. This should take about 5-10 minutes. Remove from the heat and let it cool slightly while you prep the crust.
Step 4: Prepare the Pie Crust. Unroll or roll out one of your pie crusts and gently fit it into a 9-inch pie plate. Press it into the bottom and up the sides. Trim any excess crust, leaving about a 1/2-inch overhang.
Step 5: Fill the Pie. Pour the cooled strawberry filling into the prepared pie crust. Spread it out evenly.
Step 6: Top the Pie. Unroll or roll out your second pie crust. You can place it directly over the filling and crimp the edges to seal, just like a traditional pie. Or, to get that Pop-Tart vibe, you can cut the top crust into shapes (like a large rectangle or smaller rectangles to mimic individual pastries) before placing them on top! If you’re doing a solid top crust, cut a few vents in it with a knife so steam can escape. I like to use a small cookie cutter for cute vents!
Step 7: Bake the Pie. Preheat your oven to 375°F (190°C). Place the pie on a baking sheet (this catches any drips!). Bake for 40-50 minutes, or until the crust is golden brown and you see the filling bubbling up through the vents. If the edges of the crust start browning too quickly, you can cover them loosely with aluminum foil.
Step 8: Cool the Pie. This is the hardest part! You need to let the pie cool COMPLETELY on a wire rack before slicing. Warm fruit pie filling will run everywhere if you cut it too soon. Patience, my friend, it’s worth it!
Step 9: Make the Glaze. Once the pie is cooled, whisk together the powdered sugar, half and half (or milk), pinch of salt, and vanilla extract in a small bowl until you have a smooth, thick glaze. If it’s too thick, add a tiny bit more liquid; if it’s too thin, add a little more powdered sugar.
Step 10: Decorate! Drizzle the glaze generously over the cooled pie. While the glaze is still wet, shower the top with those glorious rainbow nonpareil sprinkles! Let the glaze set for a bit before slicing.
Substitutions & Additions
- Other Fruits: You could absolutely swap the strawberries for other berries like blueberries, raspberries, or a mix! Just adjust the sugar based on the sweetness of the fruit.
- Crust Creativity: Want to make it extra? Use a flaky puff pastry for the top crust! Or make your own homemade pie crust if you’re feeling ambitious.
- Glaze Variations: Add a tiny squeeze of lemon juice to the glaze for tang, or a pinch of cinnamon. You could even do a cream cheese glaze!
- Spice It Up: A pinch of cinnamon or nutmeg in the strawberry filling can add a nice warmth.
Tips for Success
- Prevent a Soggy Bottom: Make sure you cook the filling until it’s nice and thick. Also, baking the pie on a preheated baking sheet can help crisp up the bottom crust.
- Cooling is Crucial: I can’t stress this enough! Let the pie cool completely, ideally for several hours, before slicing.
- Prep Ahead: You can make the strawberry filling a day in advance and store it in the fridge. Just assemble and bake the next day.
- Vent Those Crusts: Don’t forget to cut vents in the top crust so steam can escape while baking.
How to Store It
Let the pie cool completely before storing. Cover loosely with plastic wrap or aluminum foil, or store in an airtight pie carrier. It can be kept at room temperature for a day or two, but for longer storage or in warmer climates, it’s best to refrigerate it. It should last in the fridge for 3-4 days.
FAQs
Here are a few common questions about making this fun pie:
Can I use frozen strawberries?
Yes, but you’ll need to thaw them first and drain off any excess liquid before using them in the filling. The cooking time for the filling might also be slightly longer.
Can I make the filling ahead of time?
Absolutely! Make the filling, let it cool completely, and store it in an airtight container in the fridge for up to 2 days. Assemble and bake when you’re ready.
What if I don’t have half and half for the glaze?
Milk (whole, 2%, or even skim) works just fine for the glaze! Cream or a non-dairy alternative like almond milk can also work.
Why is my filling runny?
Most likely, the filling wasn’t cooked long enough to fully activate the cornstarch and thicken properly. Make sure it gets nice and bubbly and thickens before removing it from the heat.

Giant Strawberry Pop-Tart Pie
Equipment
- Large saucepan
- Small bowl
- 9-inch pie plate
- Knife for cutting vents
- Baking Sheet to catch drips
- Wire rack for cooling
Ingredients
Filling & Crust
- 2 lb fresh Strawberries Ripe and juicy is key.
- 0.67 cup Cornstarch
- 0.75 cup Granulated sugar
- 2 store-bought or homemade Pie crusts
- 0.33 cup Water Used to make a cornstarch slurry.
- 0.5 Lemon juiced and zested
Glaze & Decoration
- 1 cup Powdered sugar For the glaze topping!
- Rainbow nonpareil sprinkles
- 1 pinch Salt
- 1 tsp Vanilla extract
- 2 tbsp Half and half Milk works too!
Instructions
- Step 1: Prep the Strawberries. Wash your beautiful strawberries and hull them (remove the green tops). Slice them up. You can slice them uniformly or do a mix of slices and halves for texture – totally up to you!
- Step 2: Make the Filling. In a large saucepan, combine the sliced strawberries, granulated sugar, and the zest and juice from half a lemon. Stir gently. In a small bowl, whisk together the cornstarch with the water until smooth – this is your slurry! Add the slurry to the strawberry mixture in the saucepan. Stir everything together.
- Step 3: Cook the Filling. Place the saucepan over medium heat. Stir constantly as the mixture heats up. It will start to bubble and thicken. Keep stirring until it's nice and thick, like a jammy filling. This should take about 5-10 minutes. Remove from the heat and let it cool slightly while you prep the crust.
- Step 4: Prepare the Pie Crust. Unroll or roll out one of your pie crusts and gently fit it into a 9-inch pie plate. Press it into the bottom and up the sides. Trim any excess crust, leaving about a 1/2-inch overhang.
- Step 5: Fill the Pie. Pour the cooled strawberry filling into the prepared pie crust. Spread it out evenly.
- Step 6: Top the Pie. Unroll or roll out your second pie crust. You can place it directly over the filling and crimp the edges to seal, just like a traditional pie. Or, to get that Pop-Tart vibe, you can cut the top crust into shapes (like a large rectangle or smaller rectangles to mimic individual pastries) before placing them on top! If you're doing a solid top crust, cut a few vents in it with a knife so steam can escape. I like to use a small cookie cutter for cute vents!
- Step 7: Bake the Pie. Preheat your oven to 375°F (190°C). Place the pie on a baking sheet (this catches any drips!). Bake for 40-50 minutes, or until the crust is golden brown and you see the filling bubbling up through the vents. If the edges of the crust start browning too quickly, you can cover them loosely with aluminum foil.
- Step 8: Cool the Pie. This is the hardest part! You need to let the pie cool COMPLETELY on a wire rack before slicing. Warm fruit pie filling will run everywhere if you cut it too soon. Patience, my friend, it's worth it!
- Step 9: Make the Glaze. Once the pie is cooled, whisk together the powdered sugar, half and half (or milk), pinch of salt, and vanilla extract in a small bowl until you have a smooth, thick glaze. If it's too thick, add a tiny bit more liquid; if it's too thin, add a little more powdered sugar.
- Step 10: Decorate! Drizzle the glaze generously over the cooled pie. While the glaze is still wet, shower the top with those glorious rainbow nonpareil sprinkles! Let the glaze set for a bit before slicing.