
Introduction
There’s something truly magical about a homemade pie, isn’t there? The aroma filling your kitchen, the anticipation of that first perfect slice… and at the heart of it all, a beautiful, golden crust. Today, we’re diving into how to create a classic lattice pie crust, a timeless design that elevates any pie from simple to spectacular. It might look fancy, but trust me, it’s surprisingly easy, and the result is pure edible artistry!
Why You’ll Love This Recipe
- Quick to Assemble: Once you get the hang of it, this lattice comes together in a flash.
- Surprisingly Easy: Don’t be intimidated! It’s all about simple cuts and folds.
- Perfect for Gifting: A beautifully latticed pie is always a welcome gift for friends, family, or neighbors.
- Crowd-Pleasing Beauty: This classic design is universally loved and always impresses.
Ingredients
For this recipe, you’ll need a prepared double pie crust. This means one crust for the bottom and one for the top, ready to be transformed!
- Double Pie Crust: Your favorite homemade or store-bought pie dough. The key is that it’s chilled and ready to roll.
- Egg Wash (Optional, but Recommended!):
- 1 Tablespoon Heavy Cream: This makes the egg wash richer and helps create a beautiful golden sheen.
- 1 Egg: The binder that gives your crust that lovely glossy finish.
How to Make It
Alright, let’s get our hands a little bit floury and create some pie magic!
- Prepare Your Bottom Crust: Start by fitting your first pie crust into your pie plate. Crimp the edges however you like – a classic fork crimp or a fluted edge both work beautifully.
- Roll Out Your Top Crust: On a lightly floured surface, roll out your second pie crust into a circle, about 12 inches in diameter. Aim for a thickness that’s not too thick and not too thin – about 1/8 inch is perfect.
- Cut Your Strips: This is where the lattice magic begins! Using a sharp knife or a pizza cutter, cut the rolled-out dough into even strips. For a standard 9-inch pie, I usually aim for strips about 3/4 inch to 1 inch wide. You’ll want enough strips to cover your pie.
- Lay the First Set of Strips: Starting from one side of your pie, lay down parallel strips of dough, spacing them about 1/2 inch apart. Gently press the ends of the strips onto the bottom crust to secure them.
- Begin the Weave: Now for the fun part! Take every other strip and gently fold it back towards the center.
- Lay the Perpendicular Strip: Place a new, uncut strip of dough perpendicular to the folded strips, running across the unfolded strips.
- Unfold and Repeat: Unfold the folded strips back over the new strip you just laid down.
- Continue Weaving: Now, take the other set of parallel strips and fold them back. Lay down another perpendicular strip. Unfold and repeat. You’ll keep alternating which strips you fold back, creating that classic woven look.
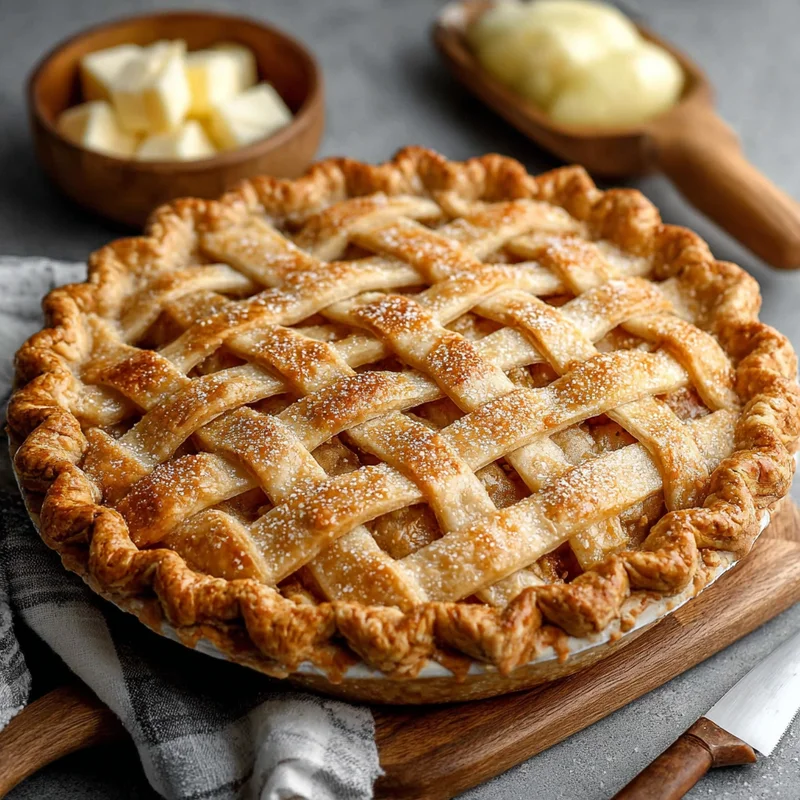
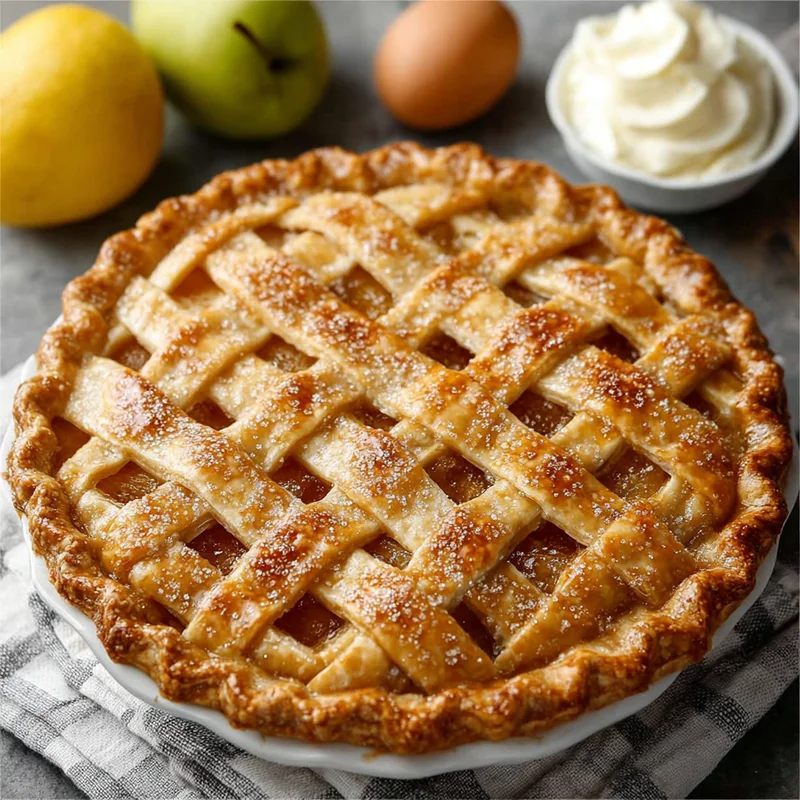
- Trim and Crimp: Once you’ve woven your lattice, trim any excess dough from the ends of the strips so they are flush with the edge of the pie crust. Gently press the lattice strips onto the bottom crust edge to seal them. You can then crimp the entire edge together for a neat finish.
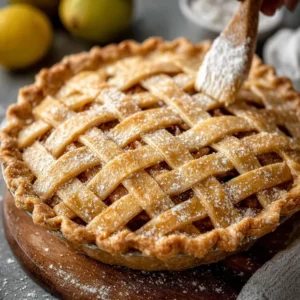
- Egg Wash (Optional): If you’re using egg wash, whisk together the heavy cream and egg in a small bowl. Gently brush this mixture over the lattice strips and the crimped edge of the pie crust. This will give you that beautiful golden-brown color and a lovely sheen.
Substitutions & Additions
While this lattice is stunning on its own, here are some ways to make it even more special!
- Crust Variations: Feel free to use a flavored pie dough, like a brown sugar or cinnamon dough, for an extra layer of deliciousness.
- Herbs in the Crust: For savory pies, consider adding finely chopped fresh rosemary or thyme to your dough before rolling.
- Decorative Cut-outs: Instead of just strips, you can use small cookie cutters (stars, leaves, hearts) to create decorative elements to weave into or place on top of your lattice.
- Sugared Crust: For a sweet touch, sprinkle coarse sugar (like turbinado or sanding sugar) over the egg wash before baking. It adds a delightful crunch and sparkle!
Tips for Success
A little bit of knowledge goes a long way when it comes to pie crusts!
- Keep it Cold: The key to a flaky crust is keeping your dough cold. If your dough starts to get too soft while you’re working with it, pop it back into the refrigerator for 10-15 minutes.
- Even Strips: Try to cut your strips as evenly as possible. This will make the weaving process much smoother and the final result more uniform.
- Don’t Overwork the Dough: Handle the dough as little as possible. Overworking can make your crust tough.
- Prep Ahead: You can prepare your lattice strips ahead of time and keep them chilled in the refrigerator on a parchment-lined baking sheet. Just cover them loosely with plastic wrap.
- Blind Baking: If your pie filling requires blind baking (pre-baking the crust), make sure to secure your bottom crust with pie weights or dried beans before adding your lattice.
How to Store It
Once your masterpiece is baked and cooled, you’ll want to store it properly to keep it delicious.
If your pie is fruit-based and doesn’t contain dairy or eggs in the filling, it can generally be stored at room temperature for a day or two. For pies with cream, custard, or dairy fillings, they should be stored in the refrigerator. Cover the pie loosely with foil or plastic wrap, or use a pie carrier. Most homemade pies will keep well in the refrigerator for about 3-4 days.
FAQs
Can I make the lattice strips ahead of time?
Yes! You can cut your strips, lay them on parchment paper, cover them loosely with plastic wrap, and refrigerate them for up to a day. This can be a real time-saver!
What if my dough cracks when I’m weaving?
No worries! Pie dough is forgiving. Just gently press the cracked areas together with your fingertips. If a strip breaks, you can often piece it back together or overlap it slightly.
How do I get my lattice to be golden brown and not pale?
The egg wash is your best friend here! Make sure to brush it evenly over all the lattice strips and the edges. Baking at the correct temperature for the recommended time is also crucial.
Can I make a lattice for any pie filling?
Absolutely! A lattice crust is wonderfully versatile and pairs beautifully with fruit pies (apple, cherry, berry), custard pies, and even some savory pies.
Homemade Lattice Pie Crust
Equipment
- Knife Or pizza cutter for cutting dough strips.
- Rolling Pin
- Pastry brush For egg wash.
- Pie plate
- Baking Sheet To place the pie on if blind baking.
- Parchment paper For lining baking sheets.
- Small bowl For mixing egg wash.
Ingredients
Main Ingredients
- 2 crusts Double Pie Crust Your favorite homemade or store-bought pie dough, chilled and ready to roll.
Egg Wash (Optional, but Recommended!)
- 1 Tablespoon Heavy Cream Makes the egg wash richer and helps create a beautiful golden sheen.
- 1 Egg Gives your crust that lovely glossy finish.
Instructions
- Prepare Your Bottom Crust: Start by fitting your first pie crust into your pie plate. Crimp the edges however you like – a classic fork crimp or a fluted edge both work beautifully.
- Roll Out Your Top Crust: On a lightly floured surface, roll out your second pie crust into a circle, about 12 inches in diameter. Aim for a thickness that’s not too thick and not too thin – about 1/8 inch is perfect.
- Cut Your Strips: This is where the lattice magic begins! Using a sharp knife or a pizza cutter, cut the rolled-out dough into even strips. For a standard 9-inch pie, aim for strips about 3/4 inch to 1 inch wide. You’ll want enough strips to cover your pie.
- Lay the First Set of Strips: Starting from one side of your pie, lay down parallel strips of dough, spacing them about 1/2 inch apart. Gently press the ends of the strips onto the bottom crust to secure them.
- Begin the Weave: Take every other strip and gently fold it back towards the center.
- Lay the Perpendicular Strip: Place a new, uncut strip of dough perpendicular to the folded strips, running across the unfolded strips.
- Unfold and Repeat: Unfold the folded strips back over the new strip you just laid down.
- Continue Weaving: Keep alternating which strips you fold back, laying down another perpendicular strip, unfolding, and repeating to create that classic woven look.
- Trim and Crimp: Once you’ve woven your lattice, trim any excess dough from the ends of the strips so they are flush with the edge of the pie crust. Gently press the lattice strips onto the bottom crust edge to seal them. You can then crimp the entire edge together for a neat finish.
- Egg Wash (Optional): If using egg wash, whisk together the heavy cream and egg in a small bowl. Gently brush this mixture over the lattice strips and the crimped edge of the pie crust for a golden-brown color and a lovely sheen.