Introduction
Oh, hey there, kitchen buddy! Do you ever get those cravings for something comforting, something cheesy, something that just screams “deliciousness”? I know I do! And when that classic Philly cheesesteak flavor hits me, but I’m trying to keep things keto-friendly, it used to be a bit of a challenge. But guess what? I’ve cracked the code! Today, we’re diving headfirst into these absolutely incredible Keto Philly Cheesesteak Rolls. They’re seriously a game-changer, and the best part? They come together so quickly, you’ll be wondering where they’ve been all your keto life.
Why You’ll Love This Recipe
- Fast: Whip these up in under 30 minutes! Perfect for weeknights.
- Easy: No fancy techniques needed, just simple mixing and baking.
- Giftable: Imagine bringing a batch of these warm, cheesy delights to a friend’s house – talk about a crowd-pleaser!
- Crowd-Pleasing: Even your non-keto friends will be asking for the recipe. They’re that good!
Ingredients
Gather up these goodies. They’re all pretty standard, and you might even have most of them in your pantry right now!
- 2 cups Monterey Jack cheese, shredded: This cheese melts like a dream and gets perfectly bubbly.
- 16 ounces ground beef: Your protein powerhouse! Feel free to use 80/20 for the best flavor.
- 1/2 medium onion, sliced: Adds that classic sweet and savory depth.
- 1 bell pepper, sliced: I love using green for that traditional cheesesteak vibe, but red or yellow work beautifully too!
- 1 teaspoon Worcestershire sauce: Just a little splash to add a umami kick.
- 4 ounces cream cheese: This is our secret weapon for that creamy, binding goodness. Make sure it’s softened!
- Salt, to taste: To bring out all those amazing flavors.
- Pepper, to taste: A little grind to add some warmth.
How to Make It
Alright, let’s get cooking! It’s so straightforward, you’ll have these out of the oven before you know it.
- Brown the Beef: Grab a large skillet and get it over medium-high heat. Add your ground beef and cook it until it’s all browned and crumbly. Drain off any excess grease – nobody likes a greasy roll!
- Sauté the Veggies: Now, add your sliced onion and bell pepper to the skillet with the beef. Cook them until they’re nice and tender-crisp, about 5-7 minutes.
- Flavor Boost: Stir in the Worcestershire sauce, salt, and pepper. Give it a good mix.
- Get Creamy: Reduce the heat to low and add the softened cream cheese. Stir it in until it’s melted and everything is beautifully combined and creamy. This is where the magic happens!
- Cheese Time: Stir in about 1.5 cups of the shredded Monterey Jack cheese. Keep stirring until it’s all melty and gooey. Save the rest of the cheese for topping!
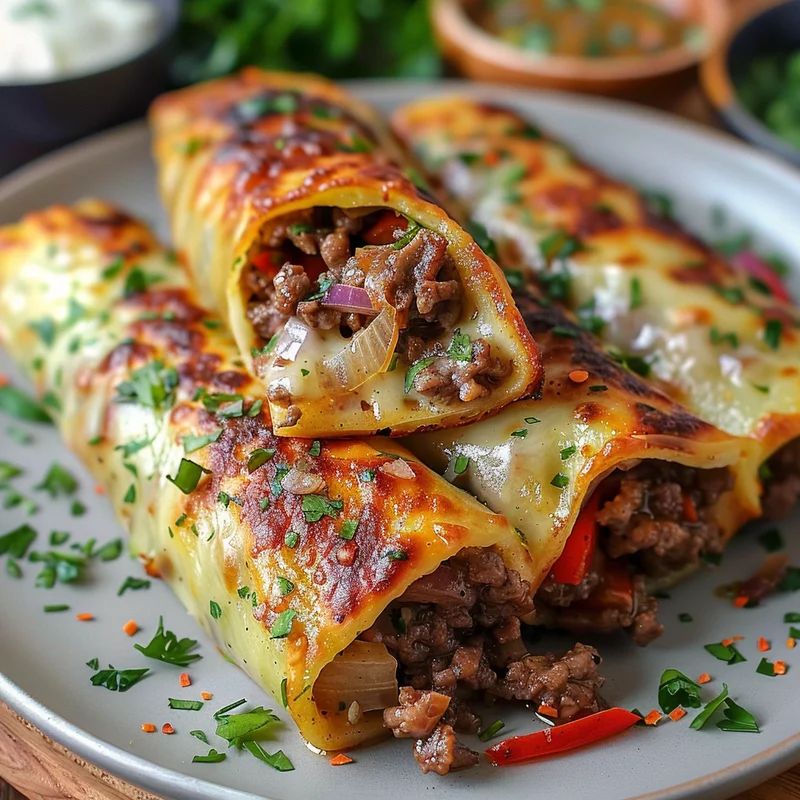
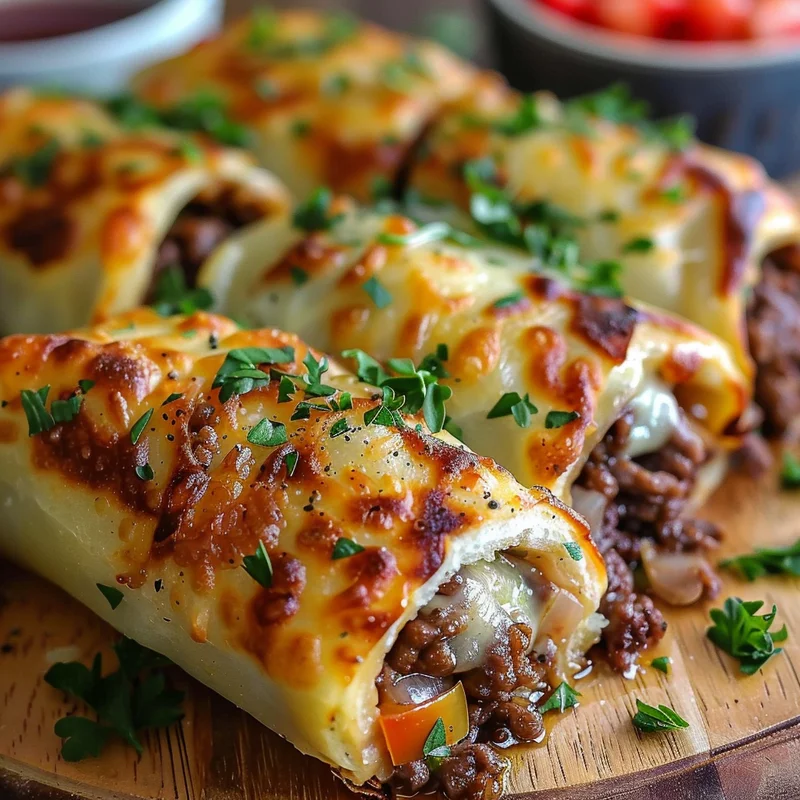
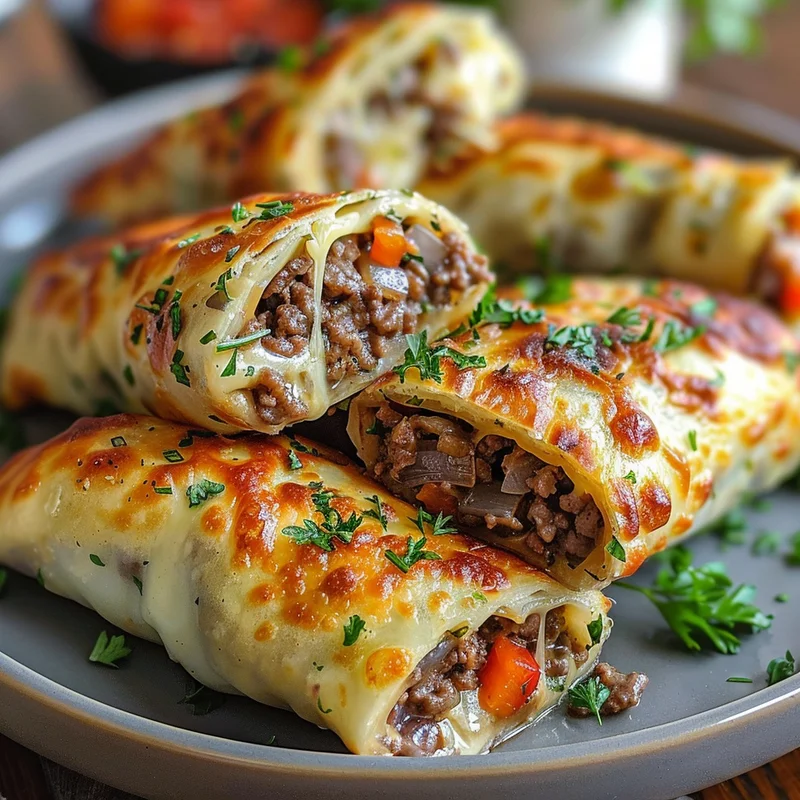
- Form the “Rolls”: Now, this is the fun part. I like to use a tablespoon to scoop out portions of the mixture and then gently form them into little oval “roll” shapes on a baking sheet lined with parchment paper. Don’t worry if they’re not perfectly shaped – they’ll taste amazing no matter what!
- Top and Bake: Sprinkle the remaining Monterey Jack cheese over the top of each “roll.” Pop the baking sheet into a preheated oven at 375°F (190°C) and bake for about 10-15 minutes, or until the cheese on top is golden brown and bubbly.
- Enjoy! Let them cool for just a minute or two before you dig in. Be careful, they’re hot and oh-so-delicious!
Substitutions & Additions
While this recipe is fantastic as is, feel free to get creative! You know I love a good kitchen experiment.
- Cheese: Cheddar, mozzarella, or a blend of your favorite melting cheeses would be delicious here.
- Veggies: Mushrooms are a classic cheesesteak addition, so sauté some sliced mushrooms with the onions and peppers. Jalapeños would add a nice kick!
- Meat: If you’re not a fan of ground beef, you could certainly use thinly sliced steak (like sirloin or ribeye) cooked until tender.
- Spice: For a bit of heat, add a pinch of red pepper flakes to the mixture.
Tips for Success
A few little pointers to make these Keto Philly Cheesesteak Rolls absolutely perfect every single time.
- Don’t Overcook the Veggies: You want them tender but with a slight bite.
- Soften Your Cream Cheese: This makes it so much easier to incorporate smoothly into the beef mixture. You can leave it out on the counter for about 30 minutes, or pop it in the microwave for 15-20 seconds (just until softened, not melted!).
- Parchment Paper is Your Friend: It prevents sticking and makes for super easy cleanup.
- Prep Ahead: You can totally brown the beef and sauté the veggies ahead of time. Store them in an airtight container in the fridge and then just mix in the cream cheese and cheeses when you’re ready to form and bake.
How to Store It
Leftovers? Lucky you! These store like a dream.
Once cooled, store any leftover Keto Philly Cheesesteak Rolls in an airtight container in the refrigerator for up to 3-4 days. To reheat, you can pop them in a toaster oven or a regular oven at around 350°F (175°C) until warmed through and the cheese is melty again. You can also gently reheat them in a skillet over low heat.
FAQs
Are these rolls actually “rolls”?
Not in the traditional sense of bread! These are formed portions of the cheesy, meaty filling that bake up with a lovely golden crust. They’re meant to be handheld, low-carb deliciousness!
Can I make the filling ahead of time?
Absolutely! You can prepare the beef and veggie mixture and store it in the fridge for a day or two. Then, just stir in the cream cheese and shredded cheese, form, and bake when you’re ready.
What can I serve these with?
These are fantastic on their own, but they also make a great appetizer or side. Try serving them with a fresh green salad, some avocado slices, or a dollop of sour cream.

Keto Philly Cheesesteak Rolls
Equipment
- Large skillet
- Baking Sheet lined with parchment paper
- Oven
- Airtight container for storage
- Toaster oven for reheating
Ingredients
Main ingredients
- 2 cups Monterey Jack cheese, shredded This cheese melts like a dream and gets perfectly bubbly.
- 16 ounces ground beef Feel free to use 80/20 for the best flavor.
- 0.5 medium onion, sliced Adds that classic sweet and savory depth.
- 1 bell pepper, sliced I love using green for that traditional cheesesteak vibe, but red or yellow work beautifully too!
- 1 teaspoon Worcestershire sauce Just a little splash to add a umami kick.
- 4 ounces cream cheese This is our secret weapon for that creamy, binding goodness. Make sure it's softened!
- salt to taste: To bring out all those amazing flavors.
- pepper to taste: A little grind to add some warmth.
Instructions
- Brown the beef in a large skillet over medium-high heat until browned and crumbly. Drain excess grease.2 cups Monterey Jack cheese, shredded
- Add sliced onion and bell pepper to the skillet with the beef. Cook until tender-crisp, about 5-7 minutes.2 cups Monterey Jack cheese, shredded
- Stir in Worcestershire sauce, salt, and pepper. Mix well.2 cups Monterey Jack cheese, shredded
- Reduce heat to low and add softened cream cheese. Stir until melted and combined, creating a creamy mixture.2 cups Monterey Jack cheese, shredded
- Stir in 1.5 cups of shredded Monterey Jack cheese until melted and gooey. Save the remaining cheese for topping.2 cups Monterey Jack cheese, shredded
- Scoop portions of the mixture with a tablespoon and form into oval "roll" shapes on a parchment-lined baking sheet.
- Sprinkle the remaining Monterey Jack cheese over the top of each "roll".2 cups Monterey Jack cheese, shredded
- Bake in a preheated oven at 375°F (190°C) for 10-15 minutes, or until the cheese on top is golden brown and bubbly.
- Let cool slightly before enjoying.