Introduction
There are some recipes that just feel like a warm hug, aren’t there? The kind that transport you back to simpler times, to cozy kitchens filled with laughter and delicious aromas. Navajo Fry Bread is absolutely one of those recipes for me. It’s incredibly simple, surprisingly quick, and the result is just pure comfort in every bite. Whether you’re looking for a delicious side dish, a sweet treat, or something to share with loved ones, this Navajo Fry Bread is going to become your new favorite go-to. Get ready to impress yourself (and everyone around you!) with this taste of tradition.
Why You’ll Love This Recipe
- Fast: From start to finish, you can have warm, fluffy fry bread ready in under an hour.
- Easy: Seriously, no fancy techniques required. If you can mix dough and fry, you can make this!
- Giftable: While best served fresh, a batch of warm fry bread (perhaps with some honey or powdered sugar) makes a delightful surprise for neighbors.
- Crowd-pleasing: Who doesn’t love a warm, slightly sweet, slightly savory bread? It’s a guaranteed hit for any gathering.

Ingredients
Gathering your ingredients is the first step to deliciousness! You probably have most of these in your pantry already, which makes this recipe even more appealing.
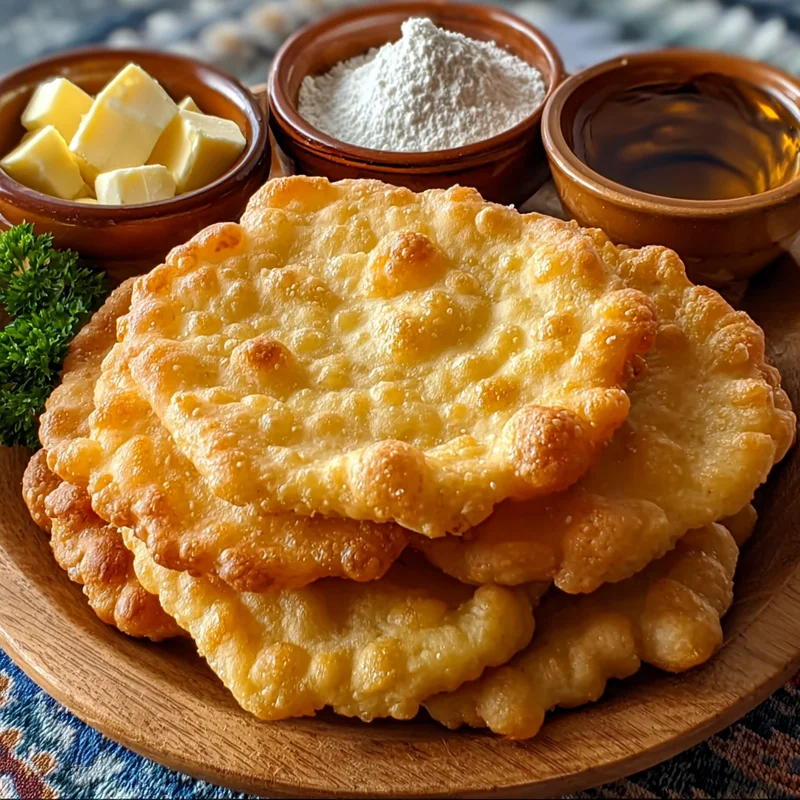
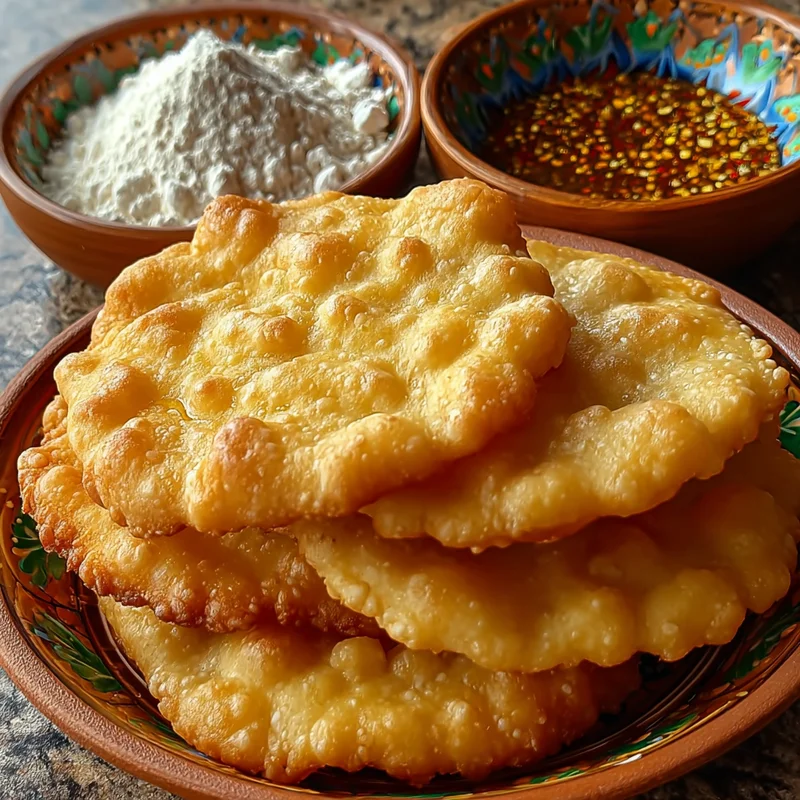
- 4 cups all-purpose flour: Your basic building block for this wonderful bread.
- 3 tablespoons baking powder: This is what gives our fry bread that lovely puffiness.
- 2 teaspoons salt: Just a touch to balance out the flavors and bring out the best in the flour.
- 2 1/2 cups warm milk: Milk makes the dough tender and rich. Warm milk helps activate the baking powder beautifully.
- 2 cups oil for frying: Vegetable oil, canola oil, or peanut oil all work wonderfully here.
How to Make It
Alright, let’s get our hands a little bit floured and make some magic happen! This is where the fun truly begins.
-
Step 1: Mix the Dry Ingredients
Grab a large mixing bowl. In it, you’ll want to whisk together your flour, baking powder, and salt. Giving them a good whisk ensures everything is evenly distributed, so you don’t get pockets of baking powder in your finished bread.
-
Step 2: Add the Milk
Now, start gradually adding the warm milk to your dry ingredients. Mix it all together until a soft, manageable dough starts to form. You might not need all the milk, or you might need just a smidge more – just aim for a dough that’s not too sticky but not too dry.
-
Step 3: Knead the Dough
Turn your dough out onto a surface that you’ve lightly floured. Now, it’s time to knead! Gently push, fold, and turn the dough for about 5 to 7 minutes. You’re looking for a dough that feels smooth and elastic. This develops the gluten, which gives our fry bread its wonderful texture.
-
Step 4: Portion the Dough
Divide your smooth dough into 8 equal portions. You can eyeball this, or if you want to be precise, you can weigh them! Roll each portion into a ball.
-
Step 5: Heat the Oil
This is where the delicious transformation happens! Pour your oil into a large, heavy-bottomed skillet or a Dutch oven. Heat it over medium-high heat until it reaches about 375°F (190°C). If you don’t have a thermometer, you can test it by dropping a tiny bit of dough in – it should sizzle immediately and bubble up.
-
Step 6: Shape the Fry Bread
Take one of your dough balls and gently stretch it out into a flat circle. Aim for about 6 to 8 inches in diameter. Don’t worry if it’s not perfectly round; rustic is beautiful!
-
Step 7: Fry Away!
Carefully, and I mean carefully, place one or two of your stretched dough circles into the hot oil. It’s important not to overcrowd the pan, as this can lower the oil temperature and lead to greasy fry bread. Let them swim happily in the oil.
-
Step 8: Golden Brown Perfection
Fry each side for about 1 to 2 minutes. You’ll see them puff up and turn a gorgeous golden brown. Keep an eye on them; they cook fast!
-
Step 9: Drain and Repeat
Using a slotted spoon or tongs, lift the beautiful fry bread out of the oil. Place them on a wire rack set over paper towels (this helps keep them from getting soggy) or directly onto paper towels to drain any excess oil.
-
Step 10: Enjoy!
Repeat the frying process with your remaining dough portions. Serve them up warm and get ready for the compliments!
Substitutions & Additions
While this recipe is perfect as is, sometimes you want to get a little creative! Here are some ideas:
- For a sweeter dough: Add a tablespoon or two of sugar to the dry ingredients before mixing with the milk.
- Gluten-Free Option: You can try a 1:1 gluten-free baking flour blend. You might need to adjust the liquid slightly, as GF flours can absorb differently.
- Savory Twist: Sprinkle some dried herbs (like rosemary or chives) or a pinch of garlic powder into the dry ingredients for a savory flavor.
- Serving Suggestions: Navajo Fry Bread is incredibly versatile! Serve it with honey, powdered sugar, jam, or even as a base for savory toppings like chili, beans, or taco meat.
Tips for Success
A few little tips can make all the difference in achieving perfect Navajo Fry Bread every time!
- Oil Temperature is Key: Make sure your oil is hot enough before adding the dough. If it’s not hot enough, the bread will absorb too much oil and become greasy. Too hot, and it will burn before cooking through.
- Don’t Overcrowd the Pan: This is my biggest tip! Frying in batches ensures each piece gets perfectly cooked and golden.
- Prep Ahead: You can mix the dough a few hours in advance and keep it covered in the refrigerator. Let it come to room temperature for about 30 minutes before shaping and frying.
- Handle Gently: When stretching the dough, be gentle. You don’t want to tear it, which can cause oil to seep in too much.
How to Store It
Navajo Fry Bread is undeniably best enjoyed fresh and warm. However, if you happen to have leftovers (which is rare in my house!), here’s how to store them:
- Once cooled completely, store any leftover fry bread in an airtight container or a resealable bag at room temperature for up to 2 days.
- To reheat, place them in a toaster oven or a dry skillet over low heat for a few minutes until warmed through. Avoid microwaving if possible, as it can make them a bit chewy.
FAQs
Can I make this recipe with water instead of milk?
While milk adds richness and tenderness, you can use warm water as a substitute. The texture might be slightly less tender, but it will still be delicious!
How do I know if the oil is hot enough?
The best way is with a thermometer, aiming for 375°F (190°C). If you don’t have one, drop a tiny piece of dough into the oil. If it sizzles and bubbles immediately, it’s ready. If it sinks and barely bubbles, it’s too cool. If it browns instantly, it’s too hot.
Can I bake Navajo Fry Bread instead of frying it?
Frying is what gives Navajo Fry Bread its signature texture and flavor. Baking would result in a different kind of bread, more like a biscuit or scone, and wouldn’t have that satisfying crispiness on the outside and softness on the inside.
How long does the dough last in the fridge?
The dough can be stored in an airtight container in the refrigerator for up to 2 days. Make sure to let it come to room temperature before shaping and frying for the best results.
Navajo Fry Bread

A simple, quick, and delicious traditional Navajo Fry Bread recipe that results in warm, fluffy, and comforting bread, perfect as a side dish or a sweet treat.
- Large mixing bowl
- Whisk
- Lightly floured surface
- Large, heavy-bottomed skillet or Dutch oven
- Slotted spoon or tongs
- Wire rack set over paper towels
Main ingredients
- 4 cups all-purpose flour
- 3 tablespoons baking powder
- 2 teaspoons salt
- 2.5 cups warm milk
- 2 cups oil for frying (Vegetable oil, canola oil, or peanut oil)
- Mix the dry ingredients: Whisk together flour, baking powder, and salt in a large mixing bowl.
- Add the milk: Gradually add warm milk to the dry ingredients, mixing until a soft, manageable dough forms. Adjust milk as needed.
- Knead the dough: Turn dough onto a lightly floured surface and knead for 5-7 minutes until smooth and elastic.
- Portion the dough: Divide the dough into 8 equal portions and roll each into a ball.
- Heat the oil: Heat about 2 cups of oil in a large skillet or Dutch oven over medium-high heat until it reaches 375°F (190°C).
- Shape the fry bread: Gently stretch each dough ball into a flat circle, about 6-8 inches in diameter.
- Fry the bread: Carefully place one or two dough circles into the hot oil, ensuring not to overcrowd the pan.
- Cook until golden brown: Fry each side for about 1-2 minutes until puffed up and golden brown.
- Drain the fry bread: Remove the fry bread from the oil with a slotted spoon or tongs and place on a wire rack over paper towels to drain.
- Repeat and serve: Repeat the frying process with the remaining dough portions. Serve warm.
Oil temperature is key for successful frying. Don’t overcrowd the pan to prevent greasy bread. Dough can be prepped ahead and refrigerated.