Introduction
Oh, remember those classic Black Forest cakes? That magical combination of rich chocolate, tangy cherries, and dreamy whipped cream? Well, get ready, because we’re taking all that goodness and transforming it into the most incredible no-bake cheesecake. Seriously, this Black Forest Cheesecake is a showstopper, but the best part? It’s ridiculously easy to make. You won’t even need to turn on the oven!
Why You’ll Love This Recipe
- Super Fast: No baking means less time in the kitchen and more time enjoying!
- Effortlessly Easy: Perfect for beginners or when you need a dessert in a pinch.
- Incredibly Giftable: Imagine presenting this beauty to a friend – they’ll be amazed!
- Guaranteed Crowd-Pleaser: This rich, decadent cheesecake is a hit with everyone.
Ingredients
Let’s gather our goodies for this delightful creation. Think of it like prepping for a cozy night in with your favorite people!
For the Oreo Crust:
- 32 whole Oreo cookies with filling (Yep, the whole cookie! That’s where the magic happens.)
- 4 tablespoons salted butter, melted (Just enough to bind everything together.)
For the Chocolate Cheesecake Filling:
- 16 ounces cream cheese, room temperature (This is key for a super smooth filling. Let it sit out for about an hour.)
- ¾ cup granulated sugar (For just the right amount of sweetness.)
- ½ cup unsweetened cocoa powder (Deep, dark chocolate flavor incoming!)
- 1 cup sour cream or plain Greek yogurt (Adds a lovely tang and creaminess.)
- 1 cup cherry pie filling (The star of the show, giving us that classic Black Forest vibe.)
- 8 ounces whipped topping, thawed (Think Cool Whip – it makes the filling light and airy.)
For the Toppings:
- 1 cup whipped cream or whipped topping (For that fluffy cloud on top.)
- 1 cup cherry pie filling (More cherries, please!)
- Optional Garnish: chocolate shavings (Because who doesn’t love a little extra chocolate flair?)
How to Make It
Alright, let’s get our hands a little messy and create some dessert magic. Grab your favorite apron!
1. Prepare the Oreo Crust:
First things first, let’s make that delicious base. You can pop your Oreos into a food processor for super-fine crumbs, or if you’re feeling adventurous (or don’t have a processor), put them in a zip-top bag and give them a good bash with a rolling pin! Once they’re all crumbly, toss them into a medium bowl. Pour in that melted butter and stir until everything is nicely moistened. Now, press this mixture firmly and evenly into the bottom of a 9-inch springform pan. This is like building the foundation of a cozy little house. Pop it in the fridge to chill while we whip up the filling.
2. Make the Chocolate Cheesecake Filling:
In a big bowl, grab your electric mixer (or a whisk and some good arm strength!) and beat the softened cream cheese and sugar until it’s wonderfully smooth. No lumps allowed! Now, dust in that cocoa powder and mix it up until it’s beautifully combined and the color is a gorgeous chocolatey brown. Next, stir in your sour cream or Greek yogurt. Keep mixing until everything is smooth as silk. Now for the fun part: gently fold in one cup of the cherry pie filling and the thawed whipped topping. Be gentle here – we want to keep all that airiness! Just fold until it’s just combined. Don’t overmix!
3. Assemble the Cheesecake:
Time to bring it all together! Pour that luscious chocolate filling right over your chilled Oreo crust. Use a spatula to spread it out evenly, making sure to get into all the nooks and crannies. Look at that already! It’s starting to look like a masterpiece.
4. Chill the Cheesecake:
This is where patience comes in, my friends! Cover your springform pan (plastic wrap works perfectly) and tuck it into the refrigerator. You’ll want to let it chill for at least 4-6 hours, but honestly, overnight is even better. The longer it chills, the firmer and more delicious it will be. Think of it as letting the flavors have a little party and get to know each other!
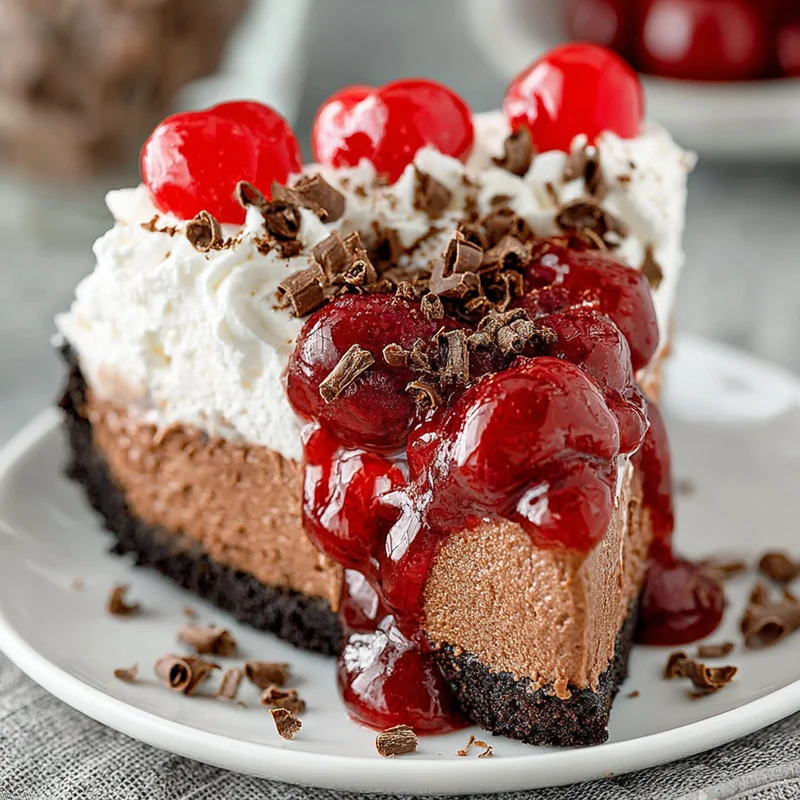
5. Decorate and Serve:
The moment of truth! Once your cheesecake is nice and firm, carefully release the sides of the springform pan. Take a deep breath and admire your creation. Now, let’s make it pretty! Dollop on that cup of whipped cream or whipped topping. Spoon the remaining cup of cherry pie filling over the whipped cream, letting it cascade down the sides a bit. If you’re feeling fancy, sprinkle on some chocolate shavings. And there you have it – your very own stunning Black Forest Cheesecake, ready to be devoured!
Substitutions & Additions
We love a good recipe, but we also love making it our own! Here are a few ideas to spice things up:
- For the Crust: Don’t have Oreos? You can use chocolate graham crackers or even shortbread cookies for a different vibe.
- For the Filling: If you’re not a fan of cherry pie filling, you could try raspberry or even a mixed berry filling for a twist.
- Boozy Kick: A tablespoon or two of kirsch (cherry liqueur) folded into the filling can give it an authentic Black Forest flavor.
- Chocolate Chunks: Fold in some mini chocolate chips into the filling for extra chocolatey goodness.
- Fruity Freshness: Top with fresh cherries or raspberries for a burst of fresh flavor alongside the pie filling.
Tips for Success
A few little tricks up my sleeve to make sure your cheesecake turns out absolutely perfect, every time!
- Room Temperature Cream Cheese is a Must: I can’t stress this enough! Cold cream cheese will give you a lumpy filling. Let it sit on the counter for at least an hour.
- Don’t Overmix the Filling: Once you add the whipped topping, fold it in gently. Overmixing can deflate it and make your cheesecake less airy.
- Chill Time is Crucial: Resist the urge to cut into it too early! Proper chilling is what makes it firm and sliceable.
- Prep Ahead: You can totally make this cheesecake a day in advance. In fact, it’s often even better the next day! Just keep it covered in the fridge.
- Springform Pan Magic: Make sure your springform pan is securely locked. You don’t want any surprises when you go to release it!
How to Store It
Leftovers (if there are any, and I doubt it!) are a treat. Just cover the cheesecake tightly with plastic wrap or foil and store it in the refrigerator. It will stay delicious for about 3-4 days. If you happen to have a slice that’s just perfect for freezing, you can wrap individual slices tightly in plastic wrap and then in foil, and freeze them for up to a month. Let them thaw in the refrigerator overnight before enjoying.
FAQs
Can I make this Black Forest Cheesecake without a springform pan?
You can! You can try using a regular 9-inch pie plate, but it will be harder to get out cleanly. If you use a pie plate, you might want to line it with parchment paper with overhangs to help lift it out. Another option is a deep-dish tart pan with a removable bottom.
What’s the difference between whipped cream and whipped topping in the filling?
Whipped topping (like Cool Whip) is already sweetened and stabilized, making it super easy to fold into the filling for a light and airy texture that holds its shape well. Regular whipped cream will also work, but make sure it’s sweetened and whipped to stiff peaks before folding it in.
Can I use fresh cherries instead of cherry pie filling?
You absolutely can! You’ll want to pit and cook down about 2 cups of fresh cherries with a little sugar and a splash of cornstarch to thicken them up before using them in the recipe. This will give you a similar texture to pie filling.

Black Forest Cheesecake
Equipment
- Food processor or zip-top bag and rolling pin
- Medium bowl
- 9-inch springform pan or 9-inch pie plate, or deep-dish tart pan with removable bottom
- Electric mixer or whisk
- Big bowl
- Spatula
- Plastic wrap
Ingredients
For the Oreo Crust
- 32 whole Oreo cookies with filling Yep, the whole cookie! That's where the magic happens.
- 4 tablespoons salted butter, melted Just enough to bind everything together.
For the Chocolate Cheesecake Filling
- 16 ounces cream cheese, room temperature This is key for a super smooth filling. Let it sit out for about an hour.
- 0.75 cup granulated sugar For just the right amount of sweetness.
- 0.5 cup unsweetened cocoa powder Deep, dark chocolate flavor incoming!
- 1 cup sour cream or plain Greek yogurt Adds a lovely tang and creaminess.
- 1 cup cherry pie filling The star of the show, giving us that classic Black Forest vibe.
- 8 ounces whipped topping, thawed Think Cool Whip – it makes the filling light and airy.
For the Toppings
- 1 cup whipped cream or whipped topping For that fluffy cloud on top.
- 1 cup cherry pie filling More cherries, please!
- chocolate shavings Optional Garnish: because who doesn't love a little extra chocolate flair?
Instructions
- First things first, let's make that delicious base. You can pop your Oreos into a food processor for super-fine crumbs, or if you're feeling adventurous (or don't have a processor), put them in a zip-top bag and give them a good bash with a rolling pin! Once they're all crumbly, toss them into a medium bowl. Pour in that melted butter and stir until everything is nicely moistened. Now, press this mixture firmly and evenly into the bottom of a 9-inch springform pan. This is like building the foundation of a cozy little house. Pop it in the fridge to chill while we whip up the filling.
- In a big bowl, grab your electric mixer (or a whisk and some good arm strength!) and beat the softened cream cheese and sugar until it's wonderfully smooth. No lumps allowed! Now, dust in that cocoa powder and mix it up until it's beautifully combined and the color is a gorgeous chocolatey brown. Next, stir in your sour cream or Greek yogurt. Keep mixing until everything is smooth as silk. Now for the fun part: gently fold in one cup of the cherry pie filling and the thawed whipped topping. Be gentle here – we want to keep all that airiness! Just fold until it's just combined. Don't overmix!
- Time to bring it all together! Pour that luscious chocolate filling right over your chilled Oreo crust. Use a spatula to spread it out evenly, making sure to get into all the nooks and crannies. Look at that already! It's starting to look like a masterpiece.
- This is where patience comes in, my friends! Cover your springform pan (plastic wrap works perfectly) and tuck it into the refrigerator. You'll want to let it chill for at least 4-6 hours, but honestly, overnight is even better. The longer it chills, the firmer and more delicious it will be. Think of it as letting the flavors have a little party and get to know each other!
- The moment of truth! Once your cheesecake is nice and firm, carefully release the sides of the springform pan. Take a deep breath and admire your creation. Now, let's make it pretty! Dollop on that cup of whipped cream or whipped topping. Spoon the remaining cup of cherry pie filling over the whipped cream, letting it cascade down the sides a bit. If you're feeling fancy, sprinkle on some chocolate shavings. And there you have it – your very own stunning Black Forest Cheesecake, ready to be devoured!