Easy & Crispy Homemade Filipino Lumpia
Incredible crispy Filipino rolls perfect as a party appetizer, easy to make at home.
Equipment
- large pan
- Deep Pan or Pot for frying
- Tongs
- paper towels for draining
Ingredients
Ingredients
- 1 pound ground beef or any meat of choice beef, pork, chicken, or turkey work beautifully too
- 1 small onion finely chopped
- 3 cloves garlic minced
- 1 cup shredded carrots
- 1 tablespoon soy sauce
- 0.5 teaspoon Salt and pepper To season everything just right. Adjust to your taste!
- 25 egg roll wrappers Readily available in the refrigerated section. Make sure they are egg roll wrappers, not spring roll wrappers.
- Oil for frying Use a neutral oil with a high smoke point like vegetable, canola, or peanut oil.
Instructions
- Make the Filling: Grab a large pan and heat a little bit of oil over medium heat. Add your finely chopped onion and cook until it's soft and translucent, about 3-5 minutes. Now, toss in your minced garlic and cook for just about 30-60 seconds until it's fragrant – don't let it burn!
- Cook the Meat: Add your ground meat to the pan. Break it up with a spoon and cook until it's fully browned and no longer pink. Drain off any excess grease.
- Add Veggies and Seasoning: Stir in the shredded carrots. Cook for another 3-5 minutes until they soften slightly. Now, pour in the soy sauce and season with salt and pepper. Give it a good stir to combine everything and let it cook for just a minute more to allow the flavors to meld.
- Cool Down: This step is important! Take the filling off the heat and let it cool down for at least 10-15 minutes. Trying to wrap hot filling is no fun and can make your wrappers soggy or tear.
- Get Ready to Wrap: Lay out an egg roll wrapper on a clean, dry surface. Position it like a diamond, with a corner pointing towards you. Put about 1-2 tablespoons of the cooled filling near the corner closest to you.
- Wrap 'Em Up: Fold the bottom corner over the filling and tuck it in snugly. Fold in the two side corners, like you're making an envelope. Now, roll tightly upwards towards the top corner. Leave the very top corner unfolded for a second.
- Seal the Deal: Dip your finger in a little bit of water and moisten the top corner of the wrapper. Finish rolling the lumpia to seal it tightly. You've got your first one done! Repeat with the remaining filling and wrappers.
- Fry Time! Heat about 1-2 inches of oil in a deep pan or pot over medium-high heat. You want the oil to be around 350°F (175°C). If you don't have a thermometer, you can test by dropping a tiny piece of wrapper in – it should sizzle and brown within 30-45 seconds.
- Cook Until Golden: Carefully place a few lumpia into the hot oil, making sure not to overcrowd the pan (this will lower the oil temp and make them greasy). Fry for 3-5 minutes, flipping them occasionally, until they are beautiful and golden brown and crispy on all sides. Using tongs works great for this!
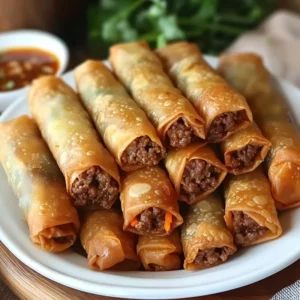
- Drain and Serve: Lift the cooked lumpia out of the oil and place them on a plate lined with paper towels to drain off excess oil. Let them cool for a minute or two before serving. Serve hot with your favorite dipping sauce (sweet chili sauce is a popular choice!).
Notes
Tips for Success:
- Cool the Filling: Hot filling can make wrappers soggy or tear.
- Don't Overfill: Too much filling makes wrapping hard and can cause bursting while frying.
- Wrap Tightly & Seal Well: Use water on the last corner!
- Don't Crowd the Pan: Fry in batches for even crispiness.
- Oil Temperature Matters: Aim for medium-high heat (350°F / 175°C). Storage:
- Store cooked lumpia in an airtight container in the refrigerator for 3-4 days.
- Reheat cooked lumpia in a toaster oven, conventional oven (350°F), or air fryer until heated through and crispy again.
- Assembled, uncooked lumpia can be stored in the fridge for 1-2 days or frozen for up to 3-4 months. Make Ahead:
- You can assemble the lumpia ahead of time! Freeze the uncooked rolls in a single layer on a baking sheet lined with parchment paper until solid. Then transfer them to a freezer-safe bag or container. You can fry them straight from frozen (they'll just need a few extra minutes). Substitutions & Additions:
- Different Meats: Swap ground beef for ground pork, chicken, or turkey. You can even use finely chopped shrimp!
- Add More Veggies: Shredded cabbage, bean sprouts, finely chopped water chestnuts, jicama, or green beans are all delicious additions.
- Boost the Flavor: A dash of sesame oil, a pinch of ginger, a little garlic powder, or even a tiny bit of sugar (like a teaspoon) can add extra depth.
- Veggie Power: Make them vegetarian by using a mix of finely chopped mushrooms, cabbage, carrots, and perhaps some cooked vermicelli noodles or tofu. FAQ Answers:
- Q: What's the difference between egg roll and lumpia wrappers?
A: Egg roll wrappers are usually a bit thicker and contain egg, frying up with a hearty, bubbly crunch. Traditional lumpia wrappers (Lumpia Shanghai wrappers) are thinner and result in a delicate crispness. This recipe uses readily available egg roll wrappers, which work perfectly and give a great crunch!
- Q: Can I bake or air fry these instead of deep frying?
A: Yes, you can! To bake, lightly brush the lumpia with oil and bake at 400°F (200°C) for 15-20 minutes, flipping halfway, until golden and crisp. For air frying, spray them with oil and air fry at 380°F (190°C) for 10-15 minutes, flipping halfway, until crispy. They won't be exactly the same as deep-fried, but they'll still be delicious and much crispier than pan-frying with less oil.
- Q: What's the best dipping sauce for lumpia?
A: This is totally personal preference, but sweet chili sauce is probably the most popular pairing. You can also make a simple dip by mixing soy sauce with vinegar (like cane vinegar or rice vinegar), a pinch of sugar, and some minced garlic or chili flakes.